12.3.2 account-web的主代码
account-web的主代码包含了2个JSP页面和4个Servlet,它们分别为:
signup.jsp:账户注册页面。
login.jsp:账户登录页面。
CaptchaImageServlet:用来生成验证码图片的Servlet。
LoginServlet:处理账户注册请求的Servlet。
ActivateServlet:处理账户激活的Servlet。
LoginServlet:处理账户登录的Servlet。
Servlet的配置可以从web.xml中获得,该文件位于项目的src/main/webapp/WEB-INF/目录。其内容见代码清单12-9。
代码清单12-9 account-web的web.xml
<!DOCTYPE web-app PUBLIC
"-//Sun Microsystems,Inc.//DTD Web Application 2.3//EN"
"http://java.sun.com/dtd/web-app_2_3.dtd">
<web-app>
<display-name>Sample Maven Project:Account Service</display-name>
<listener>
<listener-class>org.springframework.web.context.ContextLoaderListener
</listener-class>
</listener>
<context-param>
<param-name>contextConfigLocation</param-name>
<param-value>
classpath:/account-persist.xml
classpath:/account-captcha.xml
classpath:/account-email.xml
classpath:/account-service.xml
</param-value>
</context-param>
<servlet>
<servlet-name>CaptchaImageServlet</servlet-name>
<servlet-class>com.juvenxu.mvnbook.account.web.CaptchaImageServlet</serv-
let-class>
</servlet>
<servlet>
<servlet-name>SignUpServlet</servlet-name>
<servlet-class>com.juvenxu.mvnbook.account.web.SignUpServlet</servlet-
class>
</servlet>
<servlet>
<servlet-name>ActivateServlet</servlet-name>
<servlet-class>com.juvenxu.mvnbook.account.web.ActivateServlet</serv-
let-class>
</servlet>
<servlet>
<servlet-name>LoginServlet</servlet-name>
<servlet-class>com.juvenxu.mvnbook.account.web.LoginServlet</servlet-
class>
</servlet>
<servlet-mapping>
<servlet-name>CaptchaImageServlet</servlet-name>
<url-pattern>/captcha_image</url-pattern>
</servlet-mapping>
<servlet-mapping>
<servlet-name>SignUpServlet</servlet-name>
<url-pattern>/signup</url-pattern>
</servlet-mapping>
<servlet-mapping>
<servlet-name>ActivateServlet</servlet-name>
<url-pattern>/activate</url-pattern>
</servlet-mapping>
<servlet-mapping>
<servlet-name>LoginServlet</servlet-name>
<url-pattern>/login</url-pattern>
</servlet-mapping>
</web-app>
web.xml首先配置了该Web项目的显示名称,接着是一个名为ContextLoaderListener的ServletListener。该listener来自spring-web,它用来为Web项目启动Spring的IoC容器,从而实现Bean的注入。名为contextConfigLocation的context-param则用来指定Spring配置文件的位置。这里的值是四个模块的Spring配置XML文件,例如classpath://account-persist.xml表示从classpath的根路径读取名为account-persist.xml的文件。我们知道account-persist.xml文件在account-persist模块打包后的根路径下,这一JAR文件通过依赖的方式被引入到ac-count-web的classpath下。
web.xml中的其余部分是Servlet,包括各个Servlet的名称、类名以及对应的URL模式。
下面来看一个位于src/main/webapp/目录的signup.jsp文件,该文件用来呈现账户注册页面。其内容如代码清单12-10所示。
代码清单12-10 signup.jsp
<%@page contentType="text/html;charset=UTF-8"language="java"%>
<%@page import="com.juvenxu.mvnbook.account.service.*,
org.springframework.context.ApplicationContext,
org.springframework.web.context.support.WebApplicationContextUtils"%>
<html>
<head>
<style type="text/css">
……
</style>
</head>
<body>
<%
ApplicationContext context=WebApplicationContextUtils.getWebApplicationContext(
getServletContext());
AccountService accountervice=(AccountService)context.getBean("accountSer-
vice");
String captchaKey=accountervice.generateCaptchaKey();
%>
<div class="text-field">
<h2>注册新账户</h2>
<form name="signup"action="signup"method="post">
<label>账户ID:</label><input type="text"name="id"></input><br/>
<label>Email:</label><input type="text"name="email"></input>
<br/>
<label>显示名称:</label><input type="text"name="name"></input>
<br/>
<label>密码:</label><input type="password"name="password"></input>
<br/>
<label>确认密码:</label><input type="password"name="confirm_password">
</input><br/>
<label>验证码:</label><input type="text"name="captcha_value"></in-
put><br/>
<input type="hidden"name="captcha_key"value="<%=captchaKey%>"/>
<img src="<%=request.getContextPath()%>/captcha_image?key=<%=cap-
tchaKey%>"/>
</br>
<button>确认并提交</button>
</form>
</div>
</body>
</html>
该JSP的主题是一个name为signup的HTML FORM,其中包含了ID、Email、名称、密码等字段,这与一般的HTML内容并无差别。不同的地方在于,该JSP文件引入了Spring的ApplicationContext类,并且用此类加载后台的accountService,然后使用accountService先生成一个验证码的key,再在FORM中使用该key调用captcha_image对应的Servlet生成其标识的验证码图片。需要注意的是,上述代码中略去了css片段。
账户注册页面如图12-1所示。
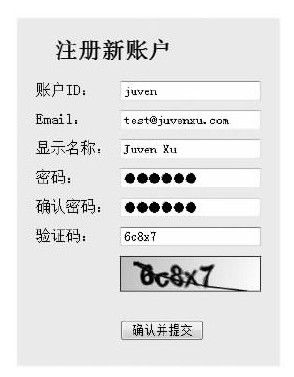
图 12-1 账户注册页面
上述JSP中使用到了/captcha_image这一资源获取验证码图片。根据web.xml,我们知道该资源对应了CaptchaImageServlet。下面看一下它的代码,见代码清单12-11。
代码清单12-11 CaptchaImageServlet.java
package com.juvenxu.mvnbook.account.web;
import java.io.IOException;
import……
public class CaptchaImageServlet
extends HttpServlet
{
private ApplicationContext context;
private static final long serialVersionUID=5274323889605521606L;
@Override
public void init()
throws ServletException
{
super.init();
context=WebApplicationContextUtils.getWebApplicationContext(getServ-
letContext());
}
public void doGet(HttpServletRequest request,HttpServletResponse response)
throws ServletException,
IOException
{
String key=request.getParameter("key");
if(key==null| |key.length()==0)
{
response.sendError(400,"No Captcha Key Found");
}
else
{
AccountService service=(AccountService)context.getBean("account-
Service");
try
{
response.setContentType("image/jpeg");
OutputStream out=response.getOutputStream();
out.write(service.generateCaptchaImage(key));
out.close();
}
catch(AccountServiceException e)
{
response.sendError(404,e.getMessage());
}
}
}
}
CaptchaImageServlet在init()方法中初始化Spring的ApplicationContext,这一context用来获取Spring Bean。Servlet的doGet()方法中首先检查key参数,如果为空,则返回HTTP 400错误,标识客户端的请求不合法;如果不为空,则载入AccountService实例。该类的generateCaptchaImage()方法能够产生一个验证码图片的字节流,我们将其设置成image/jpeg格式,并写入到Servlet相应的输出流中,客户端就能得到图12-1所示的验证码图片。
代码清单12-10中FROM的提交目标是signup,其对应了SignUpServlet。其内容如代码清单12-12所示。
代码清单12-12 SignUpServlet.java
public class SignUpServlet
extends HttpServlet
{
private static final long serialVersionUID=4784742296013868199L;
private ApplicationContext context;
@Override
public void init()
throws ServletException
{
super.init();
context=WebApplicationContextUtils.getWebApplicationContext(getServ-
letContext());
}
@Override
protected void doPost(HttpServletRequest req,HttpServletResponse resp)
throws ServletException,
IOException
{
String id=req.getParameter("id");
String email=req.getParameter("email");
String name=req.getParameter("name");
String password=req.getParameter("password");
String confirmPassword=req.getParameter("confirm_password");
String captchaKey=req.getParameter("captcha_key");
String captchaValue=req.getParameter("captcha_value");
if(id==null| |id.length()==0| |email==null| |email.length()==0| |
name==null
| |name.length()==0| |password==null| |password.length()==0| |con-
firmPassword==null
| |confirmPassword.length()==0| |captchaKey==null| |captchaKey.length
()==0| |captchaValue==null
| |captchaValue.length()==0)
{
resp.sendError(400,"Parameter Incomplete.");
return;
}
AccountService service=(AccountService)context.getBean("accountSer-
vice");
SignUpRequest request=new SignUpRequest();
request.setId(id);
request.setEmail(email);
request.setName(name);
request.setPassword(password);
request.setConfirmPassword(confirmPassword);
request.setCaptchaKey(captchaKey);
request.setCaptchaValue(captchaValue);
request.setActivateServiceUrl(getServletContext().getRealPath("/")+
"activate");
try
{
service.signUp(request);
resp.getWriter().print("Account is created,please check your mail box
for activation link.");
}
catch(AccountServiceException e)
{
resp.sendError(400,e.getMessage());
return;
}
}
}
SignUpServlet的doPost()接受客户端的HTTP POST请求,首先它读取请求中的id、name、email等参数,然后验证这些参数的值是否为空,如果验证正确,则初始化一个Sign-UpRequest实例,其包含了注册账户所需要的各类数据。其中的activateServiceUrl表示服务应该基于什么地址发送账户激活链接邮件,这里的值是与signup平行的activate地址,这正是ActivationServlet的地址。SignUpServlet使用AccountService注册账户,所有的细节都已经封装在AccountService中,如果注册成功,服务器打印一条简单的提示信息。
上面介绍了一个JSP和两个Servlet,它们都非常简单。鉴于篇幅的原因,这里就不再详细解释另外几个JSP及Servlet。感兴趣的读者可以自行下载本书的样例源码。
