8 HTML 服务器
HTML 服务器控件主要是保证服务端运行的增强型标准 HTML 控件。HTML 控件不是由服务器处理,而是被发送到浏览器进行显示,比如页面标题标签,链接标签及输入元素。
通过添加 runat = "server" 属性和一个 id 属性,它们可被特定地转化为一个服务器控件,应用于服务器端处理。
例如,HTML 输入控件:
- <input type="text" size="40">
它可以通过添加 runat 和 id 属性被转换成一个服务器控件:
- <input type="text" id="testtext" size="40" runat="server">
使用 HTML 服务器控件的优点
尽管 ASP.NET 服务器控件可以完成 HTML 服务器控件执行的每一项工作,HTML 控件在以下情况仍然具有优势:
- 使用静态表达到布局目的。
- 转换一个 HTML 页面到 ASP.NET 下运行。
下面这个表格介绍了 HTML 服务器控件:
| 控件名称 | HTML 标签 |
|---|---|
| HtmlHead | <head>element |
| HtmlInputButton | <input type=button|submit|reset> |
| HtmlInputCheckbox | <input type=checkbox> |
| HtmlInputFile | <input type = file> |
| HtmlInputHidden | <input type = hidden> |
| HtmlInputImage | <input type = image> |
| HtmlInputPassword | <input type = password> |
| HtmlInputRadioButton | <input type = radio> |
| HtmlInputReset | <input type = reset> |
| HtmlText | <input type = text|password> |
| HtmlImage | <img> element |
| HtmlLink | <link> element |
| HtmlAnchor | <a> element |
| HtmlButton | <button> element |
| HtmlButton | <button> element |
| HtmlForm | <form> element |
| HtmlTable | <table> element |
| HtmlTableCell | <td> and <th> |
| HtmlTableRow | <tr> element |
| HtmlTitle | <title> element |
| HtmlSelect | <select&t; element |
| HtmlGenericControl | 未列出的所有 HTML 控件 |
实例
以下实例使用了基本的 HTML 表格进行布局。它使用了用于从用户获得输入诸如姓名,地址,城市,州等的框,还有一个按钮控件,该控件被点击后能够获取该表最后一行中显示的用户数据。
页面在设计视图中应如下所示:
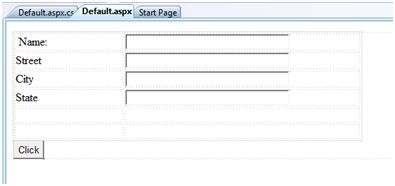 图片 8.1 image
内容页面的代码表明了 HTML 表格元素进行布局的应用。
- <%@ Page Language="C#" AutoEventWireup="true" CodeBehind="Default.aspx.cs" Inherits="htmlserver._Default" %>
- <!DOCTYPE html PUBLIC "-//W3C//DTD XHTML 1.0 Transitional//EN" "http://www.w3.org/TR/xhtml1/DTD/xhtml1-transitional.dtd">
- <html xmlns="http://www.w3.org/1999/xhtml" >
- <head runat="server">
- <title>Untitled Page</title>
- <style type="text/css">
- .style1
- {
- width: 156px;
- }
- .style2
- {
- width: 332px;
- }
- </style>
- </head>
- <body>
- <form id="form1" runat="server">
- <div>
- <table style="width: 54%;">
- <tr>
- <td class="style1">Name:</td>
- <td class="style2">
- <asp:TextBox ID="txtname" runat="server" style="width:230px">
- </asp:TextBox>
- </td>
- </tr>
- <tr>
- <td class="style1">Street</td>
- <td class="style2">
- <asp:TextBox ID="txtstreet" runat="server" style="width:230px">
- </asp:TextBox>
- </td>
- </tr>
- <tr>
- <td class="style1">City</td>
- <td class="style2">
- <asp:TextBox ID="txtcity" runat="server" style="width:230px">
- </asp:TextBox>
- </td>
- </tr>
- <tr>
- <td class="style1">State</td>
- <td class="style2">
- <asp:TextBox ID="txtstate" runat="server" style="width:230px">
- </asp:TextBox>
- </td>
- </tr>
- <tr>
- <td class="style1"> </td>
- <td class="style2"></td>
- </tr>
- <tr>
- <td class="style1"></td>
- <td ID="displayrow" runat ="server" class="style2">
- </td>
- </tr>
- </table>
- </div>
- <asp:Button ID="Button1" runat="server" onclick="Button1_Click" Text="Click" />
- </form>
- </body>
- </html>
按钮控件的后台代码为:
- protected void Button1_Click(object sender, EventArgs e)
- {
- string str = "";
- str += txtname.Text + "<br />";
- str += txtstreet.Text + "<br />";
- str += txtcity.Text + "<br />";
- str += txtstate.Text + "<br />";
- displayrow.InnerHtml = str;
- }
观察以下陈述:
- 标准 HTML 标签已被使用进行页面布局。
- HTML 表格的最后一行用于数据显示。它需要服务器端进行加工,因此为其添加 ID 属性和 runat 属性。
