第13章 Service应用
( 教学录像:48分钟)
Service用于在后台完成用户指定的操作,它可以用于音乐播放器、文件下载工具等应用程序。用户可以使用其他控件来与Service进行通信。本章将介绍Service的实现和使用方式。
通过阅读本章,您可以:
★ 掌握Service的概念和用途
★ 掌握创建Started Service的两种方式
★ 掌握创建Bound Service的两种方式
★ 掌握Service生命周期的管理
13.1 Service概述
教学录像:光盘\TM\lx\13\Service概述.exe
Service(服务)是能够在后台执行长时间运行操作并且不提供用户界面的应用程序组件。其他应用程序组件能启动服务,并且即便用户切换到另一个应用程序,服务还可以在后台运行。此外,组件能够绑定到服务并与之交互,甚至执行进程间通信(IPC)。例如,服务能在后台处理网络事务、播放音乐、执行文件I/O或者与ContentProvider通信。
13.1.1 Service的分类
服务从本质上可以分为以下两种类型。
[√]Started(启动):当应用程序组件(如Activity)通过调用startService()方法启动服务时,服务处于started状态。一旦启动,服务能在后台无限期运行,即使启动它的组件已经被销毁。通常,启动服务执行单个操作并且不会向调用者返回结果。例如,它可能通过网络下载或者上传文件。如果操作完成,服务需要停止自身。
[√]Bound(绑定):当应用程序组件通过调用bindService()方法绑定到服务时,服务处于bound状态。绑定服务提供客户端-服务器接口,以允许组件与服务交互、发送请求、获得结果,甚至使用进程间通信(IPC)跨进程完成这些操作。仅当其他应用程序组件与之绑定时,绑定服务才运行。多个组件可以一次绑定到一个服务上,当它们都解绑定时,服务被销毁。
尽管本章将两种类型的服务分开讨论,服务也可以同时属于这两种类型,既可以启动(无限期运行)也能绑定。其重点在于是否实现一些回调方法:onStartCommand()方法允许组件启动服务;onBind()方法允许组件绑定服务。
不管应用程序是否为启动状态、绑定状态或者两者兼有,都能通过Intent使用服务,就像使用Activity那样。然而,开发人员可以在配置文件中将服务声明为私有的,从而阻止其他应用程序访问。
服务运行于管理它的进程的主线程,服务不会创建自己的线程,也不会运行于独立的进程(除非开发人员定义)。这意味着,如果服务要完成CPU密集工作或者阻塞操作(如MP3回放或者联网),开发人员需要在服务中创建新线程来完成这些工作。通过使用独立的线程,能减少应用程序不响应(ANR)错误的风险,并且应用程序主线程仍然能用于用户与Activity的交互。
13.1.2 Service类中的重要方法
为了创建服务,开发人员需要创建Service类(或其子类)的子类。在实现类中,需要重写一些处理服务生命周期重要方面的回调方法,并根据需要提供组件绑定到服务的机制。需要重写的重要回调方法如下:
[√]onStartCommand()
当其他组件(如Activity)调用startService()方法请求服务启动时,系统调用该方法。一旦该方法执行,服务就启动(处于started状态)并在后台无限期运行。如果开发人员实现该方法,则需要在任务完成时调用stopSelf()或stopService()方法停止服务(如果仅想提供绑定,则不必实现该方法)。
[√]onBind()
当其他组件调用bindService()方法想与服务绑定时(如执行RPC),系统调用该方法。在该方法的实现中,开发人员必须通过返回IBinder提供客户端用来与服务通信的接口。该方法必须实现,但是如果不想允许绑定,则返回null。
[√]onCreate()
当服务第一次创建时,系统调用该方法执行一次性建立过程(在系统调用onStartCommand()或onBind()方法前)。如果服务已经运行,该方法不被调用。
[√]onDestroy()
当服务不再使用并即将销毁时,系统调用该方法。服务应该实现该方法来清理诸如线程、注册监听器、接收者等资源。这是服务收到的最后调用。
如果组件调用startService()方法启动服务(onStartCommand()方法被调用),服务需要使用stopSelf()方法停止自身,或者其他组件使用stopService()方法停止该服务。
如果组件调用bindService()方法创建服务(onStartCommand()方法不被调用),服务运行时间与组件绑定到服务的时间一样长。一旦服务从所有客户端解绑定,系统会将其销毁。
Android系统仅当内存不足并且必须回收系统资源来显示用户关注的Activity时,才会强制停止服务。如果服务绑定到用户关注的Activity,则会减小停止概率。如果服务被声明为前台运行,则基本不会停止。否则,如果服务是started状态并且长时间运行,则系统会随时间推移降低其在后台任务列表中的位置并且有很大概率将其停止。如果服务是started状态,则必须设计系统重启服务。系统停止服务后,资源可用时会将其重启(但这也依赖于onStartCommand()方法的返回值)。
Service类的继承关系如图13.1所示。
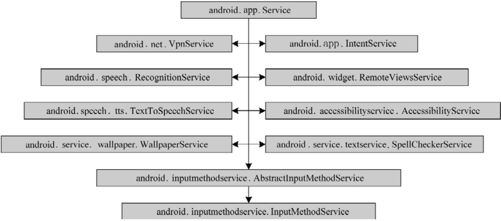 图13.1 Service类继承关系
13.1.3 Service的声明
类似于Activity和其他组件,开发人员必须在应用程序配置文件中声明全部的Service。为了声明Service,需要向<application>标签中添加<service>子标签,<service>子标签的语法如下:
- <service android:enabled=["true" | "false"]
- android:exported=["true" | "false"]
- android:icon="drawable resource"
- android:label="string resource"
- android:name="string"
- android:permission="string"
- android:process="string" >
- . . .
- </service>
各个标签属性的说明如下:
[√]android:enabled
服务能否被系统实例化,true表示可以,false表示不可以,默认值是true。<application>标签也有自己的enabled属性,用于包括服务的全部应用程序组件。<application>和<service>的enabled属性必须同时设置成true(两者的默认值都是true)才能让服务可用。如果任何一个是false,服务被禁用并且不能实例化。
[√]android:exported
其他应用程序组件能否调用服务或者与其交互,true表示可以,false表示不可以。当该值是false时,只有同一个应用程序的组件或者具有相同用户ID的应用程序能启动或者绑定到服务。
默认值依赖于服务是否包含Intent过滤器。若没有过滤器,说明服务仅能通过精确类名调用,这意味着服务仅用于应用程序内部(因为其他程序可能不知道类名)。此时,默认值是false;若存在至少一个过滤器,暗示服务可以用于外部,因此默认值是true。
该属性不是限制其他应用程序使用服务的唯一方式。还可以使用permission属性限制外部实体与服务交互。
[√]android:icon
表示服务的图标。该属性必须设置成包含图片定义的可绘制资源引用。如果没有设置,使用应用程序图标取代。
服务图标不管在此设置还是在<application>标签设置,都是所有服务的Intent过滤器默认图标。
[√]android:label
显示给用户的服务名称。如果没有设置,使用应用程序标签取代。
服务标签不管在此设置还是在<application>标签设置,都是所有服务的Intent过滤器默认标签。
标签应该设置为字符串资源引用,这样可以像用户界面的其他字符串那样本地化。然而,为了开发时方便,也可以设置成原始字符串。
[√]android:name
实现服务的Service子类名称,应该是一个完整的类名,如com.mingrisoft.RoomService。然而,为了简便,如果名称的第一个符号是点号(如.RoomService),则会增加在<manifest>标签中定义的包名。
一旦发布了应用程序,不应该再修改子类名称。该属性没有默认值并且必须指定。
[√]android:permission
实体必须包含的权限名称,以便启动或者绑定到服务。如果startService()、bindService()或stopService()方法调用者没有被授权,方法调用无效,并且Intent对象也不会发送给服务。
如果没有设置该属性,使用<application>标签的permission属性设置给服务。如果<application>和<service>标签的permission属性都未设置,服务不受权限保护。
[√]android:process
服务运行的进程名称。通常,应用程序的全部组件运行于为应用程序创建的默认进程。进程名称与应用程序包名相同。<application>标签的process属性能为全部组件设置一个相同的默认值。但是组件能用自己的process属性重写默认值,从而允许应用程序跨越多个进程。
如果分配给该属性的名称以冒号(:)开头,仅属于应用程序的新进程会在需要时创建,服务能在该进程中运行;如果进程名称以小写字母开头,服务会运行在以此为名的全局进程,但需要提供相应的权限。这允许不同应用程序组件共享进程,减少资源使用。
13.2 创建Started Service
教学录像:光盘\TM\lx\13\ 创建Started Service.exe
Started Service(启动服务)是由其他组件调用startService()方法启动的,这导致服务的onStartCommand()方法被调用。
当服务是started状态时,其生命周期与启动它的组件无关,并且可以在后台无限期运行,即使启动服务的组件已经被销毁。因此,服务需要在完成任务后调用stopSelf()方法停止,或者由其他组件调用stopService()方法停止。
应用程序组件(如Activity)能通过调用startService()方法和传递Intent对象来启动服务,在Intent对象中指定了服务并且包含服务需要使用的全部数据。服务使用onStartCommand()方法接收Intent。
例如,假设Activity需要保存一些数据到在线数据库。Activity可以启动伴侣服务并通过传递Intent到startService()方法来发送需要保存的数据。服务在onStartCommand()方法中收到Intent,联入网络并执行数据库事务。当事务完成时,服务停止自身并销毁。
Android提供了两个类供开发人员继承以创建启动服务。
[√]Service:这是所有服务的基类。当继承该类时,创建新线程来执行服务的全部工作是非常重要的。因为服务默认使用应用程序主线程,这可能降低应用程序Activity的运行性能。
[√]IntentService:这是Service类的子类,它每次使用一个工作线程来处理全部启动请求。在不必同时处理多个请求时,这是最佳选择。开发人员仅需要实现onHandleIntent()方法,该方法接收每次启动请求的Intent以便完成后台任务。
13.2.1 继承IntentService类
因为多数启动服务不必同时处理多个请求(在多线程情境下会很危险),所以使用IntentService类实现服务是非常好的选择。IntentService可完成如下任务:
[√]创建区别于应用程序主线程的默认工作线程来执行发送到onStartCommand()方法的全部Intent。
[√]创建工作队列,每次传递一个Intent到onHandleIntent()方法实现,这样就不必担心多线程。
[√]所有启动请求处理完毕后停止服务,这样就不必调用stopSelf()方法。
[√]提供onBind()方法默认实现,其返回值是null。
[√]提供onStartCommand()方法默认实现,它先发送Intent到工作队列,然后到onHandleIntent()方法实现。
以上说明开发人员仅需要实现onHandleIntent()方法来完成客户端提供的任务。由于IntentService类没有提供空参数的构造方法,因此需要提供一个构造方法。下面的代码是IntentService实现类的例子,在onHandlerIntent()方法中,仅让线程休眠了5秒钟。
- public class HelloIntentService extends IntentService {
- public HelloIntentService() {
- super("HelloIntentService");
- }
- @Override
- protected void onHandleIntent(Intent intent) {
- long endTime = System.currentTimeMillis() + 5 * 1000;
- while (System.currentTimeMillis() < endTime) {
- synchronized (this) {
- try {
- wait(endTime - System.currentTimeMillis());
- } catch (Exception e) {
- }
- }
- }
- }
- }
这就是实现IntentService类所必须的全部操作:没有参数的构造方法和onHandleIntent()方法。
如果开发人员决定重写其他回调方法,如onCreate()、onStartCommand()或onDestroy(),需要调用父类实现,这样IntentService能正确处理工作线程的生命周期。
例如,onStartCommand()方法必须返回默认实现:
- @Override
- public int onStartCommand(Intent intent, int flags, int startId) {
- Toast.makeText(this, "service starting", Toast.LENGTH_SHORT).show();
- return super.onStartCommand(intent,flags,startId);
- }
除onHandleIntent()方法外,仅有onBind()方法不必调用父类实现,该方法在服务允许绑定时实现。
13.2.2 继承Service类
如上所述,使用IntentService类将简化启动服务的实现。然而,如果需要让服务处理多线程(取代使用工作队列处理启动请求),则可以继承Service类来处理各个Intent。
作为对比,下面通过实现Service类来完成与实现IntentService类完全相同的任务。对于每次启动请求,它使用工作线程来执行任务,并且每次处理一个请求。
- public class HelloService extends Service {
- private Looper mServiceLooper;
- private ServiceHandler mServiceHandler;
- private final class ServiceHandler extends Handler {
- public ServiceHandler(Looper looper) {
- super(looper);
- }
- @Override
- public void handleMessage(Message msg) {
- long endTime = System.currentTimeMillis() + 5 * 1000;
- while (System.currentTimeMillis() < endTime) {
- synchronized (this) {
- try {
- wait(endTime - System.currentTimeMillis());
- } catch (Exception e) {
- }
- }
- }
- stopSelf(msg.arg1);
- }
- }
- @Override
- public void onCreate() {
- HandlerThread thread = new HandlerThread("ServiceStartArguments", Process.THREAD_PRIORITY _BACKGROUND);
- thread.start();
- mServiceLooper = thread.getLooper();
- mServiceHandler = new ServiceHandler(mServiceLooper);
- }
- @Override
- public int onStartCommand(Intent intent, int flags, int startId) {
- Toast.makeText(this, "service starting", Toast.LENGTH_SHORT).show();
- Message msg = mServiceHandler.obtainMessage();
- msg.arg1 = startId;
- mServiceHandler.sendMessage(msg);
- return START_STICKY;
- }
- @Override
- public IBinder onBind(Intent intent) {
- return null;
- }
- @Override
- public void onDestroy() {
- Toast.makeText(this, "service done", Toast.LENGTH_SHORT).show();
- }
- }
如上所示,这比使用IntentService增加了许多代码。
然而,由于开发人员自己处理onStartCommand()方法调用,可以同时处理多个请求。这与示例代码不同,但是如果需要,就可以为每次请求创建一个新线程并且立即运行它们(避免等待前一个请求结束)。
onStartCommand()方法必须返回一个整数。该值用来描述系统停止服务后如何继续服务(如前所述,IntentService默认实现已经处理了这些,开发人员也可以进行修改)。onStartCommand()方法返回值必须是下列常量之一。
[√]START_NOT_STICKY
如果系统在onStartCommand()方法返回后停止服务,不重新创建服务,除非有PendingIntent要发送。为避免不在不需要的时候运行服务,这是最佳选择。
[√]START_STICKY
如果系统在onStartCommand()方法返回后停止服务,重新创建服务并调用onStartCommand()方法,但是不重新发送最后的Intent;相反,系统使用空Intent调用onStartCommand()方法,除非有PendingIntent来启动服务,此时,这些Intent会被发送。这适合多媒体播放器(或者类似服务),它们不执行命令但是无限期运行并等待工作。
[√]START_REDELIVER_INTENT
如果系统在onStartCommand()方法返回后停止服务,重新创建服务并使用发送给服务的最后Intent调用onStartCommand()方法,全部PendingIntent依次发送。这适合积极执行应该立即恢复工作的服务,如下载文件。
说明:这些常量都定义在Service类中。
13.2.3 启动服务
开发人员可以从Activity或者其他应用程序组件通过传递Intent对象(指定要启动的服务)到startService()方法启动服务。Android系统调用服务的onStartCommand()方法并将Intent传递给它。
注意:请不要直接调用onStartCommand()方法。
例如,Activity能使用显式Intent和startService()方法启动前面章节的示例服务(HelloService),其代码如下:
- Intent intent = new Intent(this, HelloService.class);
- startService(intent);
startService()方法立即返回,然后Android系统调用服务的onStartCommand()方法。如果服务还没有运行,系统首先调用onCreate()方法,接着调用onStartCommand()方法。
如果服务没有提供绑定,startService()方法发送的Intent是应用程序组件和服务之间唯一的通信模式。然而,如果开发人员需要服务返回结果,则启动该服务的客户端能为广播创建PendingIntent(使用getBroadcast()方法)并通过启动服务的Intent进行发送。服务接下来便能使用广播来发送结果。
多次启动服务的请求导致Senice的onStartCommand()方法被调用多次,然而,仅需要一个停止方法(stopSelf()或stopService()方法)来停止服务。
13.2.4 停止服务
启动服务必须管理自己的生命周期,即系统不会停止或销毁服务,除非系统必须回收系统内存而且在onStartCommand()方法返回后服务继续运行。因此,服务必须调用stopSelf()方法停止自身,或者其他组件调用stopService()方法停止服务。
当使用stopSelf()或stopService()方法请求停止时,系统会尽快销毁服务。
然而,如果服务同时处理多个onStartCommand()方法调用请求,则处理完一个请求后,不应该停止服务,因为可能收到一个新的启动请求(在第一个请求结束后停止会终止第二个请求)。为了解决这个问题,开发人员可以使用stopSelf(int)方法来确保停止服务的请求总是基于最近收到的启动请求。即当调用stopSelf(int)方法时,同时将启动请求的ID(发送给onStartCommand()方法的startId)传递给停止请求。这样,如果服务在调用stopSelf(int)方法前接收到新启动请求,会因ID不匹配而不停止服务。
注意:应用程序应该在任务完成后停止服务,来避免系统资源浪费和电池消耗。如果必要,其他组件能通过stopService()方法停止服务。即便能够绑定服务,如果调用了onStartCommand()方法就必须停止服务。
13.2.5 实例1:继承IntentService输出当前时间
例13.1 在Eclipse中创建Android项目,名称为13.1,实现继承IntentService在后台输出当前时间。(实例位置:光盘\TM\sl\13\13.1)
(1)修改res\layout目录中的main.xml布局文件,设置背景图片并添加一个按钮,然后设置按钮文字的内容、颜色和大小,其代码如下:
- <?xml version="1.0" encoding="utf-8"?>
- <LinearLayout xmlns:android="http://schemas.android.com/apk/res/android"
- android:layout_width="fill_parent"
- android:layout_height="fill_parent"
- android:background="@drawable/background"
- android:orientation="vertical" >
- <Button
- android:id="@+id/current_time"
- android:layout_width="wrap_content"
- android:layout_height="wrap_content"
- android:text="@string/current_time"
- android:textColor="@android:color/black"
- android:textSize="25dp" />
- </LinearLayout>
(2)创建CurrentTimeService类,它继承了IntentService类,用于在后台输出当前时间,其代码如下:
- public class CurrentTimeService extends IntentService {
- public CurrentTimeService() {
- super("CurrentTimeService"); //调用父类非空构造方法
- }
- @Override
- protected void onHandleIntent(Intent intent) {
- Time time = new Time(); //创建Time对象
- time.setToNow(); //设置时间为当前时间
- String currentTime = time.format("%Y-%m-%d %H:%M:%S"); //设置时间格式
- Log.i("CurrentTimeService", currentTime); //记录当前时间
- }
- }
注意:此处使用的时间格式与Java API中SimpleDateFormat类有所不同。
(3)创建CurrentTimeActivity类,它继承了Activity类。在onCreate()方法中获得按钮控件并为其增加单击事件监听器。在监听器中,使用Intent启动服务,其代码如下:
- public class CurrentTimeActivity extends Activity {
- @Override
- protected void onCreate(Bundle savedInstanceState) {
- super.onCreate(savedInstanceState);
- setContentView(R.layout.main); //设置页面布局
- Button currentTime = (Button) findViewById(R.id.current_time); //通过ID值获得按钮对象
- currentTime.setOnClickListener(new View.OnClickListener() { //为按钮增加单击事件监听器
- public void onClick(View v) {
- startService(new Intent(CurrentTimeActivity.this, CurrentTimeService.class));/启动服务
- }
- });
- }
- }
(4)修改AndroidManifest.xml文件,增加Activity和Service配置,其代码如下:
- <?xml version="1.0" encoding="utf-8"?>
- <manifest xmlns:android="http://schemas.android.com/apk/res/android"
- package="com.mingrisoft"
- android:versionCode="1"
- android:versionName="1.0" >
- <uses-sdk android:minSdkVersion="15" />
- <application
- android:icon="@drawable/ic_launcher"
- android:label="@string/app_name" >
- <activity android:name=".CurrentTimeActivity">
- <intent-filter>
- <action android:name="android.intent.action.MAIN"/>
- <category android:name="android.intent.category.LAUNCHER"/>
- </intent-filter>
- </activity>
- <service android:name=".CurrentTimeService"></service>
- </application>
- </manifest>
(5)启动应用程序,界面如图13.2所示。单击“当前时间”按钮,会在LogCat中显示格式化的当前时间,如图13.3所示。
 图13.2 应用程序主界面
 图13.3 LogCat输出结果
13.2.6 实例2:继承Service输出当前时间
例13.2 在Eclipse中创建Android项目,名称为13.2,实现继承Service在后台输出当前时间。(实例位置:光盘\TM\sl\13\13.2)
(1)修改res\layout目录中的main.xml布局文件,设置背景图片并添加一个按钮,然后设置按钮文字的内容、颜色和大小,其代码如下:
- <?xml version="1.0" encoding="utf-8"?>
- <LinearLayout xmlns:android="http://schemas.android.com/apk/res/android"
- android:layout_width="fill_parent"
- android:layout_height="fill_parent"
- android:background="@drawable/background"
- android:orientation="vertical" >
- <Button
- android:id="@+id/current_time"
- android:layout_width="wrap_content"
- android:layout_height="wrap_content"
- android:text="@string/current_time"
- android:textColor="@android:color/black"
- android:textSize="25dp" />
- </LinearLayout>
(2)创建CurrentTimeService类,它继承了Service类,并且重写了onBind()和onStartCommand()方法,其中onStartCommand()方法用于在后台输出当前时间,其代码如下:
- public class CurrentTimeService extends Service {
- @Override
- public IBinder onBind(Intent intent) {
- return null;
- }
- @Override
- public int onStartCommand(Intent intent, int flags, int startId) {
- Time time = new Time(); //创建Time对象
- time.setToNow(); //设置时间为当前时间
- String currentTime = time.format("%Y-%m-%d %H:%M:%S"); //设置时间格式
- Log.i("CurrentTimeService", currentTime); //记录当前时间
- return START_STICKY;
- }
- }
注意:此处使用的时间格式与Java API中SimpleDateFormat类有所不同。
(3)创建CurrentTimeActivity类,它继承了Activity类。在onCreate()方法中获得按钮控件并为其增加单击事件监听器。在监听器中,使用Intent启动服务,其代码如下:
- public class CurrentTimeActivity extends Activity {
- @Override
- protected void onCreate(Bundle savedInstanceState) {
- super.onCreate(savedInstanceState);
- setContentView(R.layout.main); //设置页面布局
- Button currentTime = (Button) findViewById(R.id.current_time); //通过ID值获得按钮对象
- currentTime.setOnClickListener(new View.OnClickListener() { //为按钮增加单击事件监听器
- public void onClick(View v) {
- startService(new Intent(CurrentTimeActivity.this, CurrentTimeService.class));/启动服务
- }
- });
- }
- }
(4)修改AndroidManifest.xml文件,增加Activity和Service配置,其代码如下:
- <?xml version="1.0" encoding="utf-8"?>
- <manifest xmlns:android="http://schemas.android.com/apk/res/android"
- package="com.mingrisoft"
- android:versionCode="1"
- android:versionName="1.0" >
- <uses-sdk android:minSdkVersion="15" />
- <application
- android:icon="@drawable/ic_launcher"
- android:label="@string/app_name" >
- <activity android:name=".CurrentTimeActivity">
- <intent-filter>
- <action android:name="android.intent.action.MAIN"/>
- <category android:name="android.intent.category.LAUNCHER"/>
- </intent-filter>
- </activity>
- <service android:name=".CurrentTimeService"></service>
- </application>
- </manifest>
(5)启动应用程序,界面如图13.4所示。单击 “当前时间”按钮,会在LogCat中显示格式化的当前时间,如图13.5所示。
 图13.4 应用程序主界面
 图13.5 LogCat输出结果
13.3 创建Bound Service
教学录像:光盘\TM\lx\13\创建Bound Service.exe
绑定服务是允许其他应用程序绑定并且与之交互的Service类实现类。为了提供绑定,开发人员必须实现onBind()回调方法。该方法返回IBinder对象,它定义了客户端用来与服务交互的程序接口。
客户端能通过bindService()方法绑定到服务。此时,客户端必须提供ServiceConnection接口的实现类,它监视客户端与服务之间的连接。bindService()方法立即返回,但是当Android系统创建客户端与服务之间的连接时,它调用ServiceConnection接口的onServiceConnected()方法,来发送客户端用来与服务通信的IBinder对象。
多个客户端能同时连接到服务。然而,仅当第一个客户端绑定时,系统调用服务的onBind()方法来获取IBinder对象。系统接着发送同一个IBinder对象到其他绑定的客户端,但是不再调用onBind()方法。
当最后的客户端与服务解绑定时,系统销毁服务(除非服务也使用startService()方法启动)。
在实现绑定服务时,最重要的是定义onBind()回调方法返回的接口,有以下3种方式。
(1)继承Binder类
如果服务对应用程序私有并且与客户端运行于相同的进程(这非常常见),则应该继承Binder类来创建接口,并且从onBind()方法返回其一个实例。客户端接收Binder对象并用其来直接访问Binder实现类或者Service类中可用公共方法。
当服务仅用于私有应用程序时,推荐使用该技术。但当服务可以用于其他应用程序或者访问独立进程时,则不能使用该技术。
(2)使用Messenger
如果需要接口跨进程工作,则可以使用Messenger来为服务创建接口。此时,服务定义Handler对象来响应不同类型的Message对象。Handler是Messenger的基础,能与客户端分享IBinder,允许客户端使用Message对象向服务发送命令。此外,客户端能定义自己的Messenger对象,这样服务能发送回消息。
使用Messenger是执行进程间通信(IPC)的最简单方式,因为Messenger类将所有请求队列化到单独的线程,这样开发人员就不必设计服务为线程安全。
(3)使用AIDL
AIDL(Android接口定义语言)执行分解对象到原语的全部工作,以便操作系统能理解并且跨进程执行IPC。使用Messenger创建接口,实际上将AIDL作为底层架构。如上所述,Messenger在单个线程中将所有客户端请求队列化,这样服务每次收到一个请求。如果希望服务能同时处理多个请求,则可以直接使用AIDL。此时,服务必须能处理多线程并且要保证线程安全。
为了直接使用AIDL,开发人员必须创建定义编程接口的.aidl文件。Android SDK工具使用该文件来生成抽象类,它实现接口并处理IPC,然后就可以在服务中使用了。
说明:绝大多数应用程序不应该使用AIDL来创建绑定服务,因为它需要多线程能力而且会导致更加复杂的实现。因此,本章不详细讲解AIDL的使用。
13.3.1 继承Binder类
如果服务仅用于本地应用程序并且不必跨进程工作,则开发人员可以实现自己的Binder类来为客户端提供访问服务公共方法的方式。
注意:这仅当客户端与服务位于同一个应用程序和进程时才有效,这也是最常见的情况。例如,音乐播放器需要绑定Activity到自己的服务来在后台播放音乐。
其实现步骤如下:
(1)在服务中,创建Binder类实例来完成下列操作之一:
[√]包含客户端能调用的公共方法。
[√]返回当前Service实例,其中包含客户端能调用的公共方法。
[√]返回服务管理的其他类的实例,其中包含客户端能调用的公共方法。
(2)从onBind()回调方法中返回Binder类实例。
(3)在客户端,从onServiceConnected()回调方法接收Binder类实例,并且使用提供的方法调用绑定服务。
说明:服务和客户端必须位于同一个应用程序的原因是,客户端能转型返回对象并且适当地调用其方法。服务和客户端必须也位于同一个进程,因为该技术不支持跨进程。
例如,下面的服务通过Binder实现类为客户端提供访问服务中方法的方法。
- public class LocalService extends Service {
- private final IBinder binder = new LocalBinder();
- private final Random generator = new Random();
- public class LocalBinder extends Binder {
- LocalService getService() {
- return LocalService.this;
- }
- }
- @Override
- public IBinder onBind(Intent intent) {
- return binder;
- }
- public int getRandomNumber() {
- return generator.nextInt(100);
- }
- }
LocalBinder类为客户端提供了getService()方法来获得当前LocalService的实例。这允许客户端调用服务中的公共方法。例如,客户端能从服务中调用getRandomNumber()方法。
下面的Activity绑定到LocalService,并且在单击按钮时调用getRandomNumber()方法。
- public class BindingActivity extends Activity {
- LocalService localService;
- boolean bound = false;
- @Override
- protected void onCreate(Bundle savedInstanceState) {
- super.onCreate(savedInstanceState);
- setContentView(R.layout.main);
- }
- @Override
- protected void onStart() {
- super.onStart();
- Intent intent = new Intent(this, LocalService.class);
- bindService(intent, connection, Context.BIND_AUTO_CREATE);
- }
- @Override
- protected void onStop() {
- super.onStop();
- if (bound) {
- unbindService(connection);
- bound = false;
- }
- }
- public void onButtonClick(View v) {
- if (bound) {
- int num = localService.getRandomNumber();
- Toast.makeText(this, "获得随机数:" + num, Toast.LENGTH_SHORT).show();
- }
- }
- private ServiceConnection connection = new ServiceConnection() {
- public void onServiceConnected(ComponentName className, IBinder service) {
- LocalBinder binder = (LocalBinder) service;
- localService = binder.getService();
- bound = true;
- }
- public void onServiceDisconnected(ComponentName arg0) {
- bound = false;
- }
- };
- }
上面的代码演示客户端如何使用ServiceConnection实现类和onServiceConnected()回调方法绑定到服务。
13.3.2 使用Messenger类
如果开发人员需要服务与远程进程通信,则可以使用Messenger来为服务提供接口。该技术允许不使用AIDL执行进程间通信(IPC)。
使用Messenger时需注意:
[√]实现Handler的服务因为每次从客户端调用而收到回调。
[√]Handler用于创建Messenger对象(它是Handler的引用)。
[√]Messenger创建IBinder,服务从onBind()方法将其返回到客户端。
[√]客户端使用IBinder来实例化Messenger,然后使用它来发送Message对象到服务。
[√]服务在其Handler的handleMessage()方法接收Message。
此时,没有供客户端在服务上调用的方法。相反,客户端发送消息(Message对象)到服务的Handler方法。
下面的代码演示了使用Messenger接口的服务:
- public class MessengerService extends Service {
- static final int HELLO_WORLD = 1;
- class IncomingHandler extends Handler {
- @Override
- public void handleMessage(Message msg) {
- switch (msg.what) {
- case HELLO_WORLD:
- Toast.makeText(getApplicationContext(), "Hello World!", Toast.LENGTH_SHORT).show();
- break;
- default:
- super.handleMessage(msg);
- }
- }
- }
- final Messenger messenger = new Messenger(new IncomingHandler());
- @Override
- public IBinder onBind(Intent intent) {
- Toast.makeText(getApplicationContext(), "Binding", Toast.LENGTH_SHORT).show();
- return messenger.getBinder();
- }
- }
Handler中的handleMessage()方法是服务接收Message对象的地方,并且根据Message类的what成员变量决定如何操作。
客户端需要完成的全部工作就是根据服务返回的IBinder创建Messenger并且使用send()方法发送消息。例如,下面的Activity绑定到服务并发送HELLO_WORLD给服务。
- public class ActivityMessenger extends Activity {
- Messenger messenger = null;
- boolean bound;
- private ServiceConnection connection = new ServiceConnection() {
- public void onServiceConnected(ComponentName className, IBinder service) {
- messenger = new Messenger(service);
- bound = true;
- }
- public void onServiceDisconnected(ComponentName className) {
- messenger = null;
- bound = false;
- }
- };
- public void sayHello(View v) {
- if (!bound)
- return;
- Message msg = Message.obtain(null, MessengerService.HELLO_WORLD, 0, 0);
- try {
- messenger.send(msg);
- } catch (RemoteException e) {
- e.printStackTrace();
- }
- }
- @Override
- protected void onCreate(Bundle savedInstanceState) {
- super.onCreate(savedInstanceState);
- setContentView(R.layout.main);
- }
- @Override
- protected void onStart() {
- super.onStart();
- bindService(new Intent(this, MessengerService.class), connection, Context.BIND_AUTO_CREATE);
- }
- @Override
- protected void onStop() {
- super.onStop();
- if (bound) {
- unbindService(connection);
- bound = false;
- }
- }
- }
该实例并没有演示服务如何响应客户端。如果希望服务响应,则需要在客户端也创建Messenger。当客户端收到onServiceConnected()回调方法时,发送Message到服务。Message的replyTo成员变量包含客户端的Messenger。
13.3.3 绑定到服务
应用程序组件(客户端)能调用bindService()方法绑定到服务,接下来Android系统调用服务的onBind()方法,返回IBinder来与服务通信。
绑定是异步的。bindService()方法立即返回并且不返回IBinder到客户端。为了接收IBinder,客户端必须创建ServiceConnection实例,然后将其传递给bindService()方法。ServiceConnection包含系统调用发送IBinder的回调方法。
注意:只有Activity、Service和ContentProvider能绑定到服务,BroadcastReceiver不能绑定到服务。
如果需要从客户端绑定服务,需要完成以下操作:
(1)实现ServiceConnection,这需要重写onServiceConnected()和onServiceDisconnected()两个回调方法。
(2)调用bindService()方法,传递ServiceConnection实现。
(3)当系统调用onServiceConnected()回调方法时,就可以使用接口定义的方法调用服务。
(4)调用unbindService()方法解绑定。
当客户端销毁时,会将其从服务上解绑定。但是当与服务完成交互或者Activity暂停时,最好解绑定,以便系统能及时停止不用的服务。
13.3.4 实例1:继承Binder类绑定服务显示时间
例13.3 在Eclipse中创建Android项目,名称为13.3,实现继承Binder类绑定服务,并显示当前时间。(实例位置:光盘\TM\sl\13\13.3)
(1)修改res\layout目录中的main.xml布局文件,设置背景图片并添加一个按钮,然后设置按钮文字的内容、颜色和大小,其代码如下:
- <?xml version="1.0" encoding="utf-8"?>
- <LinearLayout xmlns:android="http://schemas.android.com/apk/res/android"
- android:layout_width="fill_parent"
- android:layout_height="fill_parent"
- android:background="@drawable/background"
- android:orientation="vertical" >
- <Button
- android:id="@+id/current_time"
- android:layout_width="wrap_content"
- android:layout_height="wrap_content"
- android:text="@string/current_time"
- android:textColor="@android:color/black"
- android:textSize="25dp" />
- </LinearLayout>
(2)创建CurrentTimeService类,它继承了Service类。内部类LocalBinder继承了Binder类,用于返回CurrentTimeService类的对象。getCurrentTime()方法用于返回当前时间,其代码如下:
- public class CurrentTimeService extends Service {
- private final IBinder binder = new LocalBinder();
- public class LocalBinder extends Binder {
- CurrentTimeService getService() {
- return CurrentTimeService.this; //返回当前服务的实例
- }
- }
- @Override
- public IBinder onBind(Intent arg0) {
- return binder;
- }
- public String getCurrentTime() {
- Time time = new Time(); //创建Time对象
- time.setToNow(); //设置时间为当前时间
- String currentTime = time.format("%Y-%m-%d %H:%M:%S"); //设置时间格式
- return currentTime;
- }
- }
注意:此处使用的时间格式与Java API中SimpleDateFormat类有所不同。
(3)创建CurrentTimeActivity类,它继承了Activity类。在onCreate()方法中设置布局。在onStart()方法中,获得按钮控件并增加单击事件监听器。在监听器中,使用bindService()方法绑定服务。在onStop()方法中解除绑定,其代码如下:
- public class CurrentTimeActivity extends Activity {
- CurrentTimeService cts;
- boolean bound;
- @Override
- protected void onCreate(Bundle savedInstanceState) {
- super.onCreate(savedInstanceState);
- setContentView(R.layout.main);
- }
- @Override
- protected void onStart() {
- super.onStart();
- Button button = (Button) findViewById(R.id.current_time);
- button.setOnClickListener(new View.OnClickListener() {
- public void onClick(View v) {
- Intent intent = new Intent(CurrentTimeActivity.this, CurrentTimeService.class);
- bindService(intent, sc, BIND_AUTO_CREATE); //绑定服务
- if (bound) { //如果绑定则显示当前时间
- Toast.makeText(CurrentTimeActivity.this, cts.getCurrentTime(),
- Toast.LENGTH_LONG).show();
- }
- }
- });
- }
- @Override
- protected void onStop() {
- super.onStop();
- if (bound) {
- bound = false;
- unbindService(sc); //解绑定
- }
- }
- private ServiceConnection sc = new ServiceConnection() {
- public void onServiceDisconnected(ComponentName name) {
- bound = false;
- }
- public void onServiceConnected(ComponentName name, IBinder service) {
- LocalBinder binder = (LocalBinder) service; //获得自定义的LocalBinder对象
- cts = binder.getService(); //获得CurrentTimeService对象
- bound = true;
- }
- };
- }
(4)修改AndroidManifest.xml文件,增加Activity和Service配置,其代码如下:
- <?xml version="1.0" encoding="utf-8"?>
- <manifest xmlns:android="http://schemas.android.com/apk/res/android"
- package="com.mingrisoft"
- android:versionCode="1"
- android:versionName="1.0" >
- <uses-sdk android:minSdkVersion="15" />
- <application
- android:icon="@drawable/ic_launcher"
- android:label="@string/app_name" >
- <activity android:name=".CurrentTimeActivity" >
- <intent-filter >
- <action android:name="android.intent.action.MAIN" />
- <category android:name="android.intent.category.LAUNCHER" />
- </intent-filter>
- </activity>
- <service android:name=".CurrentTimeService" />
- </application>
- </manifest>
(5)启动应用程序,界面如图13.6所示。单击“当前时间”按钮,会显示格式化的当前时间,如图13.7所示。
 |  |
| 图13.6 应用程序主界面 | 图13.7 显示当前时间 |
13.3.5 实例2:使用Messenger类绑定服务显示时间
例13.4 在Eclipse中创建Android项目,名称为13.4,实现使用Messenger类绑定服务并显示当前时间。(实例位置:光盘\TM\sl\13\13.4)
(1)修改res\layout目录中的main.xml布局文件,设置背景图片并添加一个按钮,然后设置按钮文字的内容、颜色和大小,其代码如下:
- <?xml version="1.0" encoding="utf-8"?>
- <LinearLayout xmlns:android="http://schemas.android.com/apk/res/android"
- android:layout_width="fill_parent"
- android:layout_height="fill_parent"
- android:background="@drawable/background"
- android:orientation="vertical" >
- <Button
- android:id="@+id/current_time"
- android:layout_width="wrap_content"
- android:layout_height="wrap_content"
- android:text="@string/current_time"
- android:textColor="@android:color/black"
- android:textSize="25dp" />
- </LinearLayout>
(2)创建CurrentTimeService类,它继承了Service类。内部类IncomingHanlder继承了Handler类,重写其handleMessage()方法来显示当前时间,其代码如下:
- public class CurrentTimeService extends Service {
- public static final int CURRENT_TIME = 0;
- private class IncomingHandler extends Handler {
- @Override
- public void handleMessage(Message msg) {
- if (msg.what == CURRENT_TIME) {
- Time time = new Time(); //创建Time对象
- time.setToNow(); //设置时间为当前时间
- String currentTime = time.format("%Y-%m-%d %H:%M:%S"); //设置时间格式
- Toast.makeText(CurrentTimeService.this, currentTime, Toast.LENGTH_LONG).show();
- } else {
- super.handleMessage(msg);
- }
- }
- }
- @Override
- public IBinder onBind(Intent intent) {
- Messenger messenger = new Messenger(new IncomingHandler());
- return messenger.getBinder();
- }
- }
注意:此处使用的时间格式与Java API中SimpleDateFormat类有所不同。
(3)创建CurrentTimeActivity类,它继承了Activity类。在onCreate()方法中设置布局。在onStart()方法中获得按钮控件并增加单击事件监听器。在监听器中,使用bindService()方法绑定服务。在onStop()方法中解除绑定。其代码如下:
- public class CurrentTimeActivity extends Activity {
- Messenger messenger;
- boolean bound;
- @Override
- protected void onCreate(Bundle savedInstanceState) {
- super.onCreate(savedInstanceState);
- setContentView(R.layout.main);
- }
- @Override
- protected void onStart() {
- super.onStart();
- Button button = (Button) findViewById(R.id.current_time);
- button.setOnClickListener(new View.OnClickListener() {
- public void onClick(View v) {
- Intent intent = new Intent(CurrentTimeActivity.this, CurrentTimeService.class);
- bindService(intent, connection, BIND_AUTO_CREATE);//绑定服务
- if (bound) {
- Message message = Message.obtain(null, CurrentTimeService.CURRENT_TIME, 0, 0);
- try {
- messenger.send(message);
- } catch (RemoteException e) {
- e.printStackTrace();
- }
- }
- }
- });
- }
- @Override
- protected void onStop() {
- super.onStop();
- if (bound) {
- bound = false;
- unbindService(connection);//解绑定
- }
- }
- private ServiceConnection connection = new ServiceConnection() {
- public void onServiceDisconnected(ComponentName name) {
- messenger = null;
- bound = false;
- }
- public void onServiceConnected(ComponentName name, IBinder service) {
- messenger = new Messenger(service);
- bound = true;
- }
- };
- }
(4)修改AndroidManifest.xml文件,增加Activity和Service配置,其代码如下:
- <?xml version="1.0" encoding="utf-8"?>
- <manifest xmlns:android="http://schemas.android.com/apk/res/android"
- package="com.mingrisoft"
- android:versionCode="1"
- android:versionName="1.0" >
- <uses-sdk android:minSdkVersion="15" />
- <application
- android:icon="@drawable/ic_launcher"
- android:label="@string/app_name" >
- <activity android:name=".CurrentTimeActivity" >
- <intent-filter >
- <action android:name="android.intent.action.MAIN" />
- <category android:name="android.intent.category.LAUNCHER" />
- </intent-filter>
- </activity>
- <service android:name=".CurrentTimeService" />
- </application>
- </manifest>
(5)启动应用程序,界面如图13.8所示。单击“当前时间”按钮,会显示格式化的当前时间,如图13.9所示。
 |  |
| 图13.8 应用程序主界面 | 图13.9 显示当前时间 |
13.4 管理Service的生命周期
教学录像:光盘\TM\lx\13\管理Service的生命周期.exe
服务的生命周期比Activity简单很多,但是却需要开发人员更加关注服务如何创建和销毁,因为服务可能在用户不知情的情况下在后台运行。服务的生命周期可以分成两个不同的路径:
[√]Started Service
当其他组件调用startService()方法时,服务被创建。接着服务无限期运行,其自身必须调用stopSelf()方法或者其他组件调用stopService()方法来停止服务。当服务停止时,系统将其销毁。
[√]Bound Service
当其他组件调用bindService()方法时,服务被创建。接着客户端通过IBinder接口与服务通信。客户端通过unbindService()方法关闭连接。多个客户端能绑定到同一个服务并且当它们都解绑定时,系统销毁服务(服务不需要被停止)。
这两条路径并非完全独立,即开发人员可以绑定已经使用startService()方法启动的服务。例如,后台音乐服务能使用包含音乐信息的Intent通过调用startService()方法启动。当用户需要控制播放器或者获得当前音乐信息时,可以调用bindService()方法绑定Activity到服务。此时,stopService()和stopSelf()方法直到全部客户端解绑定时才能停止服务。图13.10演示了两类服务的生命周期。
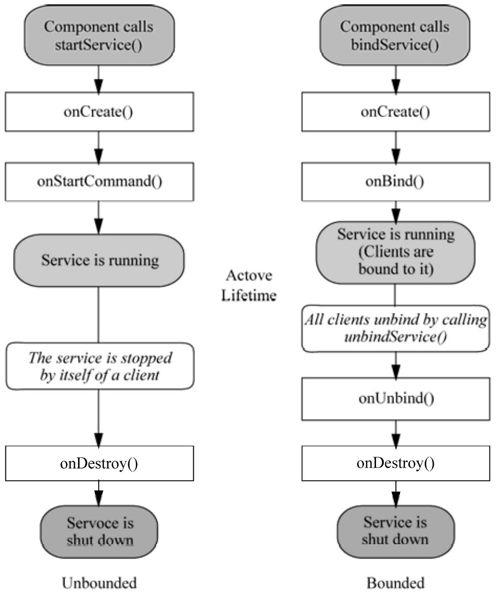 图13.10 服务的生命周期
13.5 经典范例
13.5.1 视力保护程序
例13.5 在Eclipse中创建Android项目,名称为13.5,当应用程序运行1分钟后,显示提示信息,提醒用户保护视力。(实例位置:光盘\TM\sl\13\13.5)
(1)修改res\layout目录中的main.xml文件,定义应用程序的背景图片和一个文本框,代码如下:
- <?xml version="1.0" encoding="utf-8"?>
- <LinearLayout xmlns:android="http://schemas.android.com/apk/res/android"
- android:layout_width="fill_parent"
- android:layout_height="fill_parent"
- android:background="@drawable/background"
- android:orientation="vertical" >
- <TextView
- android:id="@+id/textView"
- android:layout_width="fill_parent"
- android:layout_height="wrap_content"
- android:gravity="center"
- android:text="@string/activity_title"
- android:textColor="@android:color/black"
- android:textSize="25dp" />
- </LinearLayout>
(2)在com.mingrisoft包中,定义TimeService类,它继承Service类。在onStart()方法中,使用Timer类完成延时操作,在一个新线程中创建消息,并且在60秒后运行,代码如下:
- public class TimeService extends Service {
- private Timer timer;
- @Override
- public IBinder onBind(Intent intent) {
- return null;
- }
- @Override
- public void onCreate() {
- super.onCreate();
- timer = new Timer(true); //创建Timer对象
- }
- @Override
- public void onStart(Intent intent, int startId) {
- super.onStart(intent, startId);
- timer.schedule(new TimerTask() {
- @Override
- public void run() {
- String ns = Context.NOTIFICATION_SERVICE;
- //获得通知管理器
- NotificationManager manager = (NotificationManager) getSystemService(ns);
- Notification notification = new Notification(R.drawable.warning, getText(R.string.ticker_text),
- System.currentTimeMillis()); //创建通知
- CharSequence contentTitle = getText(R.string.content_title); //定义通知的标题
- CharSequence contentText = getText(R.string.content_text); //定义通知的内容
- Intent intent = new Intent(TimeService.this, TimeActivity.class); //创建Intent对象
- PendingIntent contentIntent = PendingIntent.getActivity(TimeService.this, 0, intent,
- Intent.FLAG_ACTIVITY_NEW_TASK); //创建PendingIntent对象
- //定义通知行为
- notification.setLatestEventInfo(TimeService.this, contentTitle, contentText, contentIntent);
- manager.notify(0, notification); //显示通知
- TimeService.this.stopSelf(); //停止服务
- }
- }, 60000);
- }
- }
(3)在com.mingrisoft包中,定义TimeActivity类,它继承Activity类。在onCreate()方法中,启动服务。代码如下:
- public class TimeActivity extends Activity {
- @Override
- protected void onCreate(Bundle savedInstanceState) {
- super.onCreate(savedInstanceState);
- setContentView(R.layout.main);
- startService(new Intent(this,TimeService.class));
- }
- }
(4)修改AndroidManifest.xml文件,增加Activity和Service配置,其代码如下:
- <?xml version="1.0" encoding="utf-8"?>
- <manifest xmlns:android="http://schemas.android.com/apk/res/android"
- package="com.mingrisoft"
- android:versionCode="1"
- android:versionName="1.0" >
- <uses-sdk android:minSdkVersion="15" />
- <application
- android:icon="@drawable/ic_launcher"
- android:label="@string/app_name" >
- <activity android:name=".TimeActivity" >
- <intent-filter >
- <action android:name="android.intent.action.MAIN" />
- <category android:name="android.intent.category.LAUNCHER" />
- </intent-filter>
- </activity>
- <service android:name=".TimeService" >
- </service>
- </application>
- </manifest>
(5)启动应用程序,界面如图13.11所示。在应用程序启动1分钟后会显示提示信息,单击打开后如图13.12所示。
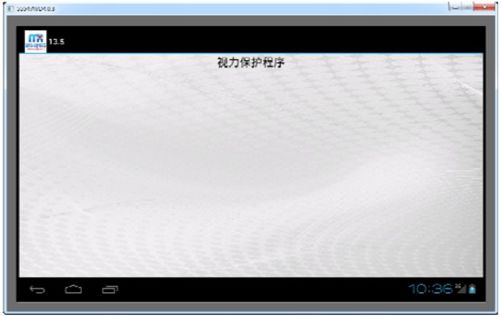 | 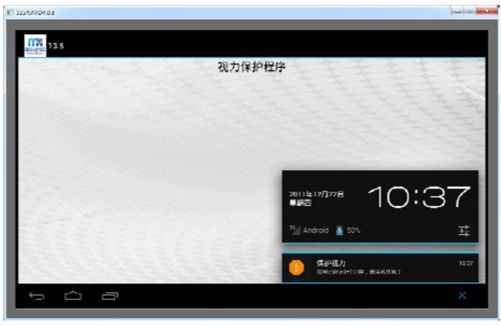 |
| 图13.11 应用程序主界面 | 图13.12 显示提示信息 |
13.5.2 查看当前运行服务信息
例13.6 在Eclipse中创建Android项目,名称为13.6,实现在Activity中显示当前运行服务的详细信息功能。(实例位置:光盘\TM\sl\13\13.6)
(1)在com.mingrisoft包中创建ServicesListActivity类,它继承了Activity类。在onStart()方法中,获得当前正在运行服务的列表。对于每个服务,获得其详细信息并在Activity中输出,其代码如下:
- public class ServicesListActivity extends Activity {
- public void onCreate(Bundle savedInstanceState) {
- super.onCreate(savedInstanceState);
- }
- @Override
- protected void onStart() {
- super.onStart();
- StringBuilder serviceInfo = new StringBuilder();
- ActivityManager manager = (ActivityManager) getSystemService(ACTIVITY_SERVICE);
- List<RunningServiceInfo> services = manager.getRunningServices(100);//获得正在运行的服务列表
- for (Iterator<RunningServiceInfo> it = services.iterator(); it.hasNext();) {
- RunningServiceInfo info = it.next();
- //获得一个服务的详细信息并保存到StringBuilder
- serviceInfo.append("activeSince: " + formatData(info.activeSince) + "\n");
- serviceInfo.append("clientCount: " + info.clientCount + "\n");
- serviceInfo.append("clientLabel: " + info.clientLabel + "\n");
- serviceInfo.append("clientPackage: " + info.clientPackage + "\n");
- serviceInfo.append("crashCount: " + info.crashCount + "\n");
- serviceInfo.append("flags: " + info.flags + "\n");
- serviceInfo.append("foreground: " + info.foreground + "\n");
- serviceInfo.append("lastActivityTime: " + formatData(info.lastActivityTime) + "\n");
- serviceInfo.append("pid: " + info.pid + "\n");
- serviceInfo.append("process: " + info.process + "\n");
- serviceInfo.append("restarting: " + formatData(info.restarting) + "\n");
- serviceInfo.append("service: " + info.service + "\n");
- serviceInfo.append("started: " + info.started + "\n");
- serviceInfo.append("uid: " + info.uid + "\n");
- serviceInfo.append("\n");
- }
- ScrollView scrollView = new ScrollView(this); //创建滚动视图
- TextView textView = new TextView(this); //创建文本视图
- textView.setBackgroundColor(Color.BLACK); //设置文本颜色
- textView.setTextSize(25); //设置字体大小
- textView.setText(serviceInfo.toString()); //设置文本内容
- scrollView.addView(textView); //将文本视图增加到滚动视图
- setContentView(scrollView); //显示滚动视图
- }
- private static String formatData(long data) { //用于格式化时间
- SimpleDateFormat format = new SimpleDateFormat("yyyy-MM-dd HH:mm:ss");
- return format.format(new Date(data));
- }
- }
(2)修改AndroidManifest.xml文件,增加Activity和Service配置,其代码如下:
- <?xml version="1.0" encoding="utf-8"?>
- <manifest xmlns:android="http://schemas.android.com/apk/res/android"
- package="com.mingrisoft"
- android:versionCode="1"
- android:versionName="1.0" >
- <uses-sdk android:minSdkVersion="15" />
- <application
- android:icon="@drawable/ic_launcher"
- android:label="@string/app_name" >
- <activity
- android:label="@string/app_name"
- android:name=".ServicesListActivity" >
- <intent-filter >
- <action android:name="android.intent.action.MAIN" />
- <category android:name="android.intent.category.LAUNCHER" />
- </intent-filter>
- </activity>
- </application>
- </manifest>
(3)启动应用程序,界面如图13.13所示。其中输出了服务的启动时间、连接的客户端个数等信息。
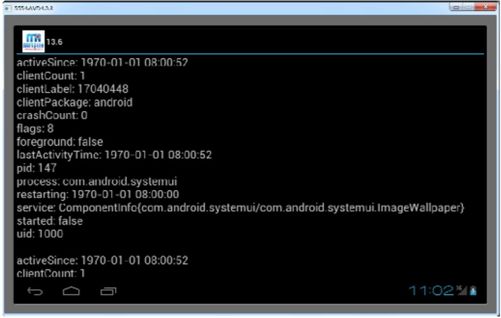 图13.13 当前运行服务的信息列表
13.6 小 结
本章详细介绍了Android四大组件之一的Service(服务)。服务可以分成Started服务和Bound服务两大类。对于Started服务,有两种实现方式:继承IntentService类和继承Service类;对于Bound服务,有两种实现方式:继承Binder类和使用Messenger类。请读者认真区别各种方式,并能根据应用场合进行选择。
13.7 实践与练习
编写Android程序,使用IntentService在后台每隔5秒钟输出应用程序运行时间。(答案位置:光盘\TM\sl\13\13.7)
编写Android程序,查看Started服务的生命周期。(答案位置:光盘\TM\sl\13\13.8)
