创建REST服务
数据库迁移
这个名字是源自于Ruby On Rails在那时候的印象,不直接使用MySQL的目的在于让我们可以专注于过程。
创建表
表的概念,类似于在Excel中的表,如果你真实不懂数据库。 让我们创建一个athomes的表,为什么是athomes,因为以前在写android程序的时候就叫的是athome,忽略掉这些次要的因素吧。
$ php artisan migrate:make create_athomes_table
打开 app/database/migrations/create_athomes_table.php这里的是由日期和某些东西组成的,修改生成的代码为下面。
use Illuminate\Database\Schema\Blueprint;use Illuminate\Database\Migrations\Migration;class CreateAthomesTable extends Migration {public function up(){Schema::create('athomes', function(Blueprint $table){$table--->increments('id');$table->float('temperature');$table->float('sensors1');$table->float('sensors2');$table->boolean('led1');$table->timestamps();});}public function down(){Schema::drop('athomes');}}
意思大致就是id是自加的,也就是我们在localhost/athome/{id},当我们创建一个新的数据的时候,会自动加上去,最后一个timestamps批的是时间,会包含创建时间和修改时间。 剩下的temperature,sensors1,sensors2是小数,以及只有真和假的led1。
数据库迁移
我们只是写了我们需要的数据的格式而并没有丢到数据库里,
$ php artisan migrate
这个就是我们执行迁移的命令,如果你用phpmyadmin可以直接打开查看,没有的话,可以。
$ mysql -uroot -p
use iot;select * from athomes;
就可以看到我们写的东西,那么接下来就是创建RESTful服务了
创建RESTful
用下面的代码实现我们称之为Athomes控制器的创建
$ php artisan controller:make AthomesController
就会在app/controllers下面生成下面的代码
class AthomesController extends \BaseController {public function index() {}public function create() {}public function store() {}public function show($id) {}public function edit($id) {}public function update($id) {}public function destroy($id) {}}
Laravel Resources
上面的代码过于沉重,请让我用 Ctrl+C 来带来点知识吧。
| Verb | Path | Action | Route Name |
|---|---|---|---|
| GET | /resource | index | resource.index |
| GET | /resource/create | create | resource.create |
| POST | /resource | store | resource.store |
| GET | /resource/{resource} | show | resource.show |
| GET | /resource/{resource}/edit | edit | resource.edit |
| PUT/PATCH | /resource/{resource} | update | resource.update |
| DELETE | /resource/{resource} | destroy | resource.destroy |
所以我们只需要专注于创建 create, edit, show, destory 等等。好吧,你可能没有耐心了,但是在修改这个之前我们需要先在 app/model 加个 class
class Athomes extends Eloquent {protected $table = 'athomes';}
如果你想要的只是控制器Athomes的代码的话。。
class AthomesController extends \BaseController {public $restful=true;protected $athome;public function __construct(Athomes $athome){$this--->athome = $athome ;}public function index(){$maxid=Athomes::all();return Response::json($maxid);}public function create(){$maxid=Athomes::max('id');return View::make('athome.create')->with('maxid',$maxid);}public function store(){$rules = array('led1'=>'required','sensors1' => 'required|numeric|Min:-50|Max:80','sensors2' => 'required|numeric|Min:-50|Max:80','temperature' => 'required|numeric|Min:-50|Max:80');$validator = Validator::make(Input::all(), $rules);if ($validator->fails()) {return Redirect::to('athome/create')->withErrors($validator)->withInput(Input::except('password'));} else {$nerd = new Athomes;$nerd->sensors1 = Input::get('sensors1');$nerd->sensors2 = Input::get('sensors2');$nerd->temperature = Input::get('temperature');$nerd->led1 = Input::get('led1');$nerd->save();Session::flash('message', 'Successfully created athome!');return Redirect::to('athome');}}public function show($id){$myid=Athomes::find($id);$maxid=Athomes::where('id','=',$id)->select('id','temperature','sensors1','sensors2','led1')->get();return Response::json($maxid);}public function edit($id){$athome = Athomes::find($id);return View::make('athome.edit')->with('athome', $athome);}public function update($id){$rules = array('led1'=>'required|','sensors1' => 'required|numeric|Min:-50|Max:80','sensors2' => 'required|numeric|Min:-50|Max:80','temperature' => 'required|numeric|Min:-50|Max:80');$validator = Validator::make(Input::all(), $rules);if ($validator->fails()) {return Redirect::to('athome/' . $id . '/edit')->withErrors($validator);} else {$nerd = Athomes::find($id);$nerd->sensors1 = Input::get('sensors1');$nerd->sensors2 = Input::get('sensors2');$nerd->temperature = Input::get('temperature');$nerd->led1 = Input::get('led1');$nerd->save();Session::flash('message', 'Successfully created athome!');return Redirect::to('athome');}}public function destroy($id){$athome = Athomes::find($id);$athome->delete();if(is_null($athome)){return Response::json('Todo not found', 404);}Session::flash('message', 'Successfully deleted the nerd!');return Redirect::to('athome');}}
希望你能读懂,没有的话,继续。
下面这部分来自于之前的博客,这里就不多加论述了。 这个也就是我们要的模板,
修改Create()
public function create(){$maxid=Athomes::max('id');return View::make('athome.create')->with('maxid',$maxid);}
这里需要在app/views/创建一个athome里面创建一个create.blade.php,至于maxid,暂时还不需要,后面会用到show。如果只需要模板,可以简化为
public function create(){return View::make('athome.create');}
这里只是对其中代码的进行一下说明。
创建表单
创建表单之前
由于使用到了bootstrap以及bootstrap-select,记得添加css。
<link rel="stylesheet" type="text/css" href="<?= url('css/bootstrap.min.css') ?>" /><link rel="stylesheet" type="text/css" href="<?= url('css/bootstrap-select.min.css') ?>" />
以及javascript
<script type="text/javascript" src="<?= url('js/jquery.min.js')?>"></script><script type="text/javascript" src="<?= url('js/bootstrap.min.js') ?>"></script><script type="text/javascript" src="<?= url('js/bootstrap-select.min.js') ?>"></script><script>$('.selectpicker').selectpicker();</script>
创建表单
这里用到的是之前提到的那个作者写下的,稍微修改了一下。
<div class="row-fluid">{{ HTML::ul($errors->all()) }}{{ Form::open(array('url' => 'athome')) }}<div class="form-group">{{ Form::label('led1', '开关1') }}{{ Form::select('led1',array('关','开'),$selected=NULL,array('class'=>'selectpicker')) }}</div><div class="form-group">{{ Form::label('sensors1', 'sensors1') }}{{ Form::text('sensors1', Input::old('sensors1'), array('class' => 'form-control')) }}</div><div class="form-group">{{ Form::label('sensors2', 'sensors2') }}{{ Form::text('sensors2', Input::old('sensors2'), array('class' => 'form-control')) }}</div><div class="form-group">{{ Form::label('temperature', 'temperature') }}{{ Form::text('temperature', Input::old('temperature'), array('class' => 'form-control')) }}</div>{{ Form::submit('Create!', array('class' => 'btn btn-primary')) }}{{ Form::close() }}</div>
开关一开始打算用 checkbox,加上 bootstrap-switch 实现 ON OFF 弱弱地觉得还是没掌握好的节奏,所以最后用 select 来实现。
还需要修改一下之前的 create(),添加一行
return Redirect::to('athome');
也就是添加完后,重定向到首页查看,最后例子给出的 create 如下
public function store(){$rules = array('led1'=>'required','sensors1' => 'required|numeric|Min:-50|Max:80','sensors2' => 'required|numeric|Min:-50|Max:80','temperature' => 'required|numeric|Min:-50|Max:80');$validator = Validator::make(Input::all(), $rules);if ($validator->fails()) {return Redirect::to('athome/create')->withErrors($validator);} else {// store$nerd = new Athomes;$nerd->sensors1 = Input::get('sensors1');$nerd->sensors2 = Input::get('sensors2');$nerd->temperature = Input::get('temperature');$nerd->led1 = Input::get('led1');$nerd->save();Session::flash('message', 'Successfully created athome!');return Redirect::to('athome');}}
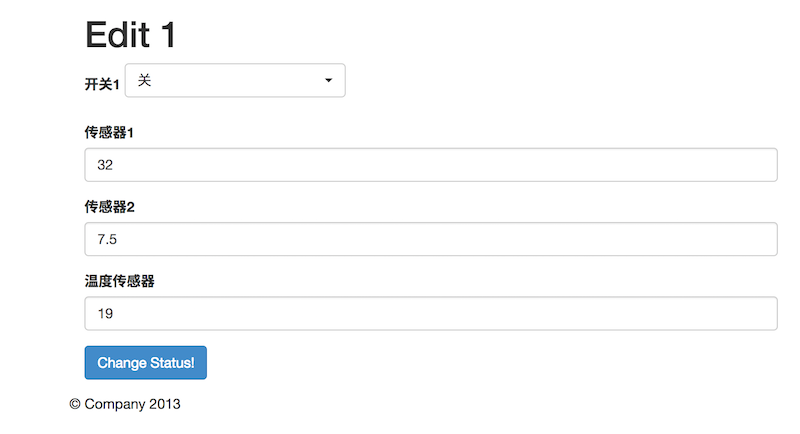
编辑模板
完整的 blade 模板文件
<!DOCTYPE html lang="zh-cn"><html><head><meta http-equiv="Content-type" content="text/html; charset=utf-8"><meta name="keywords" content=""><meta name="viewport" content="width=device-width"><meta name="description" content=""><title>@yield('title')</title><link rel="stylesheet" type="text/css" href="<?= url('css/bootstrap.min.css') ?>" /><link rel="stylesheet" type="text/css" href="<?= url('css/bootstrap-select.min.css') ?>" /><link rel="stylesheet" href="<?= url('css/justified-nav.css') ?>" type="text/css" media="screen" /></head><body><div class="container"><div class="container"><div class="row-fluid"><h1>Edit {{ $athome->id }}</h1><!-- if there are creation errors, they will show here -->{{ HTML::ul($errors->all()) }}{{ Form::model($athome, array('route' => array('athome.update', $athome->id), 'method' => 'PUT')) }}<div class="form-group">{{ Form::label('led1', '开关1') }}{{ Form::select('led1',array('关','开'),$selected=NULL,array('class'=>'selectpicker')) }}</div><div class="form-group">{{ Form::label('sensors1', '传感器1') }}{{ Form::text('sensors1', Input::old('sensors1'), array('class' => 'form-control')) }}</div><div class="form-group">{{ Form::label('sensors2', '传感器2') }}{{ Form::text('sensors2', Input::old('sensors2'), array('class' => 'form-control')) }}</div><div class="form-group">{{ Form::label('temperature', '温度传感器') }}{{ Form::text('temperature', Input::old('temperature'), array('class' => 'form-control')) }}</div>{{ Form::submit('Edit the Nerd!', array('class' => 'btn btn-primary')) }}{{ Form::close() }}</div></div><div class="footer"><p>© Company 2013</p></div></div></div><script type="text/javascript" src="<?= url('js/jquery.min.js')?>"></script><script type="text/javascript" src="<?= url('js/bootstrap.min.js') ?>"></script><script type="text/javascript" src="<?= url('js/bootstrap-select.min.js') ?>"></script><script>$('.selectpicker').selectpicker();</script><script type="text/javascript" src="<?= url('js/log.js') ?>"></script></body></html>
效果图:
最后效果见:http://b.phodal.com/
