21.7 Objective-C调用Swift实现的计算器
在上一节我们实现了Swift调用Objective-C,现在我们再来介绍一下Objective-C调用Swift实现。
21.7.1 在Objective-C工程中添加Swift类
如果我们已经有一个使用Objective-C语言编写的工程,还需要调用其他Swift类实现某些功能,那就可以充分利用Swift编写的代码。
下面我们具体在Objective-C版计算器工程中添加Swift的CalcLogic类。右键选择Calculator组,选择菜单中的“New File…”弹出新建文件模板对话框。如图21-39所示,选择iOS→Source→Cocoa Touch Class。

图 21-39 选择文件模板
接着单击“Next”按钮,随即出现如图21-40所示的界面。在Class中输入“CalcLogic”,Subclass of(继承自)项目选择NSObject,在Language中选择Swift,其他的项目保持默认值就可以了。
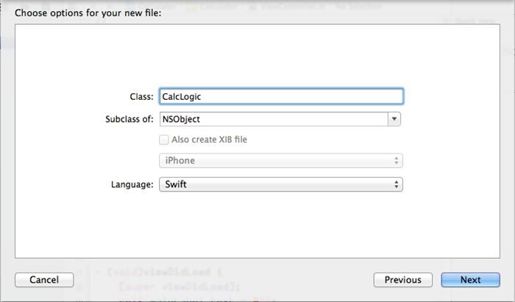
图 21-40 新建Swift类
设置完相关选项后,单击“Next”按钮,进入保存文件界面,根据提示选择存放文件的位置,然后单击“Create”按钮创建Swift类。
21.7.2 调用代码
从Objective-C调用Swift不需要桥接头文件。在Objective-C端,视图控制器ViewController的代码基本上不需要修改,但是要想访问Swift对象还是需要引入一个头文件,这个文件的命名是 <工程名>-Swift.h,那么就需要在ViewController.h文件中引入头文件,ViewController.h代码如下:
#import <UIKit/UIKit.h>#import "Calculator-Swift.h" ①@interface ViewController : UIViewController{CalcLogic logic;}@property (weak, nonatomic) IBOutlet UILabel mainLabel;- (IBAction)operandPressed:(id)sender;- (IBAction)equalsPressed:(id)sender;- (IBAction)clearPressed:(id)sender;- (IBAction)decimalPressed:(id)sender;- (IBAction)numberButtonPressed:(id)sender;@end
上述代码第①行引入了头文件Calculator-Swift.h,这样Objective-C就可以访问工程中的Swift类了。
此外,还需要修改一下Swift端的代码,Swift端的CalcLogic.swift代码如下:
import Foundationenum Operator : Int {case Plus = 200, Minus, Multiply, Dividecase Default = 0}@objc class CalcLogic : NSObject { ①//保存上一次的值var lastRetainValue : Double//最近一次选择的操作符(加、减、乘、除)var opr : Operator//临时保存MainLabel内容,为true时,输入数字MainLabel内容被清为0var isMainLabelTextTemporary : Bool/** 构造器override init () { ②println("CalcLogic init")lastRetainValue = 0.0isMainLabelTextTemporary = falseopr = .Default}* 析构器deinit {println("CalcLogic deinit")}判断字符串中是否包含./func updateMainLabelStringByNumberTag(tag : Int, withMainLabelStringmainLabelString : String)->String {var string = mainLabelStringif (isMainLabelTextTemporary) {string = “0”isMainLabelTextTemporary = false}let optNumber = tag - 100//把String转为doublevar mainLabelDouble = (string as NSString).doubleValueif mainLabelDouble == 0 && doesStringContainDecimal(string) == false {return String(optNumber)}let resultString = string + String(optNumber)return resultString}/** 判断字符串中是否包含小数点func doesStringContainDecimal(string : String)->Bool {for ch in string {if ch == "." {return true}}return false}点击操作符时的计算/func calculateByTag(tag : Int, withMainLabelString mainLabelString : String)->String {//把String转为doublevar currentValue = (mainLabelString as NSString).doubleValueswitch Operator {case .Plus:lastRetainValue += currentValuecase .Minus:lastRetainValue -= currentValuecase .Multiply:lastRetainValue *= currentValuecase .Divide:if currentValue != 0 {lastRetainValue = currentValue} else {opr = .DefaultisMainLabelTextTemporary = truereturn "错误"}Default:lastRetainValue = currentValue}/记录当前操作符,下次计算时使用opr = Operator(rawValue:tag)!let resultString = NSString(format: "%g", lastRetainValue)isMainLabelTextTemporary = truereturn resultString}func clear() {lastRetainValue = 0.0isMainLabelTextTemporary = falseopr = .Default}}
上述代码与纯Swift版本变化不是很大。但是需要注意代码第①行,CalcLogic类继承了NSObject类,而纯Swift版本中的CalcLogic类是没有继承任何父类的。再有我们在类前面声明为@objc,这也是与纯Swift版本的区别,@objc所声明的类能够被Objective-C访问,@objc还可以修饰属性。代码第②行override init()是重写NSObject父类构造器init()。
代码编写完成后,我们可以运行一下看看效果。
