存储到数据库中
SQLite3
我们创建了一个名为userdata.db的数据库文件,然后创建了一个表,里面有owner,language,eventtype,name url
def init_db():conn = sqlite3.connect('userdata.db')c = conn.cursor()c.execute('''CREATE TABLE userinfo (owner text, language text, eventtype text, name text, url text)''')
接着我们就可以查询数据,这里从结果讲起。
def get_count(username):count = 0userinfo = []condition = 'select * from userinfo where owener = \'' + str(username) + '\''for zero in c.execute(condition):count += 1userinfo.append(zero)return count, userinfo
当我查询gmszone的时候,也就是我自己就会有如下的结果
(u'gmszone', u'ForkEvent', u'RESUME', u'TeX', u'https://github.com/gmszone/RESUME')(u'gmszone', u'WatchEvent', u'iot-dashboard', u'JavaScript', u'https://github.com/gmszone/iot-dashboard')(u'gmszone', u'PushEvent', u'wechat-wordpress', u'Ruby', u'https://github.com/gmszone/wechat-wordpress')(u'gmszone', u'WatchEvent', u'iot', u'JavaScript', u'https://github.com/gmszone/iot')(u'gmszone', u'CreateEvent', u'iot-doc', u'None', u'https://github.com/gmszone/iot-doc')(u'gmszone', u'CreateEvent', u'iot-doc', u'None', u'https://github.com/gmszone/iot-doc')(u'gmszone', u'PushEvent', u'iot-doc', u'TeX', u'https://github.com/gmszone/iot-doc')(u'gmszone', u'PushEvent', u'iot-doc', u'TeX', u'https://github.com/gmszone/iot-doc')(u'gmszone', u'PushEvent', u'iot-doc', u'TeX', u'https://github.com/gmszone/iot-doc')109
一共有109个事件,有Watch,Create,Push,Fork还有其他的, 项目主要有iot,RESUME,iot-dashboard,wechat-wordpress, 接着就是语言了,Tex,Javascript,Ruby,接着就是项目的url了。
值得注意的是。
-rw-r--r-- 1 fdhuang staff 905M Apr 12 14:59 userdata.db
这个数据库文件有905M,不过查询结果相当让人满意,至少相对于原来的结果来说。
Python自带了对SQLite3的支持,然而我们还需要安装SQLite3
brew install sqlite3
或者是
sudo port install sqlite3
或者是Ubuntu的
sudo apt-get install sqlite3
openSUSE自然就是
sudo zypper install sqlite3
不过,用yast2也很不错,不是么。。
数据导入
需要注意的是这里是需要python2.7,起源于对gzip的上下文管理器的支持问题
def handle_gzip_file(filename):userinfo = []with gzip.GzipFile(filename) as f:events = [line.decode("utf-8", errors="ignore") for line in f]for n, line in enumerate(events):try:event = json.loads(line)except:continueactor = event["actor"]attrs = event.get("actor_attributes", {})if actor is None or attrs.get("type") != "User":continuekey = actor.lower()repo = event.get("repository", {})info = str(repo.get("owner")), str(repo.get("language")), str(event["type"]), str(repo.get("name")), str(repo.get("url"))userinfo.append(info)return userinfodef build_db_with_gzip():init_db()conn = sqlite3.connect('userdata.db')c = conn.cursor()year = 2014month = 3for day in range(1,31):date_re = re.compile(r"([0-9]{4})-([0-9]{2})-([0-9]{2})-([0-9]+)\.json.gz")fn_template = os.path.join("march","{year}-{month:02d}-{day:02d}-{n}.json.gz")kwargs = {"year": year, "month": month, "day": day, "n": "*"}filenames = glob.glob(fn_template.format(**kwargs))for filename in filenames:c.executemany('INSERT INTO userinfo VALUES (?,?,?,?,?)', handle_gzip_file(filename))conn.commit()c.close()
executemany可以插入多条数据,对于我们的数据来说,一小时的文件大概有五六千个会符合我们上面的安装,也就是有actor又有type才是我们需要记录的数据,我们只需要统计用户的那些事件,而非全部的事件。
我们需要去遍历文件,然后找到合适的部分,这里只是要找2014-03-01到2014-03-31的全部事件,而光这些数据的gz文件就有1.26G,同上面那些解压为json文件显得不合适,只能用遍历来处理。
这里参考了osrc项目中的写法,或者说直接复制过来。
首先是正规匹配
date_re = re.compile(r"([0-9]{4})-([0-9]{2})-([0-9]{2})-([0-9]+)\.json.gz")
不过主要的还是在于glob.glob
glob是python自己带的一个文件操作相关模块,用它可以查找符合自己目的的文件,就类似于Windows下的文件搜索,支持通配符操作。
这里也就用上了gzip.GzipFile又一个不错的东西。
最后代码可以见
更好的方案?
Redis
查询用户事件总数
import redisr = redis.StrictRedis(host='localhost', port=6379, db=0)pipe = pipe = r.pipeline()pipe.zscore('osrc:user',"gmszone")pipe.execute()
系统返回了227.0,试试别人。
>>> pipe.zscore('osrc:user',"dfm")<redis.client.StrictPipeline object at 0x104fa7f50>>>> pipe.execute()[425.0]>>>
看看主要是在哪一天提交的
>>> pipe.hgetall('osrc:user:gmszone:day')<redis.client.StrictPipeline object at 0x104fa7f50>>>> pipe.execute()[{'1': '51', '0': '41', '3': '17', '2': '34', '5': '28', '4': '22', '6': '34'}]
结果大致如下图所示:
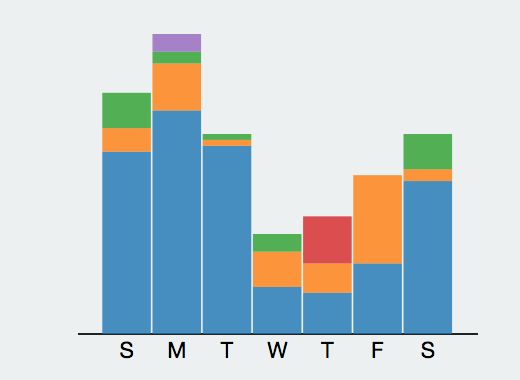 SMTWTFS
看看主要的事件是?
>>> pipe.zrevrange("osrc:user:gmszone:event".format("gmszone"), 0, -1,withscores=True)<redis.client.StrictPipeline object at 0x104fa7f50>>>> pipe.execute()[[('PushEvent', 154.0), ('CreateEvent', 41.0), ('WatchEvent', 18.0), ('GollumEvent', 8.0), ('MemberEvent', 3.0), ('ForkEvent', 2.0), ('ReleaseEvent', 1.0)]]>>>
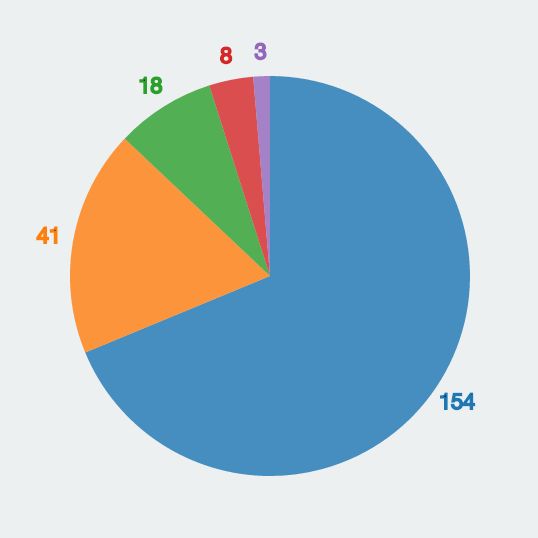 Main Event
蓝色的就是push事件,黄色的是create等等。
到这里我们算是知道了OSRC的数据库部分是如何工作的。
Redis 查询
主要代码如下所示
def get_vector(user, pipe=None):r = redis.StrictRedis(host='localhost', port=6379, db=0)no_pipe = Falseif pipe is None:pipe = pipe = r.pipeline()no_pipe = Trueuser = user.lower()pipe.zscore(get_format("user"), user)pipe.hgetall(get_format("user:{0}:day".format(user)))pipe.zrevrange(get_format("user:{0}:event".format(user)), 0, -1,withscores=True)pipe.zcard(get_format("user:{0}:contribution".format(user)))pipe.zcard(get_format("user:{0}:connection".format(user)))pipe.zcard(get_format("user:{0}:repo".format(user)))pipe.zcard(get_format("user:{0}:lang".format(user)))pipe.zrevrange(get_format("user:{0}:lang".format(user)), 0, -1,withscores=True)if no_pipe:return pipe.execute()
结果在上一篇中显示出来了,也就是
[227.0, {'1': '51', '0': '41', '3': '17', '2': '34', '5': '28', '4': '22', '6': '34'}, [('PushEvent', 154.0), ('CreateEvent', 41.0), ('WatchEvent', 18.0), ('GollumEvent', 8.0), ('MemberEvent', 3.0), ('ForkEvent', 2.0), ('ReleaseEvent', 1.0)], 0, 0, 0, 11, [('CSS', 74.0), ('JavaScript', 60.0), ('Ruby', 12.0), ('TeX', 6.0), ('Python', 6.0), ('Java', 5.0), ('C++', 5.0), ('Assembly', 5.0), ('C', 3.0), ('Emacs Lisp', 2.0), ('Arduino', 2.0)]]
有意思的是在这里生成了和自己相近的人
['alesdokshanin', 'hjiawei', 'andrewreedy', 'christj6', '1995eaton']
osrc最有意思的一部分莫过于flann,当然说的也是系统后台的设计的一个很关键及有意思的部分。
