上一篇做了一个水波纹view 不知道大家有没有动手试试呢点击打开链接
这个效果做起来好像没什么意义,如果不加监听回调 图片就能直接替代。写这篇博客的目的是锻炼一下思维能力,以更好的面多各种自定义view需求。
转载请注明出处:http://blog.csdn.net/wingichoy/article/details/50554058
本文是和代码同步写的。也就是说在写文章的时候才敲的代码。这样会显得文章有些许混乱。但是我想这样记录下来,一个自定义view的真正的制作过程,是一点一点,一步步跟着思路的改变,完善的。不可能一下子就做出一个完整的view。。技术也是这样,不可能一步登天。都是一步一步的积累。
另外,每一篇博客都是建立在之前博客的基础知识上的,如果你刚接触自定义view。可以来说说自定义view简单学习的方式这里看我以前的文章。记录了我学习自定义view的过程,而且前几篇博客或多或少犯了一些错误。这里我并不想改正博文中的错误,因为些错误是大家经常会犯的,后来的博客都有指出这些错误,以及不再犯,这是一个学习的过程。所以我想把错误的经历记录下来。等成为高手 回头看看当年的自己是多么菜。。也会有成就感。。
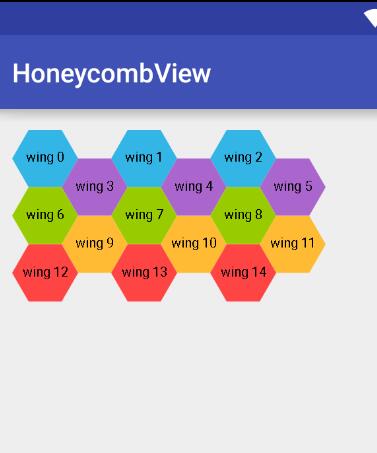
老规矩效果图如下:
首先画一个六边形,画之前来计算一下六边形的相关知识:
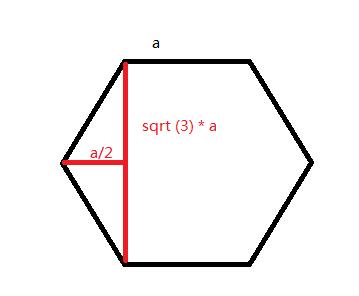
假设一个正六边形的边长为a ,因为每个角都是120° 所以可得高为根号三a ,如图所示。
有了这些信息我们就可以绘制一个六边形出来,如下:
float height = (float) (Math.sqrt(3)*mLength);mPath.moveTo(mLength/2,0);mPath.lineTo(0,height/2);mPath.lineTo(mLength/2,height);mPath.lineTo((float) (mLength*1.5),height);mPath.lineTo(2*mLength,height/2);mPath.lineTo((float) (mLength*1.5),0);mPath.lineTo(mLength/2,0);mPath.close();
绘制效果:

然后将其根据一个偏移量进行平移,就可以用循环绘制出多个六边形
这里offset是偏移量,紧挨着的话应该是偏移一个六边形的宽,宽由上图可知为 a/2+a+a/2 即 2a;
for(int i = 0 ; i < 3;i++) {int offset = mLength * 2 * i;mPath.moveTo(mLength / 2 + offset, 0);mPath.lineTo(0 + offset, height / 2);mPath.lineTo(mLength / 2 + offset, height);mPath.lineTo((float) (mLength * 1.5) + offset, height);mPath.lineTo(2 * mLength + offset, height / 2);mPath.lineTo((float) (mLength * 1.5)+offset, 0);mPath.lineTo(mLength / 2+offset, 0);mPath.close();}
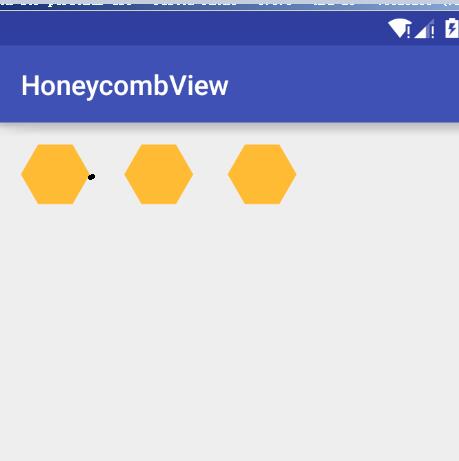
发现效果如下
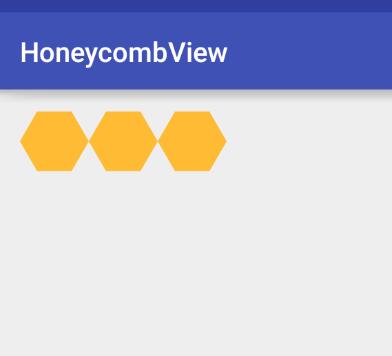
这不对啊,很奇怪啊。。 底下空出来的一个三角形放不下我们的第二行啊。。
那么怎么办呢。。 加大offset! 加大多少呢。。 应该多增加一个边长。。这样就正好留空了。 来试试
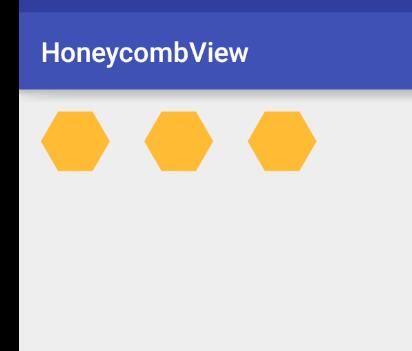
现在来准备画第二行….
发现我们之前path的坐标都是相对写死的。。 所以要回过头改一下,改成给定一个起点,就可以绘制出一个六边形,经过计算,得出下图
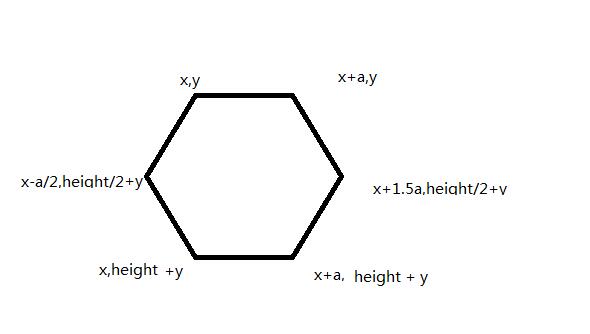
这里a代表边长。
改完之后的代码是:
float height = (float) (Math.sqrt(3)*mLength);for(int i = 0 ; i < 3;i++) {//横坐标偏移量int offset = mLength * 3 * i ;//左上角的xint x = mLength/2 + offset;int y = 0;//根据左上角一点 绘制整个正六边形mPath.moveTo(x, y);mPath.lineTo(x -mLength/2, height / 2 + y);mPath.lineTo(x, height+y);mPath.lineTo(x + mLength, height +y);mPath.lineTo((float) (x + 1.5*mLength), height / 2+y);mPath.lineTo(x + mLength, y);mPath.lineTo(x, y);mPath.close();}
绘制出来的效果是一样的。但是方法以及变了。
然后来画第二行,第二行起点的path应该在这里
坐标是: 2a , height/2 这里的偏移量不变。
首先将画path的方法提取出来(as快捷键ctrl + alt + m)
//根据左上角一点 绘制整个正六边形private void getPath(float height, float x, float y) {mPath.moveTo(x, y);mPath.lineTo(x -mLength/2, height / 2 + y);mPath.lineTo(x, height+y);mPath.lineTo(x + mLength, height +y);mPath.lineTo((float) (x + 1.5*mLength), height / 2+y);mPath.lineTo(x + mLength, y);mPath.lineTo(x, y);mPath.close();}
然后再给个循环,来绘制第二行的六边形
for(int i = 0;i<2;i++){float offset = mLength * 3 * i ;float x = mLength*2 + offset;float y = height/2;getPath(height,x,y);}canvas.drawPath(mPath,mPaint);
得到如下的效果。
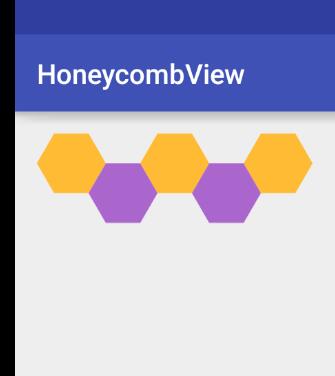
现在ondraw的全部代码如下:
@Overrideprotected void onDraw(Canvas canvas) {mPaint.setColor(Color.parseColor("#FFBB33"));//正六边形的高float height = (float) (Math.sqrt(3)*mLength);for(int i = 0 ; i < 3;i++) {//横坐标偏移量float offset = mLength * 3 * i ;//左上角的xfloat x = mLength/2 + offset;float y = 0;getPath(height, x, y);}canvas.drawPath(mPath,mPaint);mPath.reset();mPaint.setColor(Color.parseColor("#AA66CC"));for(int i = 0;i<2;i++){float offset = mLength * 3 * i ;float x = mLength*2 + offset;float y = height/2;getPath(height,x,y);}canvas.drawPath(mPath,mPaint);}
接下来对每行的个数进行一下控制。
//每行的个数private int mColumnsCount = 3;//行数private int mLineCount = 3;
对应的循环也改变,最外面套一个大循环,来控制多行绘制
for (int j = 0; j < mLineCount; j++) {if(j%2 == 0) 绘制奇数行 else 绘制偶数行}
现在整个ondraw如下。
@Overrideprotected void onDraw(Canvas canvas) {//正六边形的高float height = (float) (Math.sqrt(3) * mLength);for (int j = 0; j < mLineCount; j++) {if (j % 2 == 0) {mPaint.setColor(Color.parseColor("#FFBB33"));for (int i = 0; i < mColumnsCount; i++) {//横坐标偏移量float offset = mLength * 3 * i;//左上角的xfloat x = mLength / 2 + offset;float y = j * height / 2;getPath(height, x, y);}canvas.drawPath(mPath, mPaint);mPath.reset();} else {mPaint.setColor(Color.parseColor("#AA66CC"));for (int i = 0; i < mColumnsCount; i++) {float offset = mLength * 3 * i;float x = mLength * 2 + offset;float y = (height / 2) * j;getPath(height, x, y);}canvas.drawPath(mPath, mPaint);mPath.reset();}}}
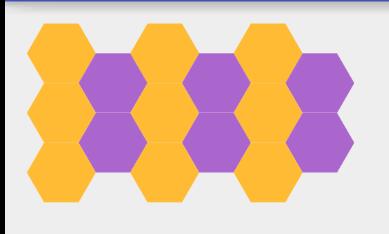
好像颜色一样就不好看了。。那我们来动态改变一下颜色..
添加一个属性list来存放color
private ArrayList<Integer> mColorList;
mColorList = new ArrayList<>();mColorList.add(Color.parseColor("#33B5E5"));mColorList.add(Color.parseColor("#AA66CC"));mColorList.add(Color.parseColor("#99CC00"));mColorList.add(Color.parseColor("#FFBB33"));mColorList.add(Color.parseColor("#FF4444"));
在循环中,取出颜色值
for (int j = 0; j < mLineCount; j++) {mPaint.setColor(mColorList.get(j));
效果如下:
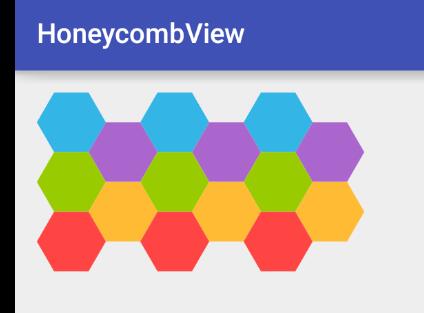
嗯。。看起来像一点样子了。。。 给中间加点文字吧。。
先给每个蜂窝编号
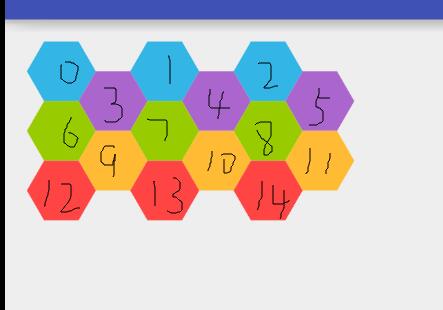
按上面的循环 j为行数 i为列数
研究规律发现 编号等于 j3 + i *
我们有六边形左上角的坐标xy 可以轻易的计算出中心坐标
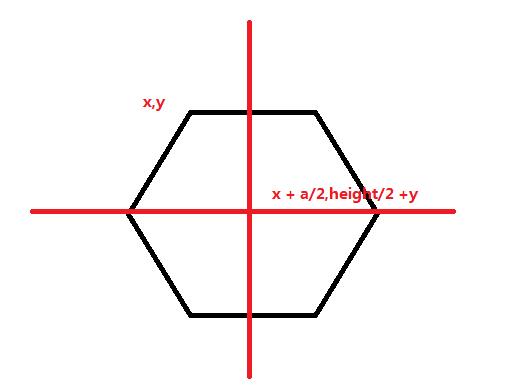
这些都有了。开一个list存放中间的文字:
//存放文字的listprivate ArrayList<String> mTextList ;
在初始化的时候给添加点数据
mTextList = new ArrayList<>();for(int i =0;i<mLineCount*mColumnsCount;i++){mTextList.add("wing "+i);}mTextPaint = new Paint();mTextPaint.setTextSize(20);
绘制文字: 这里要注意他和path的绘制顺序,如果path后绘制则会覆盖掉文字
float txtLength = mTextPaint.measureText(mTextList.get(txtId));canvas.drawText(mTextList.get(txtId),x+mLength/2-txtLength/2,y+height/2+5, mTextPaint);
下面是全部的ondraw
@Overrideprotected void onDraw(Canvas canvas) {//正六边形的高float height = (float) (Math.sqrt(3) * mLength);for (int j = 0; j < mLineCount; j++) {mPaint.setColor(mColorList.get(j));if (j % 2 == 0) {// mPaint.setColor(Color.parseColor("#FFBB33"));for (int i = 0; i < mColumnsCount; i++) {int txtId = j*3 +i;//横坐标偏移量float offset = mLength * 3 * i;//左上角的xfloat x = mLength / 2 + offset;float y = j * height / 2;mPath.reset();getPath(height, x, y);canvas.drawPath(mPath, mPaint);float txtLength = mTextPaint.measureText(mTextList.get(txtId));canvas.drawText(mTextList.get(txtId),x+mLength/2-txtLength/2,y+height/2+5, mTextPaint);}} else {// mPaint.setColor(Color.parseColor("#AA66CC"));for (int i = 0; i < mColumnsCount; i++) {int txtId = j*3 +i;float offset = mLength * 3 * i;float x = mLength * 2 + offset;float y = (height / 2) * j;mPath.reset();getPath(height, x, y);canvas.drawPath(mPath, mPaint);float txtLength = mTextPaint.measureText(mTextList.get(txtId));canvas.drawText(mTextList.get(txtId),x+mLength/2-txtLength/2,y+height/2+5, mTextPaint);}}}}
现在的效果图如下:

好,那现在让他灵活一点。添加各种set方法,比如行数啊 列数啊 边长啊 文字内容啊 颜色啊之类的。
/*** 设置列数* @param mColumnsCount*/public void setColumnsCount(int mColumnsCount) {this.mColumnsCount = mColumnsCount;invalidate();}/*** 设置行数* @param mLineCount*/public void setLineCount(int mLineCount) {this.mLineCount = mLineCount;invalidate();}/*** 设置文本数据*/public void setTextList(ArrayList<String> textList) {mTextList.clear();mTextList.addAll(textList);invalidate();}/*** 设置颜色数据* @param colorList*/public void setColorList(ArrayList<Integer> colorList) {mColorList.clear();mColorList.addAll(colorList);invalidate();}
然后 你有没有忘记测量呢? 只要把最外面的矩形大小给他就行
@Overrideprotected void onMeasure(int widthMeasureSpec, int heightMeasureSpec) {int widthSize = MeasureSpec.getSize(widthMeasureSpec);int widthMode = MeasureSpec.getMode(widthMeasureSpec);int heightSize = MeasureSpec.getSize(heightMeasureSpec);int heightMode = MeasureSpec.getMode(heightMeasureSpec);if(widthMode == MeasureSpec.AT_MOST){widthSize = (int) ((3f*mColumnsCount+0.5f) *mLength);}else{// throw new IllegalStateException("only support wrap_content");}if(heightMode == MeasureSpec.AT_MOST){heightSize = (int) ((mLineCount/2f +0.5f) * (Math.sqrt(3) * mLength));}else{// throw new IllegalStateException("only support wrap_content");}setMeasuredDimension(widthSize,heightSize);}
这下使用wrap_content 来看看view的大小:

嗯。。测量也对着。。。 这里我只实现了wrap_content 大家可以以及扩展 让他支持EXACTLY
这样 一个蜂窝煤的view 就完成了。。。但是好像没鸟用的样子。。因为没有交互的话。。图片完全可以代替。所以这次就先遗留一个问题,事件的处理。其实逻辑也不是很复杂,就是判断触摸点 是否在Path内,如果action_up的时候在,分开编号,按照编号进行回调即可,这个问题,准备下篇博客解决,请大家继续关注我的博客 蟹蟹!。
本项目地址:点击打开链接
如果你觉得我写的还不错,请点击一下顶,继续关注我。谢谢!!
