11.2.6 案例:使用Lucene索引和检索
在熟悉了Lucene的常用API之后,看一个使用Lucene对文本数据进行索引和检索的完整案例,这对读者掌握Lucene的用法非常有帮助。案例代码如下:
- 1 import java.io.File;
- 2 import java.io.IOException;
- 3 import org.apache.lucene.analysis.Analyzer;
- 4 import org.apache.lucene.document.Document;
- 5 import org.apache.lucene.document.Field;
- 6 import org.apache.lucene.document.TextField;
- 7 import org.apache.lucene.index.IndexReader;
- 8 import org.apache.lucene.index.IndexWriter;
- 9 import org.apache.lucene.index.IndexWriterConfig;
- 10 import org.apache.lucene.queryparser.classic.QueryParser;
- 11 import org.apache.lucene.search.IndexSearcher;
- 12 import org.apache.lucene.search.Query;
- 13 import org.apache.lucene.search.ScoreDoc;
- 14 import org.apache.lucene.search.TopDocs;
- 15 import org.apache.lucene.store.Directory;
- 16 import org.apache.lucene.store.FSDirectory;
- 17 import org.apache.lucene.util.Version;
- 18 import org.wltea.analyzer.lucene.IKAnalyzer;
- 19
- 20 /**
- 21 * Lucene的基本使用示例
- 22 *
- 23 * @author liufeng
- 24 * @date 2013-12-1
- 25 */
- 26 public class LuceneTest {
- 27 // 索引存储位置
- 28 private String indexDir = "F:/indexDir";
- 29 // Field名称
- 30 private String fieldName = "content";
- 31
- 32 /**
- 33 * 创建索引
- 34 *
- 35 * @param analyzer 分词器
- 36 * @throws IOException
- 37 */
- 38 public void createIndex(Analyzer analyzer) throws IOException {
- 39 // 待索引的文本数据
- 40 String[] contentArr = {
- 41 "考进清华北大是许多人的梦想",
- 42 "清华是中国著名高等学府",
- 43 "清华大学是世界上最美丽的大学之一"
- 44 };
- 45 // 创建或打开索引目录
- 46 Directory directory = FSDirectory.open(new File(indexDir));
- 47 // 创建IndexWriter
- 48 IndexWriterConfig conf = new IndexWriterConfig(Version.LUCENE_46, analyzer);
- 49 IndexWriter indexWriter = new IndexWriter(directory, conf);
- 50 // 遍历数组创建索引
- 51 for (String text : contentArr) {
- 52 // 创建document并添加field
- 53 Document document = new Document();
- 54 document.add(new TextField(fieldName, text, Field.Store.YES));
- 55 // 将document添加到索引中
- 56 indexWriter.addDocument(document);
- 57 }
- 58 indexWriter.commit();
- 59 indexWriter.close();
- 60 directory.close();
- 61 }
- 62
- 63 /**
- 64 * 从索引中检索
- 65 *
- 66 * @param sentence 检索语句
- 67 * @param analyzer 分词器
- 68 * @throws Exception
- 69 */
- 70 public void searchIndex(String sentence, Analyzer analyzer) throws Exception {
- 71 // 创建或打开索引目录
- 72 Directory directory = FSDirectory.open(new File(indexDir));
- 73 IndexReader reader = IndexReader.—open——(directory);
- 74 IndexSearcher searcher = new IndexSearcher(reader);
- 75 // 使用查询解析器创建Query
- 76 QueryParser parser = new QueryParser(Version.LUCENE_46, fieldName, analyzer);
- 77 Query query = parser.parse(sentence);
- 78 // 输出解析后的查询语句
- 79 System.out.println("查询语句:" + query.toString());
- 80 // 从索引中搜索得分排名前10的文档
- 81 TopDocs topDocs = searcher.search(query, 10);
- 82 ScoreDoc[] scoreDoc = topDocs.scoreDocs;
- 83 System.out.println("共检索到" + topDocs.totalHits + "条匹配结果");
- 84 for (ScoreDoc sd : scoreDoc) {
- 85 // 根据id获取document
- 86 Document d = searcher.doc(sd.doc);
- 87 System.out.println(d.get(fieldName) + " score:" + sd.score);
- 88 // 查看文档得分解析
- 89 System.out.println(searcher.explain(query, sd.doc));
- 90 }
- 91 reader.close();
- 92 directory.close();
- 93 }
- 94
- 95 public static void main(String[] args) throws Exception {
- 96 // 创建分词器
- 97 Analyzer analyzer = new IKAnalyzer(true);
- 98
- 99 LuceneTest luceneTest = new LuceneTest();
- 100 // 创建索引
- 101 luceneTest.createIndex(analyzer);
- 102 // 从搜索中检索
- 103 luceneTest.searchIndex("梦想上清华", analyzer);
- 104 }
- 105 }
上述示例一共有3个方法:createIndex()、searchIndex()和main(),分别用于对文本数据创建索引、从索引文件中检索和主测试方法。示例中的关键代码说明如下:
第40~44行:以数组的形式定义了3条测试数据,作为Lucene的数据源。
第46行:指定了索引的存储位置F:\indexDir,并打开索引目录。
第48~49行:根据IndexWriterConfig创建索引器,指定了Lucene的版本、分词器和索引目录。
第51~57行:遍历数据源,构造Document,并将其添加到索引文件中。
第58行:commit是指将所有的更改(添加或删除文档、索引优化、合并等)同步到索引文件中。commit操作非常耗资源,当数据源特别大的时候,需要根据实际情况考虑多久提交一次。
第59~60行:索引创建完成后,需要关闭、释放相关的资源。
第76~77行:使用查询解析器将查询文本解析成Lucene能够识别的Query。参数fieldName表示所检索的域,可以这样理解:假如文章有标题、作者和正文,fieldName表示按文章的哪个属性检索。参数sentence是查询文本,也就是用户输入的自然语言。
第79行:为了便于理解,可以通过query.toString()方法打印出解析后的查询语句。
第81~83行:search()方法根据Query从索引文件中检索符合条件的document,最多返回得分排名最高的10条document。search()方法的返回结果是TopDocs对象,可以从中取出所有得分文档和总检索结果数。
第84~90行:遍历检索得到的得分文档数组,并且将每个得分文档的域值和得分打印出来。为了便于理解和分析文档得分,可以使用explain()方法将每个文档得分的解释打印出来。
第95~104行:首先创建了IK分词器对象,分词模式采用的是智能切分,并在索引和检索时都使用该分词器(索引和检索可以使用不同的分词器,但一般不建议这么做);接着调用了索引创建方法;最后从索引文件中检索与“梦想上清华”有关的document。
上述示例依赖于如下3个JAR包:
- IKAnalyzer2012FF_u1.jar
- lucene-core-4.6.0.jar
- lucene-queryparser-4.6.0.jar
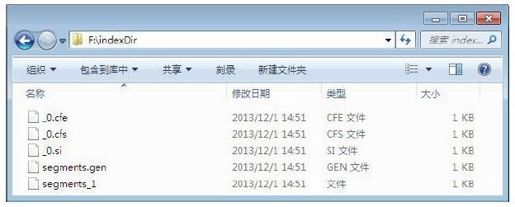
示例运行完成后,能够在F:\indexDir中看到生成的索引文件,如图11-4所示。

图11-4 Lucene的索引文件
示例的运行结果如下:
- 1 查询语句:content:梦想 content:上 content:清华
- 2 共检索到2条匹配结果
- 3 清华是中国著名高等学府 score:0.09966161
- 4 0.09966161 = (MATCH) product of:
- 5 0.29898483 = (MATCH) sum of:
- 6 0.29898483 = (MATCH) weight(content:清华 in 1) [DefaultSimilarity], result of:
- 7 0.29898483 = score(doc=1,freq=1.0 = termFreq=1.0
- 8 ), product of:
- 9 0.4862404 = queryWeight, product of:
- 10 1.4054651 = idf(docFreq=1, maxDocs=3)
- 11 0.34596404 = queryNorm
- 12 0.614891 = fieldWeight in 1, product of:
- 13 1.0 = tf(freq=1.0), with freq of:
- 14 1.0 = termFreq=1.0
- 15 1.4054651 = idf(docFreq=1, maxDocs=3)
- 16 0.4375 = fieldNorm(doc=1)
- 17 0.33333334 = coord(1/3)
- 18
- 19 考进清华北大是许多人的梦想 score:0.08542424
- 20 0.08542424 = (MATCH) product of:
- 21 0.2562727 = (MATCH) sum of:
- 22 0.2562727 = (MATCH) weight(content:梦想 in 0) [DefaultSimilarity], result of:
- 23 0.2562727 = score(doc=0,freq=1.0 = termFreq=1.0
- 24 ), product of:
- 25 0.4862404 = queryWeight, product of:
- 26 1.4054651 = idf(docFreq=1, maxDocs=3)
- 27 0.34596404 = queryNorm
- 28 0.5270494 = fieldWeight in 0, product of:
- 29 1.0 = tf(freq=1.0), with freq of:
- 30 1.0 = termFreq=1.0
- 31 1.4054651 = idf(docFreq=1, maxDocs=3)
- 32 0.375 = fieldNorm(doc=0)
- 33 0.33333334 = coord(1/3)
可以看到,共检索到两条符合查询条件的文档。上述运行结果的解释说明如下。
第1行:query.toString()的输出结果,它是QueryParser对查询文本“梦想上清华”解析的结果。可以看出,查询文本被解析成了3个查询条件,即检索content域中包含“梦想”、“上”或“清华”这3个Term(词语)的所有文档,这3个查询条件是布尔或的关系,因此,通过QueryParser得到的Query与下面的布尔查询等价:
- // 创建3个TermQuery(词条搜索)
- Query termQuery1 = new TermQuery(new Term("content", "梦想"));
- Query termQuery2 = new TermQuery(new Term("content", "上"));
- Query termQuery3 = new TermQuery(new Term("content", "清华"));
- // 创建BooleanQuery(布尔搜索)
- BooleanQuery booleanQuery = new BooleanQuery();
- booleanQuery.add(termQuery1, BooleanClause.Occur.SHOULD);
- booleanQuery.add(termQuery2, BooleanClause.Occur.SHOULD);
- booleanQuery.add(termQuery3, BooleanClause.Occur.SHOULD);
其中,BooleanClause.Occur有3个常量:MUST、MUST_NOT和SHOULD,分别表示必须包含、不能包含和可以包含。
第2行:输出了符合查询条件的文档总数。
第3行和第19行:示例代码System.out.println(d.get(fieldName)+“score:”+sd.score)的输出结果,d.get(fieldName)表示取出得分文档中content域的值,sd.score表示文档的得分,Lucene的检索结果正是按照文档得分进行排序,得到越高,就表示查询文本与检索结果文档的相似度越高。
第4~17行、第20~33行:每个匹配文档得分的解释说明,11.2.5节详细介绍了Lucene的评分机制,读者可以对照着这部分内容进行理解。
从文档得分说明中还能够得知每个文档是因为包含了哪些Term才被匹配到的。因为查询条件是只要包含“梦想”、“上”、“清华”3个Term中的任意一个就满足要求,而“清华是中国著名高等学府”中包含“清华”、“考进清华北大是许多人的梦想”中包含“梦想”,所以,这两篇文档都满足要求。可能读者会有这样的疑问:另外一条数据“清华大学是世界上最美丽的大学之一”中也包含“清华”两个字,为什么没有匹配到?这是因为示例所采用的分词模式是智能切分,“清华大学”被切分成一个词,在索引文件中,该数据所对应的document并不包含“清华”这个词。如果将示例中的查询文本修改为“梦想上清华大学”,那么这条数据就能够被匹配到。
