8.4 GridView控件的基本操作
GridView控件的功能非常强大,因此操作技巧也很多,下面就一些常用的基本操作技巧做一些阐述。
8.4.1 数据分页
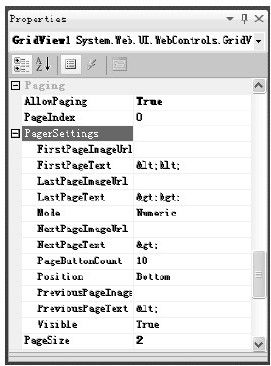
GridView控件自带了分页功能,只需要将AllowPaging属性设置为true就开启了分页功能,如图8-9所示。
图 8-9 分页属性设置
默认情况下,它的页面尺寸PageSize属性为10,可以根据自己的需要来设置它。当然,还可以通过展开PagerSettings属性来设置分页的样式外观与位置,等等。如果GridView控件是采用后台数据绑定的方式,那么还需要为它添加一个PageIndexChanging事件。如下面的示例所示:
<asp:GridView ID="GridView1"runat="server"
AutoGenerateColumns="False"Width="480px"
BorderColor="Blue"
HeaderStyle-BackColor="#cccccc"
RowStyle-BorderWidth="1px"
RowStyle-BorderColor="Blue"
AllowPaging="true"
OnPageIndexChanging="GridView1_PageIndexChanging"
PageSize="2">
<Columns>
<asp:BoundField DataField="employeeid"
HeaderText="编号"/>
<asp:BoundField DataField="employeename"HeaderText="姓名"/>
<asp:BoundField DataField="department"HeaderText="部门"/>
<asp:BoundField DataField="salary"HeaderText="工资"
DataFormatString="{0:C}"/>
</Columns>
</asp:GridView>
后台的protected void GridView1_PageIndexChanging(object sender, GridViewPageEventArgs e)事件处理代码如下所示:
protected void Page_Load(object sender, EventArgs e)
{
if(!IsPostBack)
{
Bind();
}
}
private void Bind()
{
GridView1.DataSource=
DbHelper.Instance.CreateDataTable(CommandType.Text,
"select a.employeeid, a.employeename, a.department, b.salary
from employee a, salary b
where a.employeeid=b.employeeid");
GridView1.DataBind();
}
protected void GridView1_PageIndexChanging(object sender,
GridViewPageEventArgs e)
{
this.GridView1.PageIndex=e.NewPageIndex;
Bind();
}
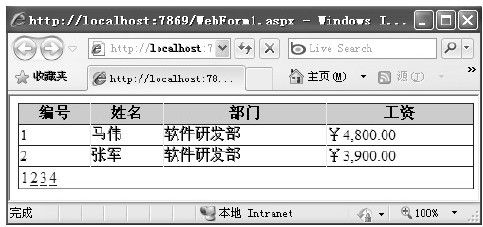
示例运行结果如图8-10所示。
图 8-10 分页示例运行结果
8.4.2 数据排序
GridView控件自带了排序功能,只需要将AllowSorting属性设置为true就开启了排序功能。接下来只需要对需要排序的列加上一个SortExpression属性就可以了。如下面的代码所示:
<asp:BoundField DataField="employeeid"HeaderText="编号"
SortExpression="employeeid"/>
<asp:BoundField DataField="employeename"HeaderText="姓名"
SortExpression="employeename"/>
<asp:BoundField DataField="department"HeaderText="部门"
SortExpression="department"/>
<asp:BoundField DataField="salary"HeaderText="工资"
DataFormatString="{0:C}"SortExpression="salary"/>
如果GridView控件是采用后台数据绑定的方式,那么还需要为它添加一个Sorting事件。事件处理代码如下所示:
protected void GridView1_Sorting(object sender,
GridViewSortEventArgs e)
{
string sortExpression=e.SortExpression;
if(GridViewSortDirection==SortDirection.Ascending)
{
GridViewSortDirection=SortDirection.Descending;
SortGridView(sortExpression,"DESC");
}
else
{
GridViewSortDirection=SortDirection.Ascending;
SortGridView(sortExpression,"ASC");
}
}
public SortDirection GridViewSortDirection
{
get
{
if(ViewState["sortDirection"]==null)
{
ViewState["sortDirection"]=SortDirection.Ascending;
}
return(SortDirection)ViewState["sortDirection"];
}
set
{
ViewState["sortDirection"]=value;
}
}
private void SortGridView(string sortExpression, string direction)
{
DataTable dt=
DbHelper.Instance.CreateDataTable(CommandType.Text,
"select a.employeeid, a.employeename, a.department,
b.salary from employee a, salarybwhere
a.employeeid=b.employeeid");
DataView dv=new DataView(dt);
dv.Sort=sortExpression+direction;
GridView1.DataSource=dv;
GridView1.DataBind();
}
其中,GridViewSortDirection是一个简单的属性,它使用ViewState(视图状态)来保存每次排序的方向。
而在GridView1_Sorting事件中,首先要得到用户单击要排序列的标题,然后判断当前GridViewSortDirection的属性值。如果已经是升序,则将GridViewSortDirection设置为降序,并调用一个SortGridView()方法。在SortGridView()方法中将要排序的数据转换为DataView并进行排序,最后再将排好序的DataView绑定到GridView1控件上。
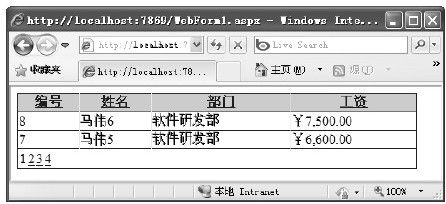
示例运行结果如图8-11所示。
图 8-11 排序示例运行结果
8.4.3 创建空表头
在GridView控件中,当绑定的数据源为空(即GridView.DataSource=null)时,将不能显示出GridView控件的表头。但有时因为客户的需要,要求数据源为空时,必须要显示一个数据表头结构。这时,就需要进行相关的处理来满足其需求。通常,处理方法有如下三种:
1)采用EmptyDataTemplate来实现,在模板中写一个静态的Table。如果表头只是html的文本,没有任何控件,则可以在表头显示出来的时候,复制表头部分的html,然后放到EmptyDataTemplate模板里面。如下面的示例代码所示:
<asp:GridView ID="GridView1"runat="server"
AutoGenerateColumns="False"Width="480px"
BorderColor="Blue"HeaderStyle-BackColor="#cccccc"
RowStyle-BorderWidth="1px"
RowStyle-BorderColor="Blue">
<Columns>
<asp:BoundField DataField="employeeid"HeaderText="编号"/>
<asp:BoundField DataField="employeename"HeaderText="姓名"/>
<asp:BoundField DataField="department"HeaderText="部门"/>
<asp:BoundField DataField="salary"HeaderText="工资"
DataFormatString="{0:C}"/>
</Columns>
<EmptyDataTemplate>
<asp:Table ID="Table1"runat="server"rules="all"
Style="width:480px;border-color:Blue;">
<asp:TableRow HorizontalAlign="Center">
<asp:TableCell Style="border-color:#CCCCCC">
编号</asp:TableCell>
<asp:TableCell Style="border-color:#CCCCCC">
姓名</asp:TableCell>
<asp:TableCell Style="border-color:#CCCCCC">
部门</asp:TableCell>
<asp:TableCell Style="border-color:#CCCCCC">
工资</asp:TableCell>
</asp:TableRow>
</asp:Table>
</EmptyDataTemplate>
</asp:GridView>
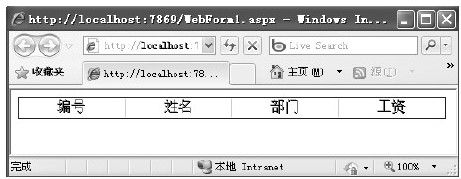
示例运行结果如图8-12所示。
图 8-12 使用EmptyDataTemplate创建空表头示例运行结果
2)如果数据源为DataTable,可以始终返回一个空行的DataTable;如果数据源是集合类((ArayList、List<T>等),可以生成一个空的实体加入到集合类中。
3)还可以通过扩展GridView控件类来实现,即自定义一个GridView控件类,并继承于System.Web.UI.WebControls.GridView。在自定义的GridView类中重写Render方法,当其数据源为空时做一下处理就可以了。自定义示例可以参考如下代码:
using System;
using System.Collections.Generic;
using System.Data;
using System.Web;
using System.Web.UI;
using System.Web.UI.WebControls;
namespace_8_1
{
public class MyGridView:System.Web.UI.WebControls.GridView
{
private bool_enableEmptyContentRender=true;
///<summary>
///是否数据为空时显示标题行
///</summary>
public bool EnableEmptyContentRender
{
set{_enableEmptyContentRender=value;}
get{return_enableEmptyContentRender;}
}
private string_TableCellCssClass;
///<summary>
///为空时单元格样式类
///</summary>
public string TableHeaderCssClass
{
set{_TableCellCssClass=value;}
get{return_TableCellCssClass;}
}
///<summary>
///为空时输出内容
///</summary>
///<param name="writer"></param>
protected virtual void RenderEmptyContent(
HtmlTextWriter writer)
{
Table t=new Table();
t.CssClass=this.CssClass;
t.GridLines=this.GridLines;
t.BorderStyle=this.BorderStyle;
t.BorderWidth=this.BorderWidth;
t.CellPadding=this.CellPadding;
t.CellSpacing=this.CellSpacing;
t.HorizontalAlign=this.HorizontalAlign;
t.Width=this.Width;
t.CopyBaseAttributes(this);
TableRow row=new TableRow();
t.Rows.Add(row);
foreach(DataControlFieldfin this.Columns)
{
TableCell cell=new TableCell();
cell.Text=f.HeaderText;
cell.CssClass=this._TableCellCssClass;
row.Cells.Add(cell);
}
t.RenderControl(writer);
}
protected override void Render(HtmlTextWriter writer)
{
if(_enableEmptyContentRender&&((tis.Rows.Count==0
||this.Rows[0].RowType==
DataControlRowType.EmptyDataRow))
{
RenderEmptyContent(writer);
}
else
{
base.Render(writer);
}
}
}
}
现在,就可以在页面引用自己的MyGridView控件。如下面的代码所示:
<cc1:MyGridView ID="GridView1"runat="server"
AutoGenerateColumns="False"Width="480px"
BorderColor="Blue"HeaderStyle-BackColor="#cccccc"
RowStyle-BorderWidth="1px"
RowStyle-BorderColor="Blue">
<Columns>
……
</Columns>
</cc1:MyGridView>
关于更多的自定义控件的内容,将在本书后面用一章的内容来详细阐述,读者可以参考学习。
8.4.4 编辑数据
GridView控件自带了编辑功能,只需要将AutoGenerateEditButton属性设置为true就开启了默认的编辑功能。但在一般情况下,为了能够更好地控制编辑按钮,采用CommandField字段列的形式来添加编辑按钮。
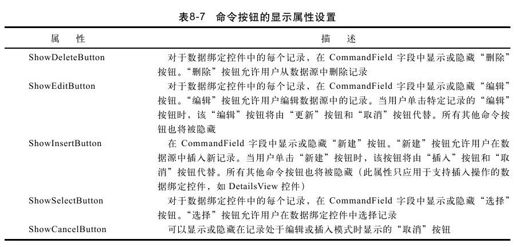
CommandField类是一个特殊字段,由数据绑定控件(如GridView和DetailsView)使用以显示执行删除、编辑、插入或选择操作的命令按钮。执行这些操作的命令按钮可以通过使用表8-7中显示的属性来显示或隐藏。
若要指定要显示的按钮类型,就必须使用ButtonType属性。当ButtonType属性设置为ButtonType.Button或ButtonType.Link时,可以通过设置表8-8中的属性来指定按钮显示的文本。
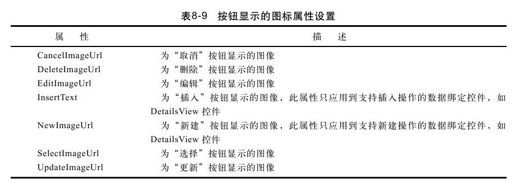
当ButtonType属性设置为ButtonType.Image时,可以通过设置表8-9中的属性来指定按钮显示的图标。
CommandField列字段的设置示例如下所示:
<asp:CommandField EditText="编辑"CancelText="取消"
UpdateText="修改"ShowEditButton="True"/>
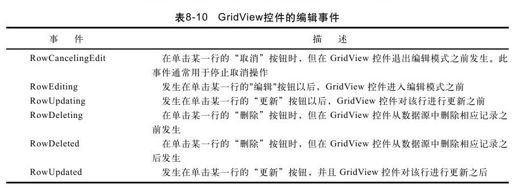
在GridView控件中,如果GridView控件是采用后台数据绑定的方式,那么除了添加这些CommandField字段列外,还需要为它们添加相关事件来进行处理。这些编辑事件如表8-10所示。
最后,为了方便在后台事件程序里获取相关的主键值,还需要在GridView标签里添加一个DataKeyNames属性。完整的演示示例如下面的代码所示:
<asp:GridView ID="GridView1"runat="server"
AutoGenerateColumns="False"Width="480px"
CellPadding="4"ForeColor="#333333"AllowPaging="true"
OnPageIndexChanging="GridView1_PageIndexChanging"
OnRowCancelingEdit="GridView1_RowCancelingEdit"
OnRowDeleting="GridView1_RowDeleting"
OnRowEditing="GridView1_RowEditing"
OnRowUpdating="GridView1_RowUpdating"
DataKeyNames="employeeid"PageSize="2">
<Columns>
<asp:BoundField DataField="employeeid"HeaderText="编号"
ReadOnly="true"/>
<asp:BoundField DataField="employeename"HeaderText="姓名">
<ControlStyle Width="50px"/>
</asp:BoundField>
<asp:BoundField DataField="department"HeaderText="部门">
<ControlStyle Width="50px"/>
</asp:BoundField>
<asp:BoundField DataField="salary"HeaderText="工资"
DataFormatString="{0:C}"ReadOnly="true"/>
<asp:CommandField EditText="编辑"CancelText="取消"
UpdateText="修改"ShowEditButton="True"HeaderText="编辑"/>
<asp:CommandField DeleteText="删除"ShowDeleteButton="True"
HeaderText="删除"/>
</Columns>
<FooterStyle BackColor="#990000"Font-Bold="True"
ForeColor="White"/>
<RowStyle ForeColor="#000066"/>
<PagerStyle BackColor="White"ForeColor="#000066"
HorizontalAlign="Left"/>
<HeaderStyle BackColor="#006699"Font-Bold="True"
ForeColor="White"/>
</asp:GridView>
在上面的GridView控件中,分别添加了4个编辑事件((GidView1_RowCancelingEdit、GridView1_RowDeleting、GridView1_RowEditing与GridView1_RowUpdating)来处理数据的编辑与删除功能。其中,ControlStyle标签用于控制在编辑模式下编辑框的样式。事件的处理代码如下所示:
protected void GridView1_RowCancelingEdit(object sender,
GridViewCancelEditEventArgs e)
{
this.GridView1.EditIndex=-1;
Bind();
}
protected void GridView1_RowEditing(object sender,
GridViewEditEventArgs e)
{
this.GridView1.EditIndex=e.NewEditIndex;
this.GridView1.EditRowStyle.BackColor=Color.GreenYellow;
Bind();
}
protected void GridView1_RowDeleting(object sender,
GridViewDeleteEventArgs e)
{
DbHelper.Instance.ExecuteNonQuery(CommandType.Text,
"delete from employee where employeeid="
+Convert.ToInt32((tis.GridView1.DataKeys[e.RowIndex].Value));
this.GridView1.EditIndex=-1;
Bind();
}
protected void GridView1_RowUpdating(object sender,
GridViewUpdateEventArgs e)
{
int employeeid=
Convert.ToInt32((tis.GridView1.DataKeys[e.RowIndex].Value);
string employeename=(((TxtBox)((GidView1.Rows
[e.RowIndex].Cells[1].Controls[0])).Text.ToString();
string department=(((TxtBox)((GidView1.Rows
[e.RowIndex].Cells[2].Controls[0])).Text.ToString();
DbHelper.Instance.ExecuteNonQuery(CommandType.Text,
"update employee set employeename='"+employeename
+"',department='"+department
+"'where employeeid="+employeeid);
this.GridView1.EditIndex=-1;
Bind();
}
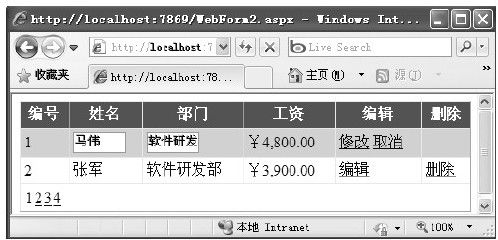
示例运行结果如图8-13所示。
图 8-13 编辑示例运行结果
