8.6 GridView模板
与其他数据控件一样,GridView控件也支持模板列。可以通过TemplateField来为GridView控件中的每一列定义一个完全定制的模板。可以在该模板中加入控件标签、任意的html元素以及数据绑定表达式等。可以说,在模板中完全可以按照自己的方式来布置一切,想怎么布置就怎么布置,与设计页面一样方便。
例如,可以使用GridView的模板列技术将上面的员工信息表换成另外一种排版方式进行显示。如下面的代码所示:
<asp:GridView ID="GridView1"runat="server"
AutoGenerateColumns="False"Width="480px"
AllowPaging="true"PageSize="2"
OnPageIndexChanging="GridView1_PageIndexChanging">
<Columns>
<asp:TemplateField HeaderText="员工信息表">
<ItemTemplate>
<b>
<%#Eval("employeeid")%>
-
<%#Eval("employeename")%>
</b>
<hr/>
<small><i>部门:<%#Eval("department")%><br/>
邮箱:<%#Eval("email")%><br/>
工资:<%#Eval("salary","{0:C}")%><br/>
</i></small>
</ItemTemplate>
</asp:TemplateField>
</Columns>
<HeaderStyle BackColor="#006699"Font-Bold="True"
ForeColor="White"/>
</asp:GridView>
这样,当绑定GridView后,GridView会从数据源获取数据并循环处理项目的集合,为每个项目处理ItemTemplate,计算其中的数据绑定表达式,并把生成的html加到表中。
这里的表达式使用了Eval()方法,它是System.Web.UI.DataBinder类的一个静态方法。Eval()方法的使用非常方便,它会自动读取绑定到当前行的数据项,使用反射找到匹配的字段(对于DataRow对象)或属性(对于自定义对象)并获得值。反射的过程稍微增加了一些负载,但不会给整个请求的处理增加很长时间。如果不使用Eval()方法,还可以使用Container.DataItem属性来访问数据对象。但在这里,建议使用Eval()方法。
除此之外,还可以在Eval()方法中加入一个格式化字符串来控制数据的显示格式。如下面的代码所示:
<%#Eval("salary","{0:C}")%>
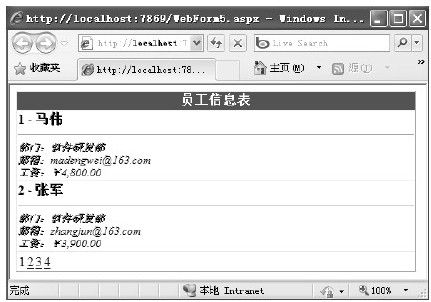
图 8-18 模板显示示例运行结果
示例运行结果如图8-18所示。
8.6.1 定义GridView模板
除了上面的ItemTemplate之外,GridView控件还支持许多其他的模板,如表8-11所示。这些模板可以使你对TemplateField对象的不同部分分别自定义模板。
在表8-11中,除了自定义HeaderTemplate或FooterTemplate模板以外,还可以通过设置TemplateField对象的其他属性来自定义TemplateField对象的标头和脚注部分。
若要在标头或脚注部分显示标题,请分别设置TemplateField对象的HeaderText或FooterText属性。当然,也可以通过设置HeaderImageUrl属性来显示图像,而不是在标头部分中显示文本。通过将ShowHeader属性设置为false,可以将标头部分隐藏在TemplateField对象中。通过将Visible属性设置为false,可以在数据绑定控件中隐藏TemplateField对象。
同样,也可以通过为字段的不同部件设置样式属性((CntrolStyle、FooterStyle、HeaderStyle与ItemStyle)来自定义TemplateField对象的外观(如字体颜色、背景颜色等)。
8.6.2 绑定方法
其实,使用模板的一个最大好处就是它允许你使用数据绑定表达式。可以在后台代码里根据需要定义相关方法,然后将此方法绑定到模板里,从而大大地增强程序设计的灵活性。
如下面的GetSalaryFlag()方法返回一个工资标志,如果工资小于3500,就返回一个红色的英文单词“Low”;如果工资大于6000,就返回一个红色的英文单词“High”。
protected string GetSalaryFlag(object item)
{
double salary=Convert.ToDouble(DataBinder.Eval(item,
"salary"). ToString());
if(salary<3500)
{
return"<b style=\"color:Red\">Low</b>";
}
else if(salary>6000)
{
return"<b style=\"color:Red\">High</b>";
}
else
{
return"";
}
}
定义好方法之后,就可以在模板里像使用Eval()方法一样使用GetSalaryFlag()方法。如下面的示例代码所示:
<asp:GridView ID="GridView1"runat="server"
AutoGenerateColumns="False"Width="480px"
AllowPaging="true"PageSize="2"
OnPageIndexChanging="GridView1_PageIndexChanging">
<Columns>
<asp:TemplateField HeaderText="员工信息表">
<ItemTemplate>
<b>
<%#GetSalaryFlag(Container.DataItem)%>
……
</asp:GridView>
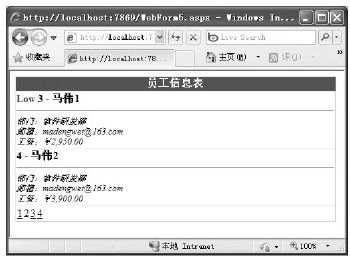
示例运行结果如图8-19所示。
图 8-19 绑定方法示例运行结果
8.6.3 处理事件
有时,可能会需要响应那些由模板列中的控件产生的事件。例如,修改上一节示例中的代码,不使用英文字母“Low”和“Hig h”来标识工资,而是使用ImageButton控件创建一组可单击的图片链接。针对这样的问题,可以这样来处理,如下面的代码所示:
<asp:TemplateField HeaderText="员工信息表">
<ItemTemplate>
<asp:ImageButton ID="ImageButton1"runat="server"
ImageUrl='<%#GetSalaryFlag(Container.DataItem)%>'/>
</ItemTemplate>
</asp:TemplateField>
这样的处理方法会存在一个问题,在模板中加入一个控件之后,GridView会为每个数据项创建一个该控件的副本。这样,当单击ImageButton控件时,需要通过这种方式确定被单击的图片属于哪一行。
解决这一问题的办法是使用GridView的事件而不是按钮事件。GridView.RowCommand事件就是起这个作用的,因为它在模板中的任意按钮被单击时发生。
当然,还是要借助某种方式向RowCommand事件传递信息以识别事件究竟发生在哪一行。这时,就要靠按钮控件的两个字符串属性:CommandName和CommandArgument。可以为CommandName属性设置一个描述性的名字从而区分当前的单击是发生在ImageButton上还是发生在GridView中的其他按钮上。CommandArgument属性则提供一段与行有关的信息,通过它可以区分被单击的行。可以通过数据绑定表达式提供这一信息。
根据上面的描述,现在就来修改一下模板里的ImageButton按钮控件。修改示例如下面的代码所示:
<asp:TemplateField HeaderText="员工信息表">
<ItemTemplate>
<asp:ImageButton ID="ImageButton1"runat="server"
ImageUrl='<%#GetSalaryFlag(Container.DataItem)%>'
CommandName="FlagClick"
CommandArgument='<%#Eval("employeeid")%>'/>
</ItemTemplate>
</asp:TemplateField>
定义好模板里的ImageButton按钮控件之后,就可以通过RowCommand事件来响应ImageButton按钮单击所需要的代码。如下面的示例代码所示:
protected void GridView1_RowCommand(object sender,
GridViewCommandEventArgs e)
{
if(e.CommandName=="FlagClick")
{
Label1.Text="你选择的员工编号是:"+e.CommandArgument;
}
}
8.6.4 使用模板编辑
使用模板进行数据编辑的方法很简单,只需要在EditItemTemplate模板里添加好相应的编辑文本框,而后在GridView控件里添加相关CommandField列,并处理相关的事件就可以了。如下面的示例代码所示:
<asp:GridView ID="GridView1"runat="server"
AutoGenerateColumns="False"Width="480px"
AllowPaging="true"PageSize="2"DataKeyNames="employeeid"
OnPageIndexChanging="GridView1_PageIndexChanging"
OnRowCancelingEdit="GridView1_RowCancelingEdit"
OnRowDeleting="GridView1_RowDeleting"
OnRowEditing="GridView1_RowEditing"
OnRowUpdating="GridView1_RowUpdating">
<Columns>
<asp:TemplateField HeaderText="员工信息表">
<ItemTemplate>
<b>
<%#Eval("employeeid")%>-
<%#Eval("employeename")%>
</b>
<hr/>
<small><i>部门:<%#Eval("department")%><br/>
邮箱:<%#Eval("email")%><br/>
工资:<%#Eval("salary","{0:C}")%><br/>
</i></small>
</ItemTemplate>
<EditItemTemplate>
<b>
<%#Eval("employeeid")%>-
<%#Eval("employeename")%>
</b>
<hr/>
<small><i>部门:<asp:TextBox ID="department"
runat="server"Text='<%#Bind("department")%>'
Width="80%"></asp:TextBox><br/>
邮箱:<asp:TextBox ID="email"runat="server"
Text='<%#Bind("email")%>'
Width="80%"></asp:TextBox><br/>
工资:<%#Eval("salary","{0:C}")%><br/>
</i></small>
</EditItemTemplate>
</asp:TemplateField>
<asp:CommandField ShowEditButton="True"
ShowDeleteButton="true"CancelText="取消"
UpdateText="更新"EditText="编辑"
DeleteText="删除"HeaderText="编辑">
<ItemStyle HorizontalAlign="Center"/>
</asp:CommandField>
</Columns>
<HeaderStyle BackColor="#006699"Font-Bold="True"
ForeColor="White"/>
</asp:GridView>
在这里需要注意的是,绑定一个编辑值到控件时,必须在数据绑定表达式中使用Bind()方法而不是通常的Eval()方法。只有Bind()方法才会创建双向链接,这样更新后的值才能回送到服务器。
其实,Bind()方法与Eval()方法有一些相似之处,但也存在很大的差异。虽然可以像使用Eval()方法一样地使用Bind()方法来检索数据绑定字段的值,但当数据可以被修改时,还是建议使用Bind()方法。
在ASP.NET中,如果采用的是数据源控件进行绑定的方式,那么数据绑定控件(如GridView、DetailsView和FormView控件)可自动使用数据源控件的更新、删除和插入操作。例如,如果已为数据源控件定义了SQL Select、Insert、Delete和Update语句,则通过使用GridView、DetailsView或FormView控件模板中的Bind()方法,就可以使控件从模板的子控件中提取值,并将这些值传递给数据源控件。然后数据源控件将执行适当的数据库命令。出于这个原因,在数据绑定控件的EditItemTemplate或InsertItemTemplate中要使用Bind()函数。
Bind方法通常与输入控件一起使用,例如由编辑模式中的GridView行所呈现的TextBox控件。当数据绑定控件将这些输入控件作为自身呈现的一部分创建时,该方法便可提取输入值。Bind方法采用数据字段的名称作为参数,从而与绑定属性关联。如下面的示例所示:
<asp:TextBox ID="email"runat="server"
Text='<%#Bind("email")%>'Width="80%">
</asp:TextBox><
GridView1_RowCancelingEdit、GridView1_RowEditing、GridView1_RowDeleting与GridView1_RowUpdating事件处理代码如下:
protected void GridView1_RowCancelingEdit(object sender,
GridViewCancelEditEventArgs e)
{
GridView1.EditIndex=-1;
Bind();
}
protected void GridView1_RowEditing(object sender,
GridViewEditEventArgs e)
{
GridView1.EditIndex=e.NewEditIndex;
Bind();
}
protected void GridView1_RowDeleting(object sender,
GridViewDeleteEventArgs e)
{
DbHelper.Instance.ExecuteNonQuery(CommandType.Text,
"delete from employee where employeeid="
+Convert.ToInt32((tis.GridView1.DataKeys
[e.RowIndex].Values["employeeid"].ToString()));
GridView1.EditIndex=-1;
Bind();
}
protected void GridView1_RowUpdating(object sender,
GridViewUpdateEventArgs e)
{
GridViewRow grid=GridView1.Rows[e.RowIndex];
int employeeid=Convert.ToInt32(
this.GridView1.DataKeys[e.RowIndex].Values
["employeeid"].ToString());
string email=
((((TxtBox)grid.FindControl("email")).Text).ToString();
string department=
((((TxtBox)grid.FindControl("department")).Text).ToString();
DbHelper.Instance.ExecuteNonQuery(CommandType.Text,
"update employee set email='"+email
+"',department='"+department
+"'where employeeid="+employeeid);
GridView1.EditIndex=-1;
Bind();
}
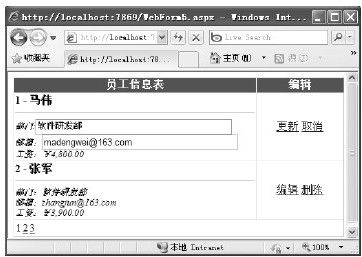
示例运行结果如图8-20所示。
图 8-20 使用模板编辑示例运行结果
除了可以使用CommandField列之外,还可以在EditItemTemplate模板里使用其他按钮控件来进行编辑。如下面的示例所示:
<EditItemTemplate>
<b>
<%#Eval("employeeid")%>
-
<%#Eval("employeename")%>
</b>
<hr/>
<small><i>部门:<asp:TextBox ID="department"runat="server"
Text='<%#Bind("department")%>'
Width="80%"></asp:TextBox><br/>
邮箱:<asp:TextBox ID="email"runat="server"
Text='<%#Bind("email")%>'Width="80%">
</asp:TextBox><br/>
工资:<%#Eval("salary","{0:C}")%><br/>
</i></small>
<asp:LinkButton runat="server"Text="修改"
CommandName="Update"ID="cmdUpdate"></asp:LinkButton>
<asp:LinkButton runat="server"Text="取消"
CommandName="Cancel"ID="cmdCancel"></asp:LinkButton>
</EditItemTemplate>


