8.7 GridView的常用编程技巧
上面几节阐述了GridView控件的基础知识与相关基础编程操作,本节将重点阐述GridView控件日常使用中最常见的几种编程操作技巧。
8.7.1 GridView实现多表头
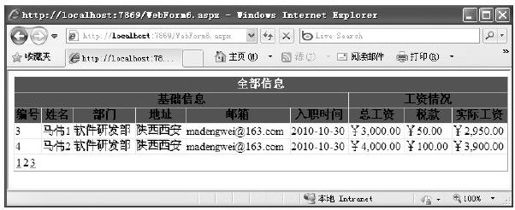
有过统计表设计经验的人都知道,在日常的报表处理中,大多数统计表都需要设计成多表头的形式,如图8-21所示。
图 8-21 多表头示例
对于这种多表头统计表,GridView控件也提供了很好的解决方案来满足需要。我们知道,在呈现GridView控件之前,必须先为该控件中的每一行创建一个GridViewRow对象。而在创建GridView控件中的每一行时,都将引发一个RowCreated事件,即RowCreated事件在创建GridView控件中的行时发生。因此,可以在RowCreated事件里创建一个多表头。
下面的示例演示了如何创建图8-21的多表头统计表。首先,需要在GridView控件里添加一个RowCreated事件。如下面的代码所示:
<asp:GridView ID="GridView1"runat="server"
AutoGenerateColumns="false"Width="700px"
AllowPaging="true"PageSize="2"
OnPageIndexChanging="GridView1_PageIndexChanging"
DataKeyNames="employeeid"
OnRowCreated="GridView1_RowCreated">
<Columns>
<asp:BoundField DataField="employeeid"HeaderText="编号"/>
<asp:BoundField DataField="employeename"HeaderText="姓名"/>
<asp:BoundField DataField="department"HeaderText="部门"/>
<asp:BoundField DataField="address"HeaderText="地址"/>
<asp:BoundField DataField="email"HeaderText="邮箱"/>
<asp:BoundField DataField="workdate"HeaderText="入职时间"
DataFormatString="{0:yyyy-MM-dd}"/>
<asp:BoundField DataField="total"HeaderText="总工资"
DataFormatString="{0:C}"/>
<asp:BoundField DataField="salestax"HeaderText="税款"
DataFormatString="{0:C}"/>
<asp:BoundField DataField="salary"HeaderText="实际工资"
DataFormatString="{0:C}"/>
</Columns>
<HeaderStyle BackColor="#006699"Font-Bold="True"
ForeColor="White"/>
</asp:GridView>
在GridView1_RowCreated里创建多表头的方法很简单,可以使用TableCellCollection对象来动态地生成一个类似于多表头的表格,当然也可以用html标签来设计。如下面的代码所示:
protected void GridView1_RowCreated(object sender,
GridViewRowEventArgs e)
{
if(e.Row.RowType==DataControlRowType.Header)
{
//第一行表头
TableCellCollection tcHeader=e.Row.Cells;
tcHeader.Clear();
tcHeader.Add(new TableHeaderCell());
tcHeader[0].Attributes.Add("colspan","9");
tcHeader[0].Text="全部信息</th></tr><tr>";
//第二行表头
tcHeader.Add(new TableHeaderCell());
tcHeader[1].Attributes.Add("colspan","6");
tcHeader[1].Attributes.Add("bgcolor","#006699");
tcHeader[1].Text="基础信息";
tcHeader.Add(new TableHeaderCell());
tcHeader[2].Attributes.Add("bgcolor","#006699");
tcHeader[2].Attributes.Add("colspan","3");
tcHeader[2].Text="工资情况</th></tr><tr>";
//第三行表头
tcHeader.Add(new TableHeaderCell());
tcHeader[3].Attributes.Add("bgcolor","#006699");
tcHeader[3].Text="编号";
tcHeader.Add(new TableHeaderCell());
tcHeader[4].Attributes.Add("bgcolor","#006699");
tcHeader[4].Text="姓名";
tcHeader.Add(new TableHeaderCell());
tcHeader[5].Attributes.Add("bgcolor","#006699");
tcHeader[5].Text="部门";
tcHeader.Add(new TableHeaderCell());
tcHeader[6].Attributes.Add("bgcolor","#006699");
tcHeader[6].Text="地址";
tcHeader.Add(new TableHeaderCell());
tcHeader[7].Attributes.Add("bgcolor","#006699");
tcHeader[7].Text="邮箱";
tcHeader.Add(new TableHeaderCell());
tcHeader[8].Attributes.Add("bgcolor","#006699");
tcHeader[8].Text="入职时间";
tcHeader.Add(new TableHeaderCell());
tcHeader[9].Attributes.Add("bgcolor","#006699");
tcHeader[9].Text="总工资";
tcHeader.Add(new TableHeaderCell());
tcHeader[10].Attributes.Add("bgcolor","#006699");
tcHeader[10].Text="税款";
tcHeader.Add(new TableHeaderCell());
tcHeader[11].Attributes.Add("bgcolor","#006699");
tcHeader[11].Text="实际工资";
}
}
这样,一个如图8-21所示的多表头统计表就设计完成了。但是,这样的设计存在一个问题,即每次设计一个多表头统计表时都要在RowCreated事件里重新进行多表头绘制,这种重复繁杂的工作很是让人讨厌,并且也不好维护。因此,可以将这些重复性的绘制工作抽象出来设计成可复用的类。这样,以后设计多表头统计表就简单多了。绘制多表头的类如代码清单8-1所示。
代码清单8-1 GridViewHeader.cs
public class GridViewHeader
{
public GridViewHeader()
{
}
///<summary>
///构造函数
///</summary>
///<param name="row">GridViewRow</param>
///<param name="header">需要显示的多表头</param>
public GridViewHeader(GridViewRow row, string header)
{
CreateGridViewHeader(row, header);
}
///<summary>
///绘制多表头
///</summary>
///<param name="row">GridViewRow</param>
///<param name="header">需要显示的多表头</param>
public void CreateGridViewHeader(GridViewRow row, string header)
{
TableCellCollection cell=row.Cells;
cell.Clear();
int rowCount=GetRowCount(header);
int colCount=GetColCount(header);
string[,]arr=ConvertHeaderToArray(header, rowCount, colCount);
int rowSpan=0;
int colSpan=0;
for(int k=0;k<rowCount;k++)
{
string name="";
for(int i=0;i<colCount;i++)
{
if(name==arr[i, k]&&k!=rowCount-1)
{
name=arr[i, k];
continue;
}
else
{
name=arr[i, k];
}
int flag=IsVisible(arr, k,i, name);
switch(flag)
{
case 0:
break;
case 1:
rowSpan=GetSpanRowCount(arr, rowCount, k,i);
colSpan=GetSpanColCount(arr, rowCount, colCount, k,i);
cell.Add(new TableHeaderCell());
cell[cell.Count-1].RowSpan=rowSpan;
cell[cell.Count-1].ColumnSpan=colSpan;
cell[cell.Count-1].HorizontalAlign=
HorizontalAlign.Center;
cell[cell.Count-1].Text=name;
break;
case 2:
string[]lowColName=name.Split(new char[]{','});
foreach(string lowName in lowColName)
{
cell.Add(new TableHeaderCell());
cell[cell.Count-1].HorizontalAlign=
HorizontalAlign.Center;
cell[cell.Count-1].Text=lowName;
}
break;
}
}
if(k!=rowCount-1)
{
//不是起始行,加入新行标签
cell[cell.Count-1].Text=cell[cell.Count-1].Text
+"</th></tr><tr class="+row.CssClass+">";
}
}
}
///<summary>
///如果上一行已经输出和当前内容相同的列头,则不显示
///</summary>
///<param name="columnArray">表头集合</param>
///<param name="rowIndex">行索引</param>
///<param name="colIndex">列索引</param>
///<returns>0:不显示;1:显示;2:含','分隔符</returns>
private int IsVisible(string[,]columnArray, int rowIndex,
int colIndex, string CurrName)
{
if(rowIndex!=0)
{
if(columnArray[colIndex, rowIndex-1]==CurrName)
{
return 0;
}
else
{
if(columnArray[colIndex, rowIndex].Contains(","))
{
return 2;
}
else
{
return 1;
}
}
}
return 1;
}
///<summary>
///取得和当前索引行及列对应的下级的内容所跨的行数
///</summary>
///<param name="columnArray">表头集合</param>
///<param name="rowCount">行数</param>
///<param name="rowIndex">行索引</param>
///<param name="colIndex">列索引</param>
///<returns>行数</returns>
private int GetSpanRowCount(string[,]columnArray,
int rowCount, int rowIndex, int colIndex)
{
string name="";
int rowSpan=1;
for(int k=rowIndex;k<rowCount;k++)
{
if(columnArray[colIndex, k]==name)
{
rowSpan++;
}
else
{
name=columnArray[colIndex, k];
}
}
return rowSpan;
}
///<summary>
///取得和当前索引行及列对应的下级的内容所跨的列数
///</summary>
///<param name="columnArray">表头集合</param>
///<param name="rowCount">行数</param>
///<param name="colCount">列数</param>
///<param name="rowIndex">行索引</param>
///<param name="colIndex">列索引</param>
///<returns>列数</returns>
private int GetSpanColCount(string[,]columnArray,
int rowCount, int colCount, int rowIndex, int colIndex)
{
string name=columnArray[colIndex, rowIndex];
int colSpan=columnArray[colIndex, rowCount-1].Split(
new char[]{','}).Length;
colSpan=colSpan==1?0:colSpan;
for(int i=colIndex+1;i<colCount;i++)
{
if(columnArray[i, rowIndex]==name)
{
colSpan+=columnArray[i, rowCount-1].Split(
new char[]{','}).Length;
}
else
{
name=columnArray[i, rowIndex];
break;
}
}
return colSpan;
}
///<summary>
///将已定义的表头保存到数组
///</summary>
///<param name="header">新表头</param>
///<param name="rowCount">行数</param>
///<param name="colCount">列数</param>
///<returns>表头数组</returns>
private string[,]ConvertHeaderToArray(string header,
int rowCount, int colCount)
{
string[]columnNames=header.Split(new char[]{'&'});
string[,]headerArray=new string[colCount, rowCount];
string name="";
for(int i=0;i<colCount;i++)
{
string[]currColNames=
columnNames[i].ToString().Split(new char[]{'-'});
for(int k=0;k<rowCount;k++)
{
if(currColNames.Length-1>=k)
{
if(currColNames[k].Contains(",")&&
currColNames.Length!=rowCount)
{
if(name=="")
{
headerArray[i, k]=headerArray[i, k-1];
name=currColNames[k].ToString();
}
else
{
headerArray[i, k+1]=name;
name="";
}
}
else
{
headerArray[i, k]=currColNames[k].ToString();
}
}
else
{
if(name=="")
{
headerArray[i, k]=headerArray[i, k-1];
}
else
{
headerArray[i, k]=name;
name="";
}
}
}
}
return headerArray;
}
///<summary>
///取得复合表头的行数
///</summary>
///<param name="header">需要显示的多表头</param>
///<returns>行数</returns>
private int GetRowCount(string header)
{
string[]columnNames=header.Split(new char[]{'&'});
int Count=0;
foreach(string name in columnNames)
{
int TempCount=name.Split(new char[]{'-'}).Length;
if(TempCount>Count)
Count=TempCount;
}
return Count;
}
///<summary>
///取得复合表头的列数
///</summary>
///<param name="header">需要显示的多表头</param>
///<returns>列数</returns>
private int GetColCount(string header)
{
return header.Split(new char[]{'&'}).Length;
}
}
使用GridViewHeader类绘制多表头时,传入的表头字符串需要遵循以下几点:
1)程序约定相邻父列头之间用“&”分隔,父列头与子列头用空格(“-”)分隔,相邻子列头用逗号分隔(“,”)。例如,两行的设置示例:“基础信息-编号,姓名,部门,地址,邮箱,入职时间&工资情况-总工资,税款,实际工资”)。
2)使用三行表头时,列头要重复,如示例:“全部信息-基础信息-编号,姓名,部门,地址,邮箱,入职时间&全部信息-工资情况-总工资,税款,实际工资”。
现在,就可以这样来处理多表头了。如下面的代码所示:
protected void GridView1_RowCreated(object sender,
GridViewRowEventArgs e)
{
if(e.Row.RowType==DataControlRowType.Header)
{
//三行表头
string header="全部信息-基础信息-编号,姓名,部门,地址,邮箱,
入职时间&全部信息-工资情况-总工资,税款,实际工资";
//两行表头
//string header="基础信息-编号,姓名,部门,地址,邮箱,
入职时间&工资情况-总工资,税款,实际工资";
//加载HeaderStyle的样式
e.Row.CssClass=GridView1.HeaderStyle.CssClass;
GridViewHeader gvHeader=new GridViewHeader();
gvHeader.CreateGridViewHeader(e.Row, header);
}
}
示例运行结果与图8-21完全一样。
8.7.2 GridView实现数据统计
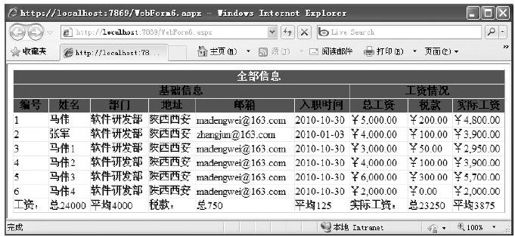
如图8-22所示,有时一张报表除了要求能够显示逐条记录之外,还需要能够将报表里的某些信息做一些简单的统计展示在报表的下面,以方便客户进行查看。
图 8-22 数据统计示例
其实,像这种统计功能在GridView控件里面非常容易实现。首先,需要将GridView控件里的ShowFooter属性设置为True,否则默认为隐藏。然后在GridView1_RowDataBound事件里做一些统计处理就可以了。如下面的示例代码所示:
private double salary=0;
private double salestax=0;
private double total=0;
protected void GridView1_RowDataBound(object sender,
GridViewRowEventArgs e)
{
if(e.Row.RowIndex>=0)
{
total+=
Convert.ToDouble(e.Row.Cells[6].Text.Remove(0,1));salestax+=
Convert.ToDouble(e.Row.Cells[7].Text.Remove(0,1));salary+=
Convert.ToDouble(e.Row.Cells[8].Text.Remove(0,1));
}
else if(e.Row.RowType==DataControlRowType.Footer)
{
e.Row.Cells[0].Text="工资:";
e.Row.Cells[1].Text="总"+total.ToString();
e.Row.Cells[2].Text="平均"
+(((duble)((ttal/GridView1.Rows.Count)).ToString();
e.Row.Cells[3].Text="税款:";
e.Row.Cells[4].Text="总"+salestax.ToString();
e.Row.Cells[5].Text="平均"
+(((duble)((slestax/GridView1.Rows.Count)).ToString();
e.Row.Cells[6].Text="实际工资:";
e.Row.Cells[7].Text="总"+salary.ToString();
e.Row.Cells[8].Text="平均"
+(((duble)((slary/GridView1.Rows.Count)).ToString();
}
}
运行结果如图8-22所示。
8.7.3 GridView导出数据
在日常开发中,还经常需要将GridView控件里的数据导入到类似于Excel、Word、Txt与html等文件中。其导出方法可分四步进行,见下面的代码与注释所示:
public bool Export(string fileType, string fileName)
{
bool flag=false;
try
{
this.ExportData.Visible=false;
//1.定义文档类型、字符编码
Response.Clear();
Response.Buffer=true;
HttpContext.Current.Response.Charset="GB2312";
HttpContext.Current.Response.ContentEncoding=
System.Text.Encoding.GetEncoding("utf-8");
//2.定义导入文档的类型
HttpContext.Current.Response.ContentType=fileType;
HttpContext.Current.Response.AppendHeader(
"Content-Disposition","attachment;filename=\""
+System.Web.HttpUtility.UrlEncode(fileName,
System.Text.Encoding.UTF8));
GridView1.Page.EnableViewState=false;
//3.定义一个输入流
System.IO.StringWriter tw=new System.IO.StringWriter();
HtmlTextWriter hw=new HtmlTextWriter(tw);
//4.将目标数据绑定到输入流输出
this.RenderControl(hw);
Response.Output.Write(tw.ToString());
Response.Flush();
Response.End();
GridView1.AllowPaging=false;
flag=true;
}
catch(Exception ex)
{
flag=false;
throw ex;
}
return flag;
}
值得注意的是,上面的HttpContext.Current.Response.ContentType=fileType语句指定导入的文件类型,它可以是application/ms-excel(输出Excel文档)、application/ms-word(输出Word文档)、application/ms-txt(输出Txt文档)、application/ms-html(输出html文档)或其他浏览器可直接支持的文档。
定义好导出方法之后,还需要在代码里重载一下VerifyRenderingInServerForm方法。如下面的代码所示:
public override void VerifyRenderingInServerForm(Control control)
{
}
现在,就可以使用上面的Export()法来导出所需要的文件格式了。如导出一个Excel文件:
protected void ExportData_Click(object sender, EventArgs e)
{
if(!Export("application/ms-excel","FileName.xls"))
{
//处理导出不成功的情况
}
}
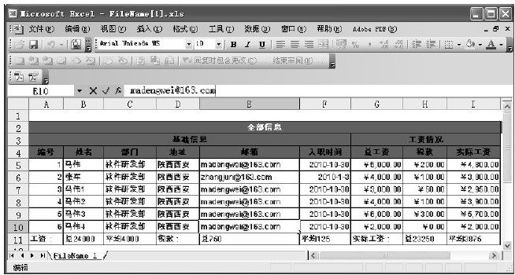
示例运行结果如图8-23所示。
图 8-23 导出Excel示例运行结果


