- 第16章 站点导航
第16章 站点导航
有过Web系统开发经验的读者或许了解,在实际Web应用程序中,为了能够让用户快速找到自己所需要的功能页面,常常需要把系统的众多页面按照其功能分成许多导航链接菜单,并且这些菜单之间有时会根据其功能层次进行很深的嵌套。有了这些导航菜单,用户就可以随时了解“现在我是在站点的哪个位置?”以及“从当前页面位置我能导航到哪里?”。
因此,如何能有效地在站点里进行导航也就成了Web开发者们面临的主要网站布局设计问题之一。当然,可以使用HTML与CSS的方式来设计这些导航菜单,从而建立起自己的导航系统。但这样的方式却存在许多问题,尤其是在站点导航设计的一致性和导航菜单的高效性等方面都表现出很多的不足之处。面对这些问题,ASP.NET的站点导航功能提供了导航控件和站点地图等技术来解决这些导航设计问题,还可以通过将导航控件放置在站点的母版页上,从而确保整个站点具有统一的感观效果。
16.1 多视图页面
在许多情况下,常常需要把一个任务分解到几个页面里。例如,在一个注册用户的应用中,通常需要用若干步来完成,用户填完某一步的表单后,可以单击“下一步”,从而进入下一步;也可以使用“上一步”的功能回到刚才的页面。面对这样的引用,最简捷的方式就是把每个步骤都设计成一个单独的页面,只需通过某种状态管理技术(如查询字符串或会话状态)把信息从一个页面传送到另一个页面。而这样的解决方案却也存在着许多问题,并且过多的状态信息很容易导致程序员编写代码上的注意力无法集中,从而导致出错。因此,或许更加希望采用多视图页面的办法(把原本在几个不同页面里的代码放到同一个页面里)来解决这些问题。
在ASP.NET 1.x里,在一个页面中建立多个视图的唯一办法是在页面中添加若干个Panel控件,这样每个面板可以代表一个视图或一个步骤。然后就可以设置每个Panel控件的Visible属性来保证用户每次只能看到一个面板。这种方式存在一个问题,你不得不在页面里添加管理面板的额外代码。此外,它不是很健壮,一些微小的错误就可能最终导致两个面板同时显示。而在ASP.NET 2.0之后,引入了两个新的控件:MultiView控件和Wizard控件,使用这两个控件可以非常容易地建立自己的多视图页面。
其实,从用户的角度来说,使用多个页面还是在一个页面中提供多个视图,这可能并没有什么差别。在一个设计良好的网站里,用户看到的只是采用多个视图的方式保持URL不变。主要的差别在于编程模型:使用多个页面时,代码能更好地分布,但你要花更多精力处理页面的交互(它们共享或传送信息的方式);使用多个视图时,会失去代码分离的好处,但更容易为不可分解的细小任务编码。
16.1.1 MultiView控件
MultiView控件是一组View控件的容器。它允许在MultiView控件里定义一组View控件,其中每个View控件都可以包含相关的子控件。随后,应用程序可以根据条件(如用户标识、用户首选项以及查询字符串参数中传递的信息)向客户端呈现特定的View控件。还可以使用MultiView控件来创建向导。在这种情况下,包含在MultiView控件中的每个View控件代表向导中的不同步骤或页。因此,可以使用MultiView控件和View控件执行如下任务:
1)根据用户选择或其他条件提供备选控件集。例如,你可能允许用户从一个源列表中选择,其中每个源都在独立的View控件中配置。然后可以显示包含用户选择的源的View控件。可以使用MultiView和View控件作为创建多个Panel控件的一种替代方法。
2)创建多视图页面。MultiView控件和View控件可以提供与Wizard控件相似的行为。Wizard控件尤其适合于创建用户分步骤填写的页面。Wizard控件还支持更多内置UI元素(如页眉和页脚)、“上一页”和“下一页”按钮以及模板。如果要创建根据条件(而不是按顺序)更改的显示,或者不需要Wizard控件支持的额外功能,则可以使用MultiView控件来代替Wizard。
创建MultiView的过程非常简单,只需要在Web页面文件里加入<asp:MultiView>标签,同时为每个<asp:MultiView>标签中加入相应的<asp:View>标签。在<asp:View>标签里面,可以根据自己的需要加入相关的HTML控件和Web控件等。下面的代码示例演示如何使用MultiView控件与View控件来创建基本调查表。其中,每个View控件都是一个单独的调查问题,如代码清单16-1所示。
代码清单16-1 TestMultiView.aspx
<%@Page Language="C#"AutoEventWireup="true"CodeBehind="TestMultiView.aspx.cs"
Inherits="_16_1.TestMultiView"%>
<!DOCTYPE html PUBLIC"-//W3C//DTD XHTML 1.0 Transitional//EN"
"http://www.w3.org/TR/xhtml1/DTD/xhtml1-transitional.dtd">
<html xmlns="http://www.w3.org/1999/xhtml">
<head runat="server">
<title>MultiView控件导航示例</title>
</head>
<body>
<form id="form1"runat="server">
<div>
<asp:Panel ID="PageOneViewPanel"Width="330px"Height="150px"
HorizontalAlign="Left"Font-Size="12"BackColor="#C0C0FF"
BorderColor="#404040"BorderStyle="Double"runat="Server">
<asp:MultiView ID="DevPollMultiView"ActiveViewIndex="0"runat="Server">
<asp:View ID="PageOne"runat="Server">
<asp:Label ID="PageOneLabel"Font-Bold="true"
Text="你使用.NET开发的项目属于?"
runat="Server"AssociatedControlID="PageOne">
</asp:Label>
<br/>
<asp:RadioButton ID="PageOneRadio1"Text="Web应用程序"
Checked="False"GroupName="RadioGroup1"
runat="server"></asp:RadioButton>
<br/>
<asp:RadioButton ID="PageOneRadio2"
Text="Windows窗体应用程序"Checked="False"
GroupName="RadioGroup1"runat="server">
</asp:RadioButton>
<br/>
<br/>
<asp:Button ID="PageOneNext"Text="下一步"
OnClick="NextButton_Command"Height="25"Width="70"
runat="Server"></asp:Button>
</asp:View>
<asp:View ID="PageTwo"runat="Server">
<asp:Label ID="PageTwoLabel"Font-Bold="true"
Text="你的开发经验有几年?"
runat="Server"AssociatedControlID="PageTwo">
</asp:Label>
<br/>
<asp:RadioButton ID="PageTwoRadio1"Text="5年以内"
Checked="False"GroupName="RadioGroup1"
runat="Server"></asp:RadioButton>
<br/>
<asp:RadioButton ID="PageTwoRadio2"Text="5年以上"
Checked="False"GroupName="RadioGroup1"
runat="Server"></asp:RadioButton>
<br/>
<br/>
<asp:Button ID="PageTwoBack"Text="上一步"
OnClick="BackButton_Command"Height="25"Width="70"
runat="Server"></asp:Button>
<asp:Button ID="PageTwoNext"Text="下一步"
OnClick="NextButton_Command"Height="25"Width="70"
runat="Server"></asp:Button>
</asp:View>
<asp:View ID="PageThree"runat="Server">
<asp:Label ID="PageThreeLabel1"Font-Bold="true"
Text="你使用何种语言进行开发?"
runat="Server"AssociatedControlID="PageThree">
</asp:Label>
<br/>
<asp:RadioButton ID="PageThreeRadio1"Text="Visual Basic.NET"
Checked="False"GroupName="RadioGroup1"
runat="Server"></asp:RadioButton>
<br/>
<asp:RadioButton ID="PageThreeRadio2"Text="C#"
Checked="False"GroupName="RadioGroup1"
runat="Server"></asp:RadioButton>
<br/>
<asp:RadioButton ID="PageThreeRadio3"Text="C++"
Checked="False"GroupName="RadioGroup1"
runat="Server"></asp:RadioButton>
<br/>
<br/>
<asp:Button ID="PageThreeBack"Text="上一步"
OnClick="BackButton_Command"Height="25"Width="70"
runat="Server"></asp:Button>
<asp:Button ID="PageThreeNext"Text="下一步"
OnClick="NextButton_Command"Height="25"Width="70"
runat="Server"></asp:Button>
<br/>
</asp:View>
<asp:View ID="PageFour"runat="Server">
<asp:Label ID="Label1"Font-Bold="true"Text="感谢您接受调查!"
runat="Server"AssociatedControlID="PageFour"></asp:Label>
<br/>
<br/>
<asp:Button ID="PageFourSave"Text="结束调查"
OnClick="NextButton_Command"Height="25"Width="110"
runat="Server"></asp:Button>
<asp:Button ID="PageFourRestart"Text="重新调查"
OnClick="BackButton_Command"Height="25"
Width="110"runat="Server"></asp:Button>
</asp:View>
</asp:MultiView>
</asp:Panel>
</div>
</form>
</body>
</html>
在代码清单16-1中,我们在MultiView控件DevPollMultiView里创建了4个View控件。其中,每个View控件代表调查表的一步调查情况,这些View控件根据“上一步”与“下一步”按钮进行相互切换。
当然,还可以通过编程来添加这些View控件,具体方法和其他所有控件一样,实例化一个新的View控件对象,并通过Views集合的Add()或AddAt()把它加入到MultiView控件里。
在Visual Studio的设计视图里,会一个接着一个地显示所有的View控件。如图16-1所示,可以采用编辑页面其他部分的方法来编辑这些区域。
图 16-1 TestMultiView.aspx设计视图
MultiView控件的ActiveViewIndex属性决定在页面上显示哪一个View控件,该属性的默认值是-1,它表示不在页面上显示任何View控件。
因此,在代码清单16-1中,当用户单击页面上的“上一步”按钮时,将减小ActiveViewIndex属性的值(即减1),以定位到上一个View控件。当用户单击页面的“下一步”按钮时,将增大ActiveViewIndex属性的值(即加1),以定位到下一个View控件。依次类推,从而在各个View控件之间进行交互显示。如下面的代码所示:
public partial class TestMultiView:System.Web.UI.Page
{
protected void Page_Load(object sender, EventArgs e)
{
}
protected void NextButton_Command(object sender, EventArgs e)
{
if(DevPollMultiView.ActiveViewIndex>-1&
DevPollMultiView.ActiveViewIndex<3)
{
DevPollMultiView.ActiveViewIndex+=1;
}
else if(DevPollMultiView.ActiveViewIndex==3)
{
//在这里处理调查完毕后的操作
PageFourSave.Enabled=false;
PageFourRestart.Enabled=false;
this.Label1.Text="调查完毕!";
}
else
{
throw new Exception("An error occurred.");
}
}
protected void BackButton_Command(object sender, EventArgs e)
{
if(DevPollMultiView.ActiveViewIndex>0&
DevPollMultiView.ActiveViewIndex<=2)
{
DevPollMultiView.ActiveViewIndex-=1;
}
else if(DevPollMultiView.ActiveViewIndex==3)
DevPollMultiView.ActiveViewIndex=0;
}
else
{
throw new Exception("An error occurred.");
}
}
}
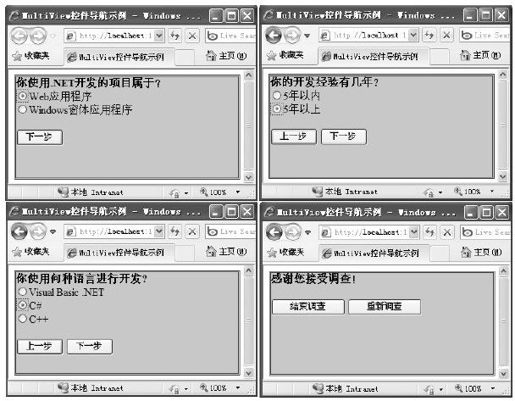
运行代码清单16-1,结果如图16-2所示。
如上面的代码所示,通过使用MultiView控件中ActiveViewIndex属性实现了“上一步”与“下一步”的交互显示功能。其实,在实际应用中,完全可以不必手工编写这些代码,因为MultiView控件具有一些内建的智能。和其他某些富数据控件一样,MultiView控件能识别按钮控件的一些特定命令名称(按钮控件是所有实现IButtonControl的控件,包括Button、ImageButton和LinkButton)。如果在View控件里添加一个使用了可被识别的命令的按钮,那么该按钮就会自动具有一些功能。表16-1列出了所有可被识别的命令名称。每个命令名称在MultiView类里都有对应的静态字段,这样,通过编程设定,可以很容易地获得正确的命令名称。
图 16-2 TestMultiView.aspx运行结果
现在,可以将代码清单16-1中按钮事件NextButton_Command和BackButton_Command去掉,然后将所有的按钮事件都写成CommandName="PrevView"和CommandName="NextView"形式,如下面的代码所示:
<asp:MultiView ID="DevPollMultiView"ActiveViewIndex="0"runat="Server">
<asp:View ID="PageOne"runat="Server">
<asp:Label ID="PageOneLabel"Font-Bold="true"
Text="你使用.NET开发的项目属于?"runat="Server"
AssociatedControlID="PageOne"></asp:Label>
<br/>
<asp:RadioButton ID="PageOneRadio1"Text="Web应用程序"
Checked="False"GroupName="RadioGroup1"
runat="server"></asp:RadioButton>
<br/>
<asp:RadioButton ID="PageOneRadio2"Text="Windows窗体应用程序"
Checked="False"GroupName="RadioGroup1"
runat="server"></asp:RadioButton>
<br/>
<br/>
<asp:Button ID="PageOneNext"Text="下一步"
CommandName="NextView"Height="25"Width="70"
runat="Server"></asp:Button>
</asp:View>
<asp:View ID="PageTwo"runat="Server">
<asp:Label ID="PageTwoLabel"Font-Bold="true"Text="你的开发经验有几年?"
runat="Server"AssociatedControlID="PageTwo"></asp:Label>
<br/>
<asp:RadioButton ID="PageTwoRadio1"Text="5年以内"Checked="False"
GroupName="RadioGroup1"runat="Server"></asp:RadioButton>
<br/>
<asp:RadioButton ID="PageTwoRadio2"Text="5年以上"Checked="False"
GroupName="RadioGroup1"runat="Server"></asp:RadioButton>
<br/>
<br/>
<asp:Button ID="PageTwoBack"Text="上一步"CommandName="PrevView"
Height="25"Width="70"runat="Server"></asp:Button>
<asp:Button ID="PageTwoNext"Text="下一步"CommandName="NextView"
Height="25"Width="70"runat="Server"></asp:Button>
</asp:View>
<asp:View ID="PageThree"runat="Server">
<asp:Label ID="PageThreeLabel1"Font-Bold="true"
Text="你使用何种语言进行开发?"
runat="Server"AssociatedControlID="PageThree"></asp:Label>
<br/>
<asp:RadioButton ID="PageThreeRadio1"Text="Visual Basic.NET"
Checked="False"GroupName="RadioGroup1"
runat="Server"></asp:RadioButton>
<br/>
<asp:RadioButton ID="PageThreeRadio2"Text="C#"Checked="False"
GroupName="RadioGroup1"runat="Server"></asp:RadioButton>
<br/>
<asp:RadioButton ID="PageThreeRadio3"Text="C++"Checked="False"
GroupName="RadioGroup1"runat="Server"></asp:RadioButton>
<br/>
<br/>
<asp:Button ID="PageThreeBack"Text="上一步"CommandName="PrevView"
Height="25"Width="70"runat="Server"></asp:Button>
<asp:Button ID="PageThreeNext"Text="下一步"CommandName="NextView"
Height="25"Width="70"runat="Server"></asp:Button>
<br/>
</asp:View>
<asp:View ID="PageFour"runat="Server">
<asp:Label ID="Label1"Font-Bold="true"Text="感谢您接受调查!"
runat="Server"AssociatedControlID="PageFour"></asp:Label>
</asp:View>
</asp:MultiView>
这样,MultiView控件根据按钮控件的特定命令名称来自己实现“上一步”与“下一步”的功能操作,其运行结果与图16-2相同。
注意 在MultiView控件中,一次只能将一个View控件定义为活动视图。如果某个View控件定义为活动视图,它所包含的子控件则会呈现到客户端。可以使用ActiveViewIndex属性或SetActiveView方法定义活动视图。如果ActiveViewIndex属性为空或者为-1,则MultiView控件不向客户端呈现任何内容。如果活动视图设置为MultiView控件中不存在的View,则会在运行时引发ArgumentOutOfRangeException。
16.1.2 Wizard控件
相对于MultiView控件和View控件,Wizard控件在创建多个步骤的相关数据的导航和用户界面方面就显得更加专业了。它除了支持每次显示几个视图中的一个之外,还包含一系列自定义的内建行为,包括导航按钮、带有分步链接的侧栏、样式和模板等。通过它,可以非常轻松地生成步骤、添加新步骤或重新安排步骤等,而无须编写任何代码就可以生成线性(从当前步骤前进到下一步或者退回到上一步)和非线性(它允许你根据用户提供的信息来忽略某些步骤)的导航,并自定义控件的用户导航。
1.向导步骤
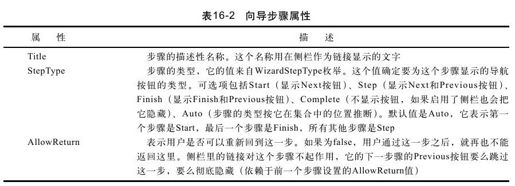
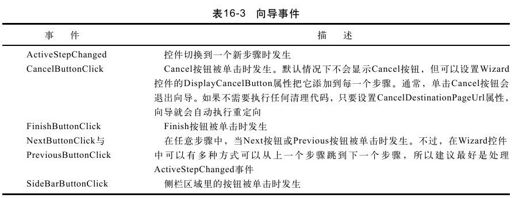
与MultiView控件类似,Wizard控件也包含一个WizardStep对象集合,WizardStep类是从抽象类WizardStepBase继承而来,而WizardStepBase类却又是从View类继承而来。因此,WizardStep和Wizard控件之间的关系与View和MultiView控件的关系一样。在定义向导时,只需要在<asp:Wizard>标签里使用<asp:WizardStep>标签定义导航的相关步骤和内容即可。每个步骤都包含一些基本信息,如表16-2所示。
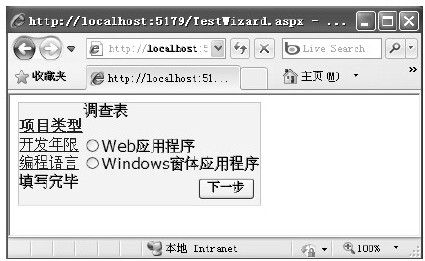
下面仍然以代码清单16-1为例,该向导包括四个步骤,它们一起组成一个调查问卷。问卷结束时添加了Complete步骤,它显示一些处理调查完毕的信息。在这里,导航按钮和侧栏链接是由系统自动加入的,如代码清单16-2所示。
代码清单16-2 TestWizard.aspx
<form id="form1"runat="server">
<div>
<asp:Wizard ID="Wizard1"runat="server">
<WizardSteps>
<asp:WizardStep ID="WizardStep1"runat="server"
Title="项目类型"StepType="Start">
<br/>
<asp:RadioButton ID="PageOneRadio1"Text="Web应用程序"
Checked="False"GroupName="RadioGroup1"
runat="server"></asp:RadioButton>
<br/>
<asp:RadioButton ID="PageOneRadio2"Text="Windows窗体应用程序"
Checked="False"GroupName="RadioGroup1"
runat="server"></asp:RadioButton>
</asp:WizardStep>
<asp:WizardStep ID="WizardStep2"runat="server"Title="开发年限"
StepType="Step">
<br/>
<asp:RadioButton ID="PageTwoRadio1"Text="5年以内"Checked="False"
GroupName="RadioGroup1"runat="Server"></asp:RadioButton>
<br/>
<asp:RadioButton ID="PageTwoRadio2"Text="5年以上"Checked="False"
GroupName="RadioGroup1"runat="Server"></asp:RadioButton>
</asp:WizardStep>
<asp:WizardStep ID="WizardStep3"runat="server"Title="编程语言"
StepType="Finish">
<br/>
<asp:RadioButton ID="PageThreeRadio1"Text="Visual Basic.NET"
Checked="False"GroupName="RadioGroup1"
runat="Server"></asp:RadioButton>
<br/>
<asp:RadioButton ID="PageThreeRadio2"Text="C#"Checked="False"
GroupName="RadioGroup1"
runat="Server"></asp:RadioButton>
<br/>
<asp:RadioButton ID="PageThreeRadio3"Text="C++"Checked="False"
GroupName="RadioGroup1"
runat="Server"></asp:RadioButton>
<br/>
</asp:WizardStep>
<asp:WizardStep ID="WizardStep4"runat="server"Title="填写完毕"
StepType="Complete">
填写完毕,感谢您接受调查!
</asp:WizardStep>
</WizardSteps>
</asp:Wizard>
</div>
</form>
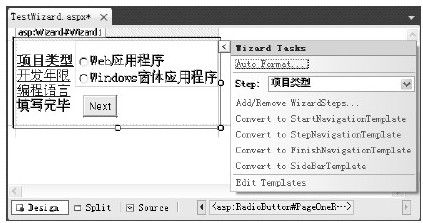
与MultiView控件不同,在Visual Studio的页面设计器里每次只能看到一个步骤。当然,可以从智能标签里选择要设计的步骤进行设计,如图16-3所示。
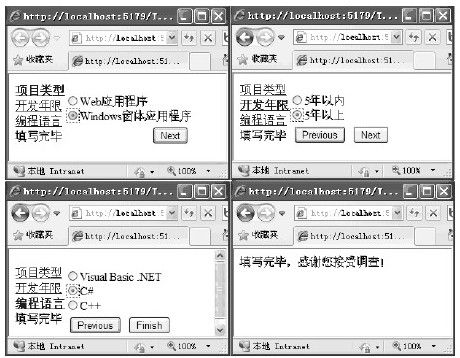
这里需要注意的是,当每次在智能标签里选择要设计的步骤进行设计的时候,Visual Studio会把Wizard控件的ActiveStepIndex属性改成当前选择的步骤。所以在运行应用程序前一定要把该属性设为0,这样向导才会从第一步开始操作。代码清单16-2的运行结果如图16-4所示。
图 16-3 TestWizard.aspx设计页面
2.向导事件
除了使用Wizard控件的内置事件处理程序之外,还可以通过自定义事件的处理程序来增强程序功能。可以通过在页面的属性窗口来添加这些事件,如图16-5所示。
图 16-4 TestWizard.aspx运行结果
图 16-5 Wizard控件的事件
对这些事件的描述如表16-3所示。
一般来讲,Wizard控件有两种类型的向导编程模型:
1)逐步提交。如果每个向导步骤包含一个不可回撤的原子操作,就应该采用逐步提交。例如,如果处理的订单信息涉及信用卡授权,而在这之后是最终的购买,就不能允许用户回退到“上一步”重新编辑信用卡号。要支持这种模型,就需要把某些或所有步骤的AllowReturn属性设为false,并且响应ActiveStepChanged事件为每个步骤提交变更。如下面的代码所示:
protected void Wizard1_ActiveStepChanged(object sender, EventArgs e)
{
//逐步提交的处理
}
2)最后提交。如果向导的每个步骤是为最后要执行的操作收集数据,就应该使用最后提交。例如,正在收集用户信息,并在获得所有信息后创建一个新账号,用户就很可能在整个过程中做一些修改。在向导结束时通过响应FinishButtonClick事件来执行创建新账号的代码。如下面的代码所示:
protected void Wizard1_FinishButtonClick(object sender, WizardNavigationEventArgs e)
{
//最后提交的处理
}
如果希望知道用户在向导里执行的是哪一个步骤,可以使用Wizard.GetHistory()方法。它返回目前已经被访问的WizardStepBase对象集合,按时间反向排序。也就是说,集合的第一项代表前一个步骤,第二项代表前一个步骤之前的那一个,依次类推。
3.向导样式
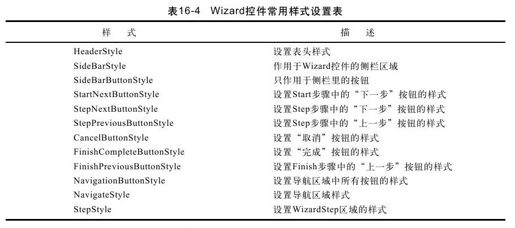
与ASP.NET的其他富数据控件一样,Wizard控件也提供了丰富的样式属性,如表16-4所示。利用这些样式属性,可以控制其颜色、字体、空格以及边框样式等。还可以利用样式调整每个按钮的外观。例如,要修改Next按钮,可以使用这些属性:StepNextButtonType(使用按钮、链接或可单击的图片)、StepNextButtonText(定制按钮或链接的文字)、StepNextButtonImageUrl(设置用于图片按钮的图片)、StepNextButtonStyle(使用样式表里的样式)。还可以通过HeaderText属性来为向导添加标题。
下面的示例为代码清单16-2中的向导添加一些简单的样式,并通过使用StartNextButtonText、StepNextButtonText、StepPreviousButtonText、FinishPreviousButtonText和FinishComplete-ButtonText属性将按钮名称替换成自己的名称。如下面的代码所示:
<asp:Wizard ID="Wizard1"runat="server"StartNextButtonText="下一步"
StepNextButtonText="下一步"StepPreviousButtonText="上一步"
FinishPreviousButtonText="上一步"FinishCompleteButtonText="完成"
HeaderText="调查表"BackColor="#EFF3FB"
Font-Names="Verdana"Font-Size="0.8em"BorderWidth="1px"
BorderColor="#B5C7DE"Style="font-size:medium;font-family:Verdana;">
运行结果如图16-6所示。
图 16-6 添加样式后的Wizard控件
4.向导模板
如果想更进一步定制Wizard控件默认的样式或外观等,还可以通过其模板编辑功能来达成更深层次的定制。Wizard控件提供了5种模板编辑,如表16-5所示。
为了让代码清单1 6-2中的示例更加美观,下面在向导里面添加一些样式属性和一个HeaderTemplate模板,该模板用于显示调查问卷各部分的标题信息。如下面的代码所示:
<asp:Wizard ID="Wizard1"runat="server"StartNextButtonText="下一步"
StepNextButtonText="下一步"StepPreviousButtonText="上一步"
FinishPreviousButtonText="上一步"FinishCompleteButtonText="完成"
BackColor="#EFF3FB"Font-Names="Verdana"
Font-Size="0.8em"BorderWidth="1px"
BorderColor="#B5C7DE"Style="font-size:medium;font-family:Verdana;">
<WizardSteps>
……
</WizardSteps>
<HeaderStyle BackColor="#FFCC66"BorderColor="#FFFBD6"
BorderStyle="Solid"BorderWidth="2px"
Font-Bold="True"Font-Size="0.9em"ForeColor="#333333"
HorizontalAlign="Center"/>
<SideBarButtonStyle ForeColor="White"/>
<NavigationButtonStyle BackColor="White"BorderColor="#CC9966"
BorderStyle="Solid"BorderWidth="1px"Font-Names="Verdana"
Font-Size="0.8em"ForeColor="#990000"/>
<SideBarStyle BackColor="#990000"Font-Size="0.9em"
VerticalAlign="Top"Width="100px"/>
<HeaderTemplate>
<b><%=Wizard1.ActiveStep.Title%></b>
</HeaderTemplate>
</asp:Wizard>
运行页面,结果如图16-7所示。
图 16-7 添加样式和HeaderTemplate模板后的Wizard控件
最后,还需要注意的是,设置FinishNavigationTemplate、DisplaySideBar、Header Template、SideBarTemplate、StartNavigation Template或StepNavigation-Template属性时会重新创建Wizard控件的子控件。因此,子控件的视图状态会在处理过程中丢失。为了避免这种情况,请使用显式维护Wizard控件的子控件的控件状态,或者避免将控件置于模板中。

