4.3.3 Spark块管理
RDD在逻辑上是按照Partition分块的,可以将RDD看成是一个分区作为数据项的分布式数组。这也是Spark在极力做到的一点,让编写分布式程序像编写单机程序一样简单。而物理上存储RDD是以Block为单位的,一个Partition对应一个Block,用Partition的ID通过元数据的映射到物理上的Block,而这个物理上的Block可以存储在内存,也可以存储在某个节点的Spark的硬盘临时目录,等等。
整体的I/O管理分为以下两个层次。
1)通信层:I/O模块也是采用Master-Slave结构来实现通信层的架构,Master和Slave之间传输控制信息、状态信息。
2)存储层:Spark的块数据需要存储到内存或者磁盘,有可能还需传输到远端机器,这些是由存储层完成的。
通过图4-10,可以大致了解整个Spark存储(Store)模块。下面从以下几个方面介绍存储模块。
1.实体和类
可以从以下几个维度理解整个存储系统。
(1)管理和接口
BlockManager:当其他模块要和storage模块进行交互时,storage模块提供了统一的操作类BlockManager,外部类与storage模块打交道都需要调用BlockManager相应接口来实现。
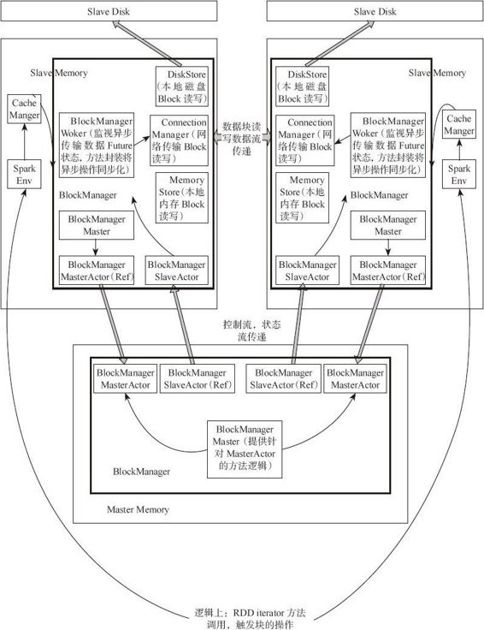
图4-10 Spark存储模块全景
(2)通信层
·BlockManagerMasterActor:从主节点创建,从节点通过这个Actor的引用向主节点传递消息和状态。
·BlockManagerSlaveActor:在从节点创建,主节点通过这个Actor的引用向从节点传递命令,控制从节点的块读写。
·BlockManagerMaster:对Actor通信进行管理。
(3)数据读写层
·DiskStore:提供Block在磁盘上以文件形式读写的功能。
·MemoryStore:提供Block在内存中的Block读写功能。
·ConnectionManager:提供本地机器和远端节点进行网络传输Block的功能。
·BlockManagerWorker:对远端数据的异步传输进行管理。
2.BlockManager中的通信
主节点和从节点之间通过Actor传送消息来传递命令和状态。
各个类在Master和Slave上所扮演的角色如图4-11所示。
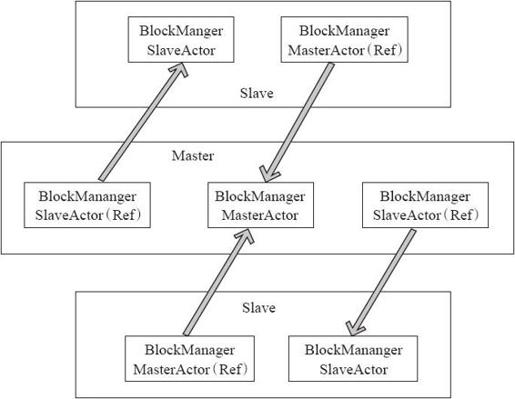
图4-11 Spark存储模块通信
整体的数据存储通信仍相当于Master-Slave模型,节点之间传递消息和状态,Master节点负责总体控制,Slave节点接收命令、汇报状态。(补充介绍:Actor和ref是AKKA中两个不同的Actor引用。)
BlockManager的创建对于Master和Slave来说有所不同。
(1)Master端
BlockManagerMaster对象拥有BlockManagerMasterActor的actor引用以及所有BlockManagerSlaveActor的ref引用。
(2)Slave端
对于Slave,BlockManagerMaster对象拥有BlockManagerMasterActor对象的ref的引用和自身BlockManagerSlaveActor的actor的引用。BlockManagerMasterActor在ref和Actor之间通信,BlockManagerSlaveActor在ref和Actor之间通信。
BlockManager在内部封装BlockManagerMaster,并通过BlockManagerMaster进行通信。Spark在各节点创建各自的BlockManager,通过BlockManager对storage模块进行操作。BlockManager对象在SparkEnv中创建,SparkEnv相当于线程的上线下文变量,在SparkEnv中也会创建很多的管理组件。例如,connectionManager、broadcastManager、cacheManager等的创建过程如下。
- private[spark] def create(
- conf: SparkConf,
- executorId: String,
- hostname: String,
- port: Int,
- isDriver: Boolean,
- isLocal: Boolean,
- listenerBus: LiveListenerBus = null): SparkEnv = {
- ……
- mapOutputTracker.trackerActor = registerOrLookup(
- "MapOutputTracker",
- new MapOutputTrackerMasterActor(mapOutputTracker.asInstanceOf[MapOutputTrackerMaster], conf))
- val blockManagerMaster = new BlockManagerMaster(registerOrLookup(
- "BlockManagerMaster",new BlockManagerMasterActor(isLocal, conf, listenerBus)), conf)
- /*创建blockManager*/
- val blockManager = new BlockManager(executorId, actorSystem, blockManagerMaster,
- serializer, conf, securityManager, mapOutputTracker)
- val connectionManager = blockManager.connectionManager
- val broadcastManager = new BroadcastManager(isDriver, conf, securityManager)
- val cacheManager = new CacheManager(blockManager)
- val httpFileServer =
- if (isDriver) {
- val server = new HttpFileServer(securityManager)
- server.initialize()
- conf.set("spark.fileserver.uri", server.serverUri)
- server
- } else {
- null
- }
- val metricsSystem = if (isDriver) {
- MetricsSystem.createMetricsSystem("driver", conf, securityManager)
- } else {
- MetricsSystem.createMetricsSystem("executor", conf, securityManager)
- }
- metricsSystem.start()
- val sparkFilesDir: String = if (isDriver) {
- Utils.createTempDir().getAbsolutePath
- } else {
- "."
- }
- val shuffleManager = instantiateClass[ShuffleManager](
- "spark.shuffle.manager", "org.apache.spark.shuffle.hash.HashShuffleManager")
- if (conf.contains("spark.cache.class")) {
- logWarning("The spark.cache.class property is no longer being used! Specify storage " + "levels using the RDD.persist() method instead.")
- }
- new SparkEnv(
- executorId,
- actorSystem,
- serializer,
- closureSerializer,
- cacheManager,
- mapOutputTracker,
- shuffleManager,
- broadcastManager,
- blockManager,
- connectionManager,
- securityManager,
- httpFileServer,
- sparkFilesDir,
- metricsSystem,
- conf)
- }
通信层中涉及许多控制消息和状态消息的通信以及消息处理,感兴趣的读者可以参照源码。
3.读写流程
(1)数据写入
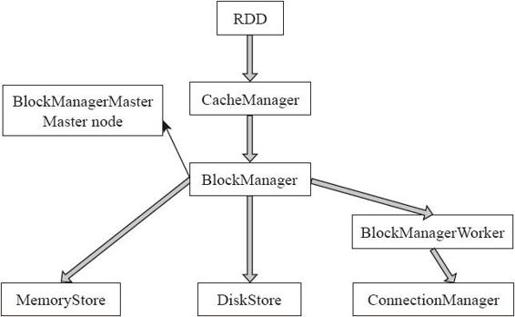
图4-12 Spark数据读写
数据写入的简要流程,读取流程和写入流程类似。数据写入流程主要分为以下几个步骤。
1)RDD调用compute()方法进行指定分区的写入。
2)CacheManager中调用BlockManater判断数据是否已经写入,如果未写则写入。
3)BlockManager中数据与其他节点同步。
4)BlockManager根据存储级别写入指定的存储层。
5)BlockManager向主节点汇报存储状态。
详细步骤如下。
1)入口在RDD类中通过compute方法调用iterator方法进行某个分区Partition的读写,Partition是逻辑概念,在物理上是一个Block。其具体实现如下:
- final def iterator(split: Partition, context: TaskContext): Iterator[T] = {
- if (storageLevel != StorageLevel.NONE) {
- SparkEnv.get.cacheManager.getOrCompute(this, split, context, storageLevel)
- } else {
- computeOrReadCheckpoint(split, context)
- }
- }
2)在CacheManager类中,getOrCompute方法通过调用BlockManager的put接口来写入数据。
我们可以看到,在这里有个判断逻辑,它先从内存cache读取是否有块可以读取,如果没有,则需要进行RDD的计算,通过触发RDD的执行和块的计算来加载数据。其具体实现如下:
- def getOrCompute[T](
- rdd: RDD[T],
- partition: Partition,
- context: TaskContext,
- storageLevel: StorageLevel): Iterator[T] = {
- val key = RDDBlockId(rdd.id, partition.index)
- logDebug(s"Looking for partition $key")
- blockManager.get(key) match {
- ……
- case None =>
- ……
- /*如果BlockManager中还没有数据,则将数据写入BlockManager中*/
- val cachedValues = putInBlockManager(key, computedValues, storageLevel,
- updatedBlocks)
- context.taskMetrics.updatedBlocks = Some(updatedBlocks)
- new InterruptibleIterator(context, cachedValues)
- ……
- }
- private def putInBlockManager[T](
- ……
- updatedBlocks ++= blockManager.put(key, values, storageLevel, tellMaster = true)
- ……
- }
- /*在BlockManager中,调用put方法*/
- def put(
- blockId: BlockId,
- values: Iterator[Any],
- level: StorageLevel,
- tellMaster: Boolean): Seq[(BlockId, BlockStatus)] = {
- require(values != null, "Values is null")
- doPut(blockId, IteratorValues(values), level, tellMaster)
- }
- /*调用doPut方法*/
- private def doPut(
- blockId: BlockId,
- data: BlockValues,
- level: StorageLevel,
- tellMaster: Boolean = true): Seq[(BlockId, BlockStatus)] = {
- ……
3)将写入的数据与其他Woker进行同步。其具体实现如下:
- val replicationFuture = data match {
- case b: ByteBufferValues if level.replication > 1 =>
- 副本并不复制二进制数据,只是创建封装器
- val bufferView = b.buffer.duplicate()
- Future { replicate(blockId, bufferView, level) }
- case _ => null
- }
- ……
- var marked = false
- try {
4)根据用户设置的StorageLevel来判断数据写入哪个存储层。其具体实现如下:
- val (returnValues, blockStore: BlockStore) = {
- if (level.useMemory) {
- /*优先写入内存,即设置useDisk为真,如果内存不能存储完,再写入磁盘*/
- (true, memoryStore)
- } else if (level.useOffHeap) {
- /*写入tachyon,这样存储于Java Heap之外的内存空间*/
- (false, tachyonStore)
- } else if (level.useDisk) {
- them
- /*写入磁盘*/
- (level.replication > 1, diskStore)
- } else {
- assert(level == StorageLevel.NONE)
- throw new BlockException(
- blockId, s"Attempted to put block $blockId without specifying storage
- level!")
- }
- }
- /*依据适用的Store类写入相应的存储,这里体现面向接口的编程*/
- val result = data match {
- case IteratorValues(iterator) =>
- blockStore.putValues(blockId, iterator, level, returnValues)
- case ArrayBufferValues(array) =>
- blockStore.putValues(blockId, array, level, returnValues)
- case ByteBufferValues(bytes) =>
- bytes.rewind()
- blockStore.putBytes(blockId, bytes, level)
- }
- ……
5)通知BlockManagerMaster有新数据写入,在BlockManagerMaster中保存元数据。代码实现如下:
- reportBlockStatus(blockId, putBlockInfo, putBlockStatus)
- ……
- }
(2)数据读取
在RDD类中,通过compute方法调用iterator读写某个分区(Partition),作为数据读取的入口。分区是逻辑概念,在物理上是一个数据块(block)。
- final def iterator(split: Partition, context: TaskContext): Iterator[T] = {
- if (storageLevel != StorageLevel.NONE) {
- SparkEnv.get.cacheManager.getOrCompute(this, split, context, storageLevel)
- } else {
- computeOrReadCheckpoint(split, context)
- }
- }
- /*在CacheManager的getOrCompute方法中*/
- def getOrCompute[T](rdd: RDD[T], split: Partition, context: TaskContext,
- storageLevel: StorageLevel): Iterator[T] = {
- ……
- /*本质调用BlockManager的get方法获取数据*/
- blockManager.get(key) match {
- case Some(values) =>
- // Partition is already materialized, so just return its values
- new InterruptibleIterator(context, values.asInstanceOf[Iterator[T]])
- case None =>
- ……
- }
(3)读取逻辑
通过下面BlockManager读取代码进入读取逻辑。
- private[spark] class BlockManager(
- executorId: String,
- actorSystem: ActorSystem,
- val master: BlockManagerMaster,
- val defaultSerializer: Serializer,
- maxMemory: Long,
- val conf: SparkConf,
- securityManager: SecurityManager,
- mapOutputTracker: MapOutputTracker)
- extends Logging {
- ……
- def get(blockId: BlockId): Option[Iterator[Any]] = {
- /*如果需要读取的数据块在本地,则返回本地的数据块*/
- val local = getLocal(blockId)
- ……
- /*如果需要的数据块不在本地,则远端获取(Fetch)数据块*/
- val remote = getRemote(blockId)
- ……
- /*如果远端也没有,则数据块不存在*/
- None
- }
- ……
- }
1)本地读取。
在本地同步读取数据块,首先看能否在内存读取数据块,如果不能读取,则看能否从Tachyon读取数据块,如果仍不能读取,则看能否从磁盘读取数据块。
- private def doGetLocal(blockId: BlockId, asValues: Boolean): Option[Any] = {
- val info = blockInfo.get(blockId).orNull
- if (info != null) {
- /*同步读取数据块*/
- info.synchronized {
- ……
- /*在内存读取数据块*/
- if (level.useMemory) {
- logDebug("Getting block " + blockId + " from memory")
- val result = if (asValues) {
- memoryStore.getValues(blockId)
- } else {
- memoryStore.getBytes(blockId)
- }
- ……
- }
- /*在Tachyon读取数据块*/
- if (level.useOffHeap) {
- logDebug("Getting block " + blockId + " from tachyon")
- if (tachyonStore.contains(blockId)) {
- tachyonStore.getBytes(blockId) match {
- case Some(bytes) => {
- if (!asValues) {
- return Some(bytes)
- } else {
- return Some(dataDeserialize(blockId, bytes))
- }
- }
- case None =>
- logDebug("Block " + blockId + " not found in tachyon")
- }
- }
- }
- /*在磁盘读取数据块*/
- if (level.useDisk) {
- logDebug("Getting block " + blockId + " from disk")
- val bytes: ByteBuffer = diskStore.getBytes(blockId) match {
- case Some(bytes) => bytes
- case None =>
- throw new Exception("Block " + blockId + " not found on disk, though
- it should be")
- }
- ……
- }
2)远程读取。
远程获取调用路径,然后getRemote调用doGetRemote,通过BlockManagerWorker.syncGetBlock从远程获取数据。
- private def doGetRemote(blockId: BlockId, asValues: Boolean): Option[Any] = {
- ……
- /*获取远端数据块,返回data数据块*/
- val data = BlockManagerWorker.syncGetBlock(
- GetBlock(blockId), ConnectionManagerId(loc.host, loc.port))
- ……
- }
在BlockManagerWorker中调用syncGetBlock获取远端数据块,这里使用了Future模型。Future本身是一种被广泛运用的并发设计模式,可在很大程度上简化需要数据流同步的并发应用开发。这里以java.util.concurrent.Future为例,简单介绍Future的具体工作方式。Future对象本身可以看做是一个显式的引用,一个对异步处理结果的引用。由于其异步性质,在创建之初,它所引用的对象可能还并不可用(如尚在运算中、网络传输中或等待中)。这时,得到Future的程序流程如果并不急于使用Future所引用的对象,就可以做其他需要做的工作,当流程进行到需要Future背后引用的对象时,可能有以下两种情况。
第一种情况:希望能看到这个对象可用,并完成一些相关的后续流程。如果实在不可用,则也可以进入其他分支流程。
第二种情况:没有这个结果,则无法执行下去(可以设置超时进行时间限制)。对于前一种情况,可以通过调用Future.isDone()判断引用的对象是否就绪,并采取不同的处理;后一种情况则只需调用get()或get(long timeout,TimeUnit unit),通过同步阻塞方式等待对象就绪。实际运行期是阻塞,还是立即返回,取决于get()的调用时机和对象就绪的先后。Future模式可以在连续流程中满足数据驱动的并发需求,这样既获得了并发执行的性能提升,又不失连续流程的简洁优雅。
下面通过SyncGetBlock方法了解获取数据块的方式。
- def syncGetBlock(msg: GetBlock, toConnManagerId: ConnectionManagerId): ByteBuffer = {
- ……
- /*返回responseMessage对象相当于是个Future*/
- val responseMessage = connectionManager.sendMessageReliablySync(
- toConnManagerId, blockMessageArray.toBufferMessage)
- ……
- }
- def sendMessageReliablySync(connectionManagerId: ConnectionManagerId,
- message: Message): Option[Message] = {
- Await.result(sendMessageReliably(connectionManagerId, message), Duration.Inf)
- }
在ConnectionManager中,通过sendMessage方法获取远端数据,通过Future异步计算模型获取远端读取结果状态。
- def sendMessageReliably(connectionManagerId: ConnectionManagerId, message: Message)
- : Future[Option[Message]] = {
- val promise = Promise[Option[Message]]
- val status = new MessageStatus(
- message, connectionManagerId, s => promise.success(s.ackMessage))
- messageStatuses.synchronized {
- messageStatuses += ((message.id, status))
- }
- sendMessage(connectionManagerId, message)
- promise.future
- }
在sendMessage方法中:
- private def sendMessage(connectionManagerId: ConnectionManagerId, message: Message) {
- ……
- /*需要和远端身份验证建立连接*/
- connection.getAuthenticated().synchronized {
- /*发送消息*/
- connection.send(message)
- wakeupSelector()
- }
4.数据块读写管理
数据块的读写,如果在本地内存存在所需数据块,则先从本地内存读取,如果不存在,则看本地的磁盘是否有数据,如果仍不存在,再看网络中其他节点上是否有数据,即数据有3个类别的读写来源。
(1)MemoryStore内存块读写
通过源码可以看到进行块读写是线程间同步的。通过entries.synchronized控制多线程并发读写,防止出现异常。
PutBlock对象用来确保只有一个线程写入数据块。这样确保数据读写且线程安全的。示例代码如下:
- private val putLock = new Object()
内存Block块管理是通过链表来实现的,如图4-13所示。
- private val entries = new LinkedHashMap[BlockId, MemoryEntry](32, 0.75f, true)

图4-13 MemoryStore数据存储格式
MemoryStroe内存快读写示例代码如下所示。通过getValues等方法为入口进行数据块的同步读,通过trytoPut等方法为入口进行数据块的同步写。
- /*读取内存数据块*/
- override def getValues(blockId: BlockId): Option[Iterator[Any]] = {
- /*同步读取数据*/
- val entry = entries.synchronized {
- entries.get(blockId)
- }
- if (entry == null) {
- None
- } else if (entry.deserialized) {
- Some(entry.value.asInstanceOf[ArrayBuffer[Any]].iterator)
- } else {
- val buffer = entry.value.asInstanceOf[ByteBuffer].duplicate() /* 实际并不复制数据*/
- Some(blockManager.dataDeserialize(blockId, buffer))
- }
- }
- /*内存写入数据块*/
- private def tryToPut(
- blockId: BlockId,
- value: Any,
- size: Long,
- deserialized: Boolean): ResultWithDroppedBlocks = {
- ……
- /*同步进行数据写*/
- putLock.synchronized {
- ……
- /*如果有足够内存空间*/
- if (enoughFreeSpace) {
- val entry = new MemoryEntry(value, size, deserialized)
- /*互斥写入entries容器*/
- entries.synchronized {
- entries.put(blockId, entry)
- currentMemory += size
- }
- val valuesOrBytes = if (deserialized) "values" else "bytes"
- logInfo("Block %s stored as %s in memory (estimated size %s, free %s)".format(
- blockId, valuesOrBytes, Utils.bytesToString(size), Utils.bytesToString
- (freeMemory)))
- putSuccess = true
- } else {
- ……
- }
(2)DiskStore磁盘块写入
在DiskStore中,一个Block对应一个文件。在diskManager中,存储blockId和一个文件路径映射。数据块的读写入相当于读写文件流。
写入二进制数据的具体实现代码如下所示。
- override def putBytes(blockId: BlockId, _bytes: ByteBuffer, level: StorageLevel): PutResult = {
- val bytes = _bytes.duplicate()
- ……
- val file = diskManager.getFile(blockId)
- /*获取这个块对应的文件输出流*/
- val channel = new FileOutputStream(file).getChannel
- while (bytes.remaining > 0) {
- /*将数据块写入文件*/
- channel.write(bytes)
- }
- ……
- }
