第 3 章 IPv6、Unix域套接字和网络接口
本章攻略:
- 把本地端口转发到远程主机
- 通过ICMP查验网络中的主机
- 等待远程网络服务上线
- 枚举设备中的接口
- 找出设备中某个接口的IP地址
- 探测设备中的接口是否开启
- 检测网络中未开启的设备
- 使用相连的套接字执行基本的进程间通信
- 使用Unix域套接字执行进程间通信
- 确认你使用的Python是否支持IPv6套接字
- 从IPv6地址中提取IPv6前缀
- 编写一个IPv6回显客户端/服务器
3.1 简介
本章使用一些第三方库扩展Python中socket库的用法,还要介绍一些高级技术,例如Python标准库中的ayncore异步模块。与此同时,还会涉及很多不同的协议,例如ICMP查验和IPv6客户端/服务器。
本章通过一些示例攻略介绍几个有用的Python第三方模块的用法,例如Python网络程序员熟知的网络数据包抓取库Scapy。
本章部分攻略专门介绍Python中IPv6的处理方法,包括开发一个IPv6客户端/服务器应用程序。其他攻略则涉及Unix域套接字。
3.2 把本地端口转发到远程主机
有时,你需要创建一个本地端口转发器,把本地端口发送的流量全部重定向到特定的远程主机上。利用这个功能,可以让用户只能访问特定的网站,而不能访问其他网站。
3.2.1 实战演练
我们来编写一个本地端口转发脚本,把8800端口接收到的所有流量重定向到谷歌的首页(http://www.google.com)。我们可以把本地主机和远程主机连同端口号一起传入脚本。简单起见,这里只指定本地端口号,因为我们知道Web服务器运行在80端口上。
代码清单3-1是一个端口转发示例,如下所示:
#!usrbin/env python # Python Network Programming Cookbook -- Chapter - 3# This program is optimized for Python 2.7.
# It may run on any other version with/without modifications.
import argparse
LOCAL_SERVER_HOST = 'localhost'
REMOTE_SERVER_HOST = 'www.google.com'
BUFSIZE = 4096
import asyncore
import socket
首先,我们来定义PortForwarder类:
class PortForwarder(asyncore.dispatcher): def __init__(self, ip, port, remoteip,remoteport,backlog=5):asyncore.dispatcher.__init__(self)
self.remoteip=remoteip
self.remoteport=remoteport
self.create_socket(socket.AF_INET,socket.SOCK_STREAM)
self.set_reuse_addr()
self.bind((ip,port))
self.listen(backlog)
def handle_accept(self):
conn, addr = self.accept()
print "Connected to:",addr
Sender(Receiver(conn),self.remoteip,self.remoteport)
然后定义Receiver和Sender类,如下所示:
class Receiver(asyncore.dispatcher): def __init__(self,conn):asyncore.dispatcher.__init__(self,conn)
self.from_remote_buffer=''
self.to_remote_buffer=''
self.sender=None
def handle_connect(self):
pass
def handle_read(self):
read = self.recv(BUFSIZE)
self.from_remote_buffer += read
def writable(self):
return (len(self.to_remote_buffer) > 0)
def handle_write(self):
sent = self.send(self.to_remote_buffer)
self.to_remote_buffer = self.to_remote_buffer[sent:]
def handle_close(self):
self.close()
if self.sender:
self.sender.close()
class Sender(asyncore.dispatcher):
def __init__(self, receiver, remoteaddr,remoteport):
asyncore.dispatcher.__init__(self)
self.receiver=receiver
receiver.sender=self
self.create_socket(socket.AF_INET, socket.SOCK_STREAM)
self.connect((remoteaddr, remoteport))
def handle_connect(self):
pass
def handle_read(self):
read = self.recv(BUFSIZE)
self.receiver.to_remote_buffer += read
def writable(self):
return (len(self.receiver.from_remote_buffer) > 0)
def handle_write(self):
sent = self.send(self.receiver.from_remote_buffer)
self.receiver.from_remote_buffer = self.receiver.from_remote_buffer[sent:]
def handle_close(self):
self.close()
self.receiver.close()
if __name__ == "__main__":
parser = argparse.ArgumentParser(description='Stackless Socket Server Example') parser.add_argument('--localhost', action="store", dest="local_host", default=LOCAL_SERVER_HOST) parser.add_argument('--local-port', action="store", dest="local_port", type=int, required=True) parser.add_argument('--remote-host', action="store", dest="remote_host", default=REMOTE_SERVER_HOST) parser.add_argument('--remoteport', action="store", dest="remote_port", type=int, default=80) given_args = parser.parse_args()
local_host, remote_host = given_args.local_host, given_args.remote_host local_port, remote_port = given_args.local_port, given_args.remote_port
print "Starting port forwarding local %s:%s => remote %s:%s" % (local_host, local_port, remote_host, remote_port) PortForwarder(local_host, local_port, remote_host, remote_port)
asyncore.loop()
运行这个脚本后,会看到如下输出:
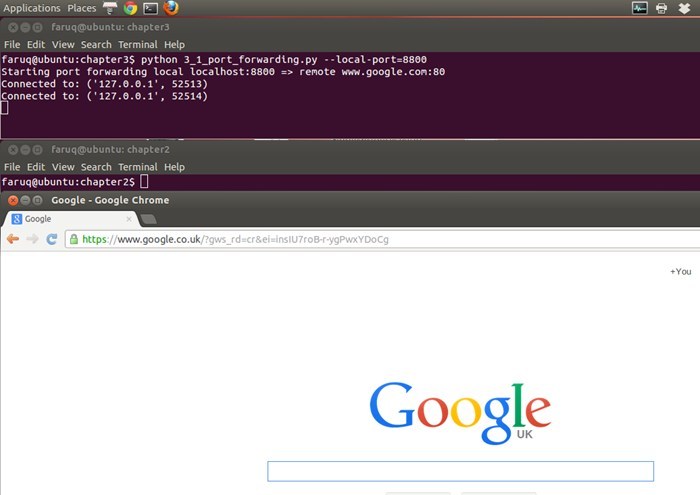
$ python 3_1_port_forwarding.py --local-port=8800
Starting port forwarding local localhost:8800 => remote www.google.com:80
现在打开浏览器,访问http://localhost:8800。浏览器会把你带到谷歌的首页,在命令行中会输出类似下面的信息:
Connected to: ('127.0.0.1', 38557)
把本地端口转发到远程主机的过程如下面的截图所示:
3.2.2 原理分析
我们创建了一个端口转发类PortForwarder,继承自asyncore.dispatcher。asyncore.dispatcher类包装了一个套接字对象,还提供了一些帮助方法用于处理特定的事件,例如连接成功或客户端连接到服务器套接字。你可以选择重定义这些方法,在上面的脚本中我们只重定义了handle_accept()方法。
另外两个类也继承自asyncore.dispatcher。Receiver类处理进入的客户端请求,Sender类接收一个Receiver类实例,把数据发送给客户端。如你所见,这两个类都重定义了handle_read()、handle_write()和writeable()三个方法,目的是实现远程主机和本地客户端之间的双向通信。
概括来说,PortForwarder类在一个本地套接字中保存进入的客户端请求,然后把这个套接字传给Sender类实例,再使用Receiver类实例发起与远程主机指定端口之间的双向通信。
3.3 通过ICMP查验网络中的主机
ICMP查验(ICMP ping)1是你见过的最普通的网络扫描类型。ICMP查验做起来很简单,打开命令行或终端,输入ping www.google.com即可。这在Python程序中又有什么难的呢?这个攻略展示了一个简单的Python查验脚本。
1ICMP是Internet Control Message Protocol的简称,意思是“网络控制报文协议”。——译者注
3.3.1 准备工作
要在你的设备上运行这个脚本,需要有超级用户或管理员权限才行。
3.3.2 实战演练
你可以偷个懒,在Python脚本中调用系统中的ping命令,如下所示:
import subprocess import shlex
command_line = "ping -c 1 www.google.com"
args = shlex.split(command_line)
try:
subprocess.check_call(args,stdout=subprocess.PIPE,\
stderr=subprocess.PIPE)
print "Google web server is up!"
except subprocess.CalledProcessError:
print "Failed to get ping."
然而,很多情况下,系统中的ping可执行文件不可用,或者无法访问。此时,我们需要一个纯粹的Python脚本实现查验。注意,这个脚本要使用超级用户或者管理员的身份运行。
代码清单3-2展示了如何执行ICMP查验,如下所示:
#!usrbin/env python # Python Network Programming Cookbook -- Chapter - 3# This program is optimized for Python 2.7.
# It may run on any other version with/without modifications.
import os
import argparse
import socket
import struct
import select
import time
ICMP_ECHO_REQUEST = 8 # Platform specific
DEFAULT_TIMEOUT = 2
DEFAULT_COUNT = 4
class Pinger(object):
""" Pings to a host -- the Pythonic way"""
def __init__(self, target_host, count=DEFAULT_COUNT, timeout=DEFAULT_TIMEOUT): self.target_host = target_host
self.count = count
self.timeout = timeout
def do_checksum(self, source_string):
""" Verify the packet integritity """
sum = 0
max_count = (len(source_string)/2)*2
count = 0
while count < max_count:
val = ord(source_string[count + 1])*256 + ord(source_string[count]) sum = sum + val
sum = sum & 0xffffffff
count = count + 2
if max_count<len(source_string):
sum = sum + ord(source_string[len(source_string) - 1])
sum = sum & 0xffffffff
sum = (sum >> 16) + (sum & 0xffff)
sum = sum + (sum >> 16)
answer = ~sum
answer = answer & 0xffff
answer = answer >> 8 | (answer << 8 & 0xff00)
return answer
def receive_pong(self, sock, ID, timeout):
"""
Receive ping from the socket.
"""
time_remaining = timeout
while True:
start_time = time.time()
readable = select.select([sock], [], [], time_remaining)
time_spent = (time.time() - start_time)
if readable[0] == []: # Timeout
return
time_received = time.time()
recv_packet, addr = sock.recvfrom(1024)
icmp_header = recv_packet[20:28]
type, code, checksum, packet_ID, sequence = struct.unpack(
"bbHHh", icmp_header
)
if packet_ID == ID:
bytes_In_double = struct.calcsize("d")
time_sent = struct.unpack("d", recv_packet[28:28 + bytes_In_double])[0]
return time_received - time_sent
time_remaining = time_remaining - time_spent
if time_remaining <= 0:
return
我们要定义send_ping()方法,把查验请求的数据发送给目标主机。而且,在这个方法中还要调用do_checksum()方法,检查查验数据的完整性,如下所示:
def send_ping(self, sock, ID): """Send ping to the target host
"""
target_addr = socket.gethostbyname(self.target_host)
my_checksum = 0
# Create a dummy heder with a 0 checksum.
header = struct.pack("bbHHh", ICMP_ECHO_REQUEST, 0, my_checksum, ID, 1) bytes_In_double = struct.calcsize("d")
data = (192 - bytes_In_double) * "Q"
data = struct.pack("d", time.time()) + data
# Get the checksum on the data and the dummy header.
my_checksum = self.do_checksum(header + data)
header = struct.pack(
"bbHHh", ICMP_ECHO_REQUEST, 0, socket.htons(my_checksum), ID, 1
)
packet = header + data
sock.sendto(packet, (target\_addr, 1))
我们再来定义一个方法,ping_once(),只向目标主机发送一次查验。在这个方法中,把ICMP协议传给socket()方法,创建一个原始的ICMP套接字。异常处理代码负责处理未使用超级用户运行脚本的情况,以及其他套接字错误。代码如下:
def ping_once(self): """Returns the delay (in seconds) or none on timeout.
"""
icmp = socket.getprotobyname("icmp")
try:
sock = socket.socket(socket.AF_INET, socket.SOCK_RAW, icmp)
except socket.error, (errno, msg):
if errno == 1:
# Not superuser, so operation not permitted
msg += "ICMP messages can only be sent from root user processes"
raise socket.error(msg)
except Exception, e:
print "Exception: %s" %(e)
my_ID = os.getpid() & 0xFFFF
self.send_ping(sock, my_ID)
delay = self.receive_pong(sock, my_ID, self.timeout)
sock.close()
return delay
这个类要执行的主方法是ping()。这个方法中有个for循环,在for循环中调用ping_once()方法count次。延迟时间从查验的响应中获取,单位为秒。如果没有返回延迟时间,就意味着查验失败。代码如下:
def ping(self): """Run the ping process
"""
for i in xrange(self.count):
print "Ping to %s..." % self.target_host,
try:
delay = self.ping_once()
except socket.gaierror, e:
print "Ping failed. (socket error: '%s')" % e[1]
break
if delay == None:
print "Ping failed. (timeout within %ssec.)" % self.timeout else:
delay = delay * 1000
print "Get pong in %0.4fms" % delay
if __name__ == '__main__':
parser = argparse.ArgumentParser(description='Python ping')
parser.add_argument('--target-host', action="store", dest="target_host", required=True) given_args = parser.parse_args()
target_host = given_args.target_host
pinger = Pinger(target_host=target_host)
pinger.ping()
以超级用户的身份运行这个脚本,得到的输出如下所示:
$ sudo python 3_2_ping_remote_host.py --target-host=www.google.com Ping to www.google.com... Get pong in 7.6921msPing to www.google.com... Get pong in 7.1061ms
Ping to www.google.com... Get pong in 8.9211ms
Ping to www.google.com... Get pong in 7.9899ms
3.3.3 原理分析
Pinger类定义了很多有用的方法,初始化时创建了几个变量,其值由用户指定,或者有默认值,如下所示:
target_host:要查验的目标主机;count:查验次数;timeout:这个值决定何时终止未完成的查验操作。
在send_ping()方法中获取了目标主机的DNS主机名,然后使用struct模块创建了一个ICMP_ECHO_REQUEST数据包。在这个方法中一定要使用do_checksum()方法检查数据的完整性。do_checksum()方法接收一个源字符串,经过处理之后生成一个特有的校验和。在接收端,receive_pong()方法在未到达超时时间之前一直等待响应,或者直接接收响应,然后抓取ICMP响应首部,对比数据包ID,再计算请求-响应循环的延迟时间。
3.4 等待远程网络服务上线
有时,在网络服务恢复的过程中,可以运行一个脚本检查服务器何时再次上线。
3.4.1 实战演练
我们可以编写一个客户端,一直等待某个网络服务上线,或者只等待一段时间。在这个示例中,默认情况下我们检查的是本地主机中的一个Web服务器。如果你指定了其他远程主机或端口,这个脚本会使用你提供的信息。
代码清单3-3展示了如何等待远程网络服务上线,如下所示:
#!usrbin/env python # Python Network Programming Cookbook -- Chapter – 3# This program is optimized for Python 2.7.
# It may run on any other version with/without modifications.
import argparse
import socket
import errno
from time import time as now
DEFAULT_TIMEOUT = 120
DEFAULT_SERVER_HOST = 'localhost'
DEFAULT_SERVER_PORT = 80
class NetServiceChecker(object):
""" Wait for a network service to come online"""
def __init__(self, host, port, timeout=DEFAULT_TIMEOUT):
self.host = host
self.port = port
self.timeout = timeout
self.sock = socket.socket(socket.AF_INET, socket.SOCK_STREAM)
def end_wait(self):
self.sock.close()
def check(self):
""" Check the service """
if self.timeout:
end_time = now() + self.timeout
while True:
try:
if self.timeout:
next_timeout = end_time - now()
if next_timeout < 0:
return False
else:
print "setting socket next timeout %ss" %round(next_timeout) self.sock.settimeout(next_timeout)
self.sock.connect((self.host, self.port))
# handle exceptions
except socket.timeout, err:
if self.timeout:
return False
except socket.error, err:
print "Exception: %s" %err
else: # if all goes well
self.end_wait()
return True
if __name__ == '__main__':
parser = argparse.ArgumentParser(description='Wait for Network Service') parser.add_argument('--host', action="store", dest="host", default=DEFAULT_SERVER_HOST) parser.add_argument('--port', action="store", dest="port", type=int, default=DEFAULT_SERVER_PORT) parser.add_argument('--timeout', action="store", dest="timeout", type=int, default=DEFAULT_TIMEOUT) given_args = parser.parse_args()
host, port, timeout = given_args.host, given_args.port, given_args.timeout service_checker = NetServiceChecker(host, port, timeout=timeout)
print "Checking for network service %s:%s ..." %(host, port)
if service_checker.check():
print "Service is available again!"
如果在你的设备上运行着一个Web服务器,例如Apache,运行这个脚本后会看到如下输出:
$ python 3_3_wait_for_remote_service.py Waiting for network service localhost:80 ...setting socket next timeout 120.0s
Service is available again!
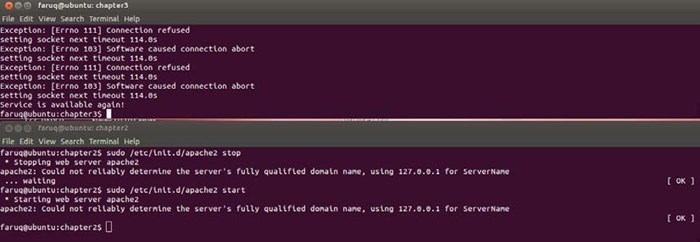
现在停止Apache进程,再运行这个脚本,然后重启Apache。此时看到的输出会有所不同,在我的设备上,输出如下:
Exception: [Errno 103] Software caused connection abort setting socket next timeout 104.189137936Exception: [Errno 111] Connection refused
setting socket next timeout 104.186291933
Exception: [Errno 103] Software caused connection abort
setting socket next timeout 104.186164856
Service is available again!
下面的截图展示了等待Apache Web服务器上线的过程:
3.4.2 原理分析
上述脚本使用argparse模块接收用户的输入,处理主机名、端口和超时时间。超时时间指等待所需网络服务的时间。这个脚本创建了一个NetServiceChecker类实例,然后调用check()方法。这个方法计算等待的最后结束时间,并使用套接字的settimeout()方法控制每次循环的结束时间,即next_timeout。然后check()方法调用套接字的connect()方法在超时时间到达之前测试所需的网络服务是否可用。check()方法还能捕获套接字超时异常,以及比较套接字超时时间和用户指定的超时时间。
3.5 枚举设备中的接口
在Python中列出设备中的网络接口并不难。有很多第三方库可以使用,只需几行代码即可。不过,我们来看一下如何只使用套接字调用完成这一操作。
3.5.1 准备工作
这个攻略需要在Linux设备中运行。若想列出可用的网络接口,可以执行下面的命令:
$ sbinifconfig
3.5.2 实战演练
代码清单3-4展示了如何列出网络接口,如下所示:
#!usrbin/env python # Python Network Programming Cookbook -- Chapter - 3# This program is optimized for Python 2.7.
# It may run on any other version with/without modifications.
import sys
import socket
import fcntl
import struct
import array
SIOCGIFCONF = 0x8912 #from C library sockios.h
STUCT_SIZE_32 = 32
STUCT_SIZE_64 = 40
PLATFORM_32_MAX_NUMBER = 2**32
DEFAULT_INTERFACES = 8
def list_interfaces():
interfaces = []
max_interfaces = DEFAULT_INTERFACES
is_64bits = sys.maxsize > PLATFORM_32_MAX_NUMBER
struct_size = STUCT_SIZE_64 if is_64bits else STUCT_SIZE_32
sock = socket.socket(socket.AF_INET, socket.SOCK_DGRAM)
while True:
bytes = max_interfaces struct_size
interface_names = array.array('B', '' bytes)
sock_info = fcntl.ioctl(
sock.fileno(),
SIOCGIFCONF,
struct.pack('iL', bytes, interface_names.buffer_info()[0]) )
outbytes = struct.unpack('iL', sock_info)[0]
if outbytes == bytes:
max_interfaces *= 2
else:
break
namestr = interface_names.tostring()
for i in range(0, outbytes, struct_size):
interfaces.append((namestr[i:i+16].split('\0', 1)[0]))
return interfaces
if __name__ == '__main__':
interfaces = list_interfaces()
print "This machine has %s network interfaces: %s." %(len(interfaces), interfaces)
上述脚本能列出网络接口,输出结果如下:
$ python 3_4_list_network_interfaces.py This machine has 2 network interfaces: ['lo', 'eth0'].
3.5.3 原理分析
这个攻略使用低层套接字特性找出系统中的接口。list_interfaces()方法创建一个套接字对象,通过处理这个对象找到网络接口信息,做法是调用fnctl模块中的ioctl()方法。fnctl模块用到了一些Unix程序,例如fnctl()。这个接口在底层的文件描述符套接字上执行I/O控制操作。文件描述符通过在套接字对象上调用fileno()方法获取。
ioctl()方法的其他参数包括:C套接字库中定义的常量SIOCGIFADDR,以及使用struct模块中的pack()函数生成的数据结构。数据结构中指定的内存地址保存在变量interface_names中,经修改后作为ioctl()方法的结果返回。从ioctl()方法的返回结果sock_info中取出数据后,如果大小和变量bytes相等,则将网络接口的数量翻倍。为了防止之前假设的接口数量不正确,这个操作要在一个while循环中完成,以便找出所有接口。
接口的名字从变量interface_names的字符串形式中提取,先读取这个变量的指定字段,然后再把获得的值添加到接口列表的末尾。在list_interfaces()函数的最后,返回这个接口列表。
3.6 找出设备中某个接口的IP地址
在Python网络应用程序中可能需要找出某个网络接口的IP地址。
3.6.1 准备工作
这个攻略是Linux专用的。有一些Python模块经过特别设计,为Windows和Mac平台提供了类似的功能。例如,http://sourceforge.net/projects/pywin32/是专为Windows实现的库。
3.6.2 实战演练
你可以使用fnctl模块在你的设备中查询IP地址。
代码清单3-5展示了如何在你的设备中找出指定接口的IP地址,如下所示:
#!usrbin/env python # Python Network Programming Cookbook -- Chapter - 3# This program is optimized for Python 2.7.
# It may run on any other version with/without modifications.
import argparse
import sys
import socket
import fcntl
import struct
import array
def get_ip_address(ifname):
s = socket.socket(socket.AF_INET, socket.SOCK_DGRAM)
return socket.inet_ntoa(fcntl.ioctl(
s.fileno(),
0x8915, # SIOCGIFADDR
struct.pack('256s', ifname[:15])
)[20:24])
if __name__ == '__main__':
parser = argparse.ArgumentParser(description='Python networking utils') parser.add_argument('--ifname', action="store", dest="ifname", required=True) given_args = parser.parse_args()
ifname = given_args.ifname
print "Interface [%s] \-\-> IP: %s" %(ifname, get\_ip\_address(ifname))
这个脚本的输出只有一行,如下所示:
$ python 3_5getinterface_ip_address.py --ifname=eth0
Interface [eth0] \-\-> IP: 10.0.2.15
3.6.3 原理分析
这个攻略和前一个攻略类似。上述脚本接收一个命令行参数:要查询的IP地址的网络接口名。get_ip_address()函数创建一个套接字对象,然后调用fnctl.ioctl()函数利用这个套接字对象查询IP信息。注意,socket.inet_ntoa()函数的作用是,把二进制数据转换成我们熟悉的人类可读的点分格式。
3.7 探测设备中的接口是否开启
如果设备中有多个网络接口,在使用某个接口前你需要知道它的状态,例如,这个接口是否开启。这样才能保证把命令传递给处于激活状态的接口。
3.7.1 准备工作
这个攻略是为Linux设备编写的,因此无法在Windows或Mac主机上运行。这个攻略用到了一个著名的网络扫描工具——nmap。在nmap的网站http://nmap.org/中可以了解更多信息。
运行这个攻略还需要python-nmap模块,可使用pip安装,如下所示:
$ pip install python-nmap
3.7.2 实战演练
我们可以创建一个套接字对象,然后获取接口的IP地址,再使用任何一种扫描技术探测接口的状态。
代码清单3-6展示了如何探测网络接口的状态,如下所示:
#!usrbin/env python # Python Network Programming Cookbook -- Chapter - 3# This program is optimized for Python 2.7.
# It may run on any other version with/without modifications.
import argparse
import socket
import struct
import fcntl
import nmap
SAMPLE_PORTS = '21-23'
def get_interface_status(ifname):
sock = socket.socket(socket.AF_INET, socket.SOCK_DGRAM)
ip_address = socket.inet_ntoa(fcntl.ioctl(
sock.fileno(),
0x8915, #SIOCGIFADDR, C socket library sockios.h
struct.pack('256s', ifname[:15])
)[20:24])
nm = nmap.PortScanner()
nm.scan(ip_address, SAMPLE_PORTS)
return nm[ip_address].state()
if __name__ == '__main__':
parser = argparse.ArgumentParser(description='Python networking utils') parser.add_argument('--ifname', action="store", dest="ifname", required=True) given_args = parser.parse_args()
ifname = given_args.ifname
print "Interface [%s] is: %s" %(ifname, get\_interface\_status(ifname))
如果运行这个脚本查询eth0的状态,会看到类似下面的输出:
$ python 3_6_find_network_interface_status.py --ifname=eth0
Interface [eth0] is: up
3.7.3 原理分析
这个攻略从命令行中读取接口名,然后将其传给get_interface_status()函数。这个函数通过处理一个UDP套接字对象找到该接口的IP地址。
这个攻略需要第三方模块nmap的支持。我们可以使用pip从PyPI上安装这个模块。nmap扫描的实例nm,是通过调用PortScanner()创建的。初步扫描本地IP后就能获取对应网络接口的状态。
3.8 检测网络中未开启的设备
如果有人给你网络中一些设备的IP地址,让你编写一个脚本定期找出哪些主机未开启,你可以编写一个网络扫描类型的程序,而无需在目标主机电脑中安装任何软件。
3.8.1 准备工作
这个攻略需要安装Scapy库(2.2以上版本),下载地址为http://www.secdev.org/projects/scapy/files/scapy-latest.zip。
3.8.2 实战演练
我们可以使用成熟的第三方网络分析库Scapy启动ICMP扫描。因为我们要定期运行这个脚本,所以需要用到Python中的sched模块,安排扫描任务。
代码清单3-7展示了如何检测未开启的设备,如下所示:
#!usrbin/env python # Python Network Programming Cookbook -- Chapter - 3# This program is optimized for Python 2.7.
# It may run on any other version with/without modifications.
# This recipe requires scapy-2.2.0 or higher
import argparse
import time
import sched
from scapy.all import sr, srp, IP, UDP, ICMP, TCP, ARP, Ether
RUN_FREQUENCY = 10
scheduler = sched.scheduler(time.time, time.sleep)
def detect_inactive_hosts(scan_hosts):
"""
Scans the network to find scan_hosts are live or dead
scan_hosts can be like 10.0.2.2-4 to cover range.
See Scapy docs for specifying targets.
"""
global scheduler
scheduler.enter(RUN_FREQUENCY, 1, detect_inactive_hosts, (scan_hosts, )) inactive_hosts = []
try:
ans, unans = sr(IP(dst=scan_hosts)/ICMP(), retry=0, timeout=1) ans.summary(lambda(s,r) : r.sprintf("%IP.src% is alive"))
for inactive in unans:
print "%s is inactive" %inactive.dst
inactive_hosts.append(inactive.dst)
print "Total %d hosts are inactive" %(len(inactive_hosts))
except KeyboardInterrupt:
exit(0)
if __name__ == "__main__":
parser = argparse.ArgumentParser(description='Python networking utils') parser.add_argument('--scan-hosts', action="store", dest="scan_hosts", required=True) given_args = parser.parse_args()
scan_hosts = given_args.scan_hosts
scheduler.enter(1, 1, detect_inactive_hosts, (scan_hosts, ))
scheduler.run()
这个脚本的输出如下面的命令行所示:
$ sudo python 3_7_detect_inactive_machines.py --scan-hosts=10.0.2.2-4Begin emission:
.*...Finished to send 3 packets.
.
Received 6 packets, got 1 answers, remaining 2 packets
10.0.2.2 is alive
10.0.2.4 is inactive
10.0.2.3 is inactive
Total 2 hosts are inactive
Begin emission:
*.Finished to send 3 packets.
Received 3 packets, got 1 answers, remaining 2 packets
10.0.2.2 is alive
10.0.2.4 is inactive
10.0.2.3 is inactive
Total 2 hosts are inactive
3.8.3 原理分析
上述脚本先从命令行中读取一组网络主机的地址,保存到变量scan_hosts中,然后创建一个日程表,每隔一秒运行一次detect_inactive_hosts()函数。detect_inactive_hosts()函数的参数是scan_hosts,该函数调用了Scapy库的sr()函数。
detect_inactive_hosts()函数再次调用schedule.enter()函数,以安排自己10秒钟之后再次运行。如此一来,我们就能定期执行扫描任务了。
Scapy库的sr()函数接收的参数分别是IP、协议和一些扫描控制信息。在这个脚本中,把scan_hosts传给IP()方法,作为扫描的目标主机,协议指定为ICMP。协议还可使用TCP或UDP。我们没有指定重试一次并把超时时间设为一秒,以便提升脚本的运行速度。你可以自己尝试,找到符合需求的选项值。
扫描函数sr()在一个元组中返回有应答的主机和无应答的主机。我们获取了无应答的主机,构建成一个列表,然后打印出来。
3.9 使用相连的套接字执行基本的进程间通信
有时,两个脚本要通过两个进程彼此通信。在Unix/Linux中,有一个概念叫作“相连的套接字”,即socketpair。这一节对此做些实验。
3.9.1 准备工作
这个脚本为Unix/Linux主机而编写,不适合在Windows/Mac中运行。
3.9.2 实战演练
我们要在test_socketpair()函数中编写几行代码,测试套接字的socketpair()函数。
代码清单3-8是一个socketpair用法示例,如下所示:
#!usrbin/env python # Python Network Programming Cookbook -- Chapter - 3# This program is optimized for Python 2.7.
# It may run on any other version with/without modifications.
import socket
import os
BUFSIZE = 1024
def test_socketpair():
""" Test Unix socketpair"""
parent, child = socket.socketpair()
pid = os.fork()
try:
if pid:
print "@Parent, sending message..."
child.close()
parent.sendall("Hello from parent!")
response = parent.recv(BUFSIZE)
print "Response from child:", response
parent.close()
else:
print "@Child, waiting for message from parent"
parent.close()
message = child.recv(BUFSIZE)
print "Message from parent:", message
child.sendall("Hello from child!!")
child.close()
except Exception, err:
print "Error: %s" %err
if __name__ == '__main__':
test\_socketpair()
上述脚本的输出如下所示:
$ python 3_8_ipc_using_socketpairs.py @Parent, sending message...@Child, waiting for message from parent
Message from parent: Hello from parent!
Response from child: Hello from child!!
3.9.3 原理分析
socket.socketpair()函数返回的是两个相连的套接字对象,这里我们把其中一个称为父套接字,另一个称为子套接字。我们调用os.fork()方法派生出了另一个进程,其返回结果是父进程的ID。在各个进程中,先把另一个进程中的套接字关闭,然后在当前进程中的套接字上调用sendall()方法交换消息。在try-except块中如果出现异常,就把错误打印出来。
3.10 使用Unix域套接字执行进程间通信
有时使用Unix域套接字(Unix Domain Socket,简称UDS)处理两个进程之间的通信更方便。在Unix中,一切都是文件。如果你需要一个这种进程间通信的例子,这个攻略可以给你一些帮助。
3.10.1 实战演练
我们要启动一个UDS服务器,绑定到一个文件系统路径上。然后启动一个UDS客户端,使用相同的路径和服务器通信。
代码清单3-9a是一个Unix域套接字服务器,如下所示:
#!usrbin/env python # Python Network Programming Cookbook -- Chapter – 3# This program is optimized for Python 2.7.
# It may run on any other version with/without modifications.
import socket
import os
import time
SERVER_PATH = "tmppython_unix_socket_server"
def run_unix_domain_socket_server():
if os.path.exists(SERVER_PATH):
os.remove( SERVER_PATH )
print "starting unix domain socket server."
server = socket.socket( socket.AF_UNIX, socket.SOCK_DGRAM )
server.bind(SERVER_PATH)
print "Listening on path: %s" %SERVER_PATH
while True:
datagram = server.recv( 1024 )
if not datagram:
break
else:
print "-" * 20
print datagram
if "DONE" == datagram:
break
print "-" * 20
print "Server is shutting down now..."
server.close()
os.remove(SERVER_PATH)
print "Server shutdown and path removed."
if __name__ == '__main__':
run\_unix\_domain\_socket\_server()
代码清单3-9b是一个UDS客户端,如下所示
#!usrbin/env python # Python Network Programming Cookbook -- Chapter - 3# This program is optimized for Python 2.7.
# It may run on any other version with/without modifications.
import socket
import sys
SERVER_PATH = "tmppython_unix_socket_server"
def run_unix_domain_socket_client():
""" Run "a Unix domain socket client """
sock = socket.socket(socket.AF_UNIX, socket.SOCK_DGRAM)
# Connect the socket to the path where the server is listening
server_address = SERVER_PATH
print "connecting to %s" % server_address
try:
sock.connect(server_address)
except socket.error, msg:
print >>sys.stderr, msg
sys.exit(1)
try:
message = "This is the message. This will be echoed back!"
print "Sending [%s]" %message
sock.sendall(message)
amount_received = 0
amount_expected = len(message)
while amount_received < amount_expected:
data = sock.recv(16)
amount_received += len(data)
print >>sys.stderr, "Received [%s]" % data
finally:
print "Closing client"
sock.close()
if __name__ == '__main__':
run\_unix\_domain\_socket\_client()
服务器的输出如下所示:
$ python 3_9a_unix_domain_socket_server.py starting unix domain socket server.Listening on path: tmppython_unix_socket_server --------------------
This is the message. This will be echoed back!
客户端的输出如下所示:
$ python 3_9b_unix_domain_socket_client.py connecting to tmppython_unix_socket_server
Sending [This is the message. This will be echoed back!]
3.10.2 原理分析
我们为UDS客户端和服务器定义了一个共用的路径,二者都用这个路径连接和监听。
在服务器的代码中,如果前一次运行脚本后路径仍然存在,就将其删除。然后创建一个Unix数据报套接字,绑定到指定的路径上,监听进入的连接。在数据处理循环中,使用recv()方法获取客户端发出的数据并打印到屏幕上。
客户端代码直接打开一个Unix数据报套接字,连接共用的服务器地址。客户端调用sendall()方法向服务器发送一个消息,然后等待这些消息返回,再打印出来。
3.11 确认你使用的Python是否支持IPv6套接字
IP第6版(IPv6)在业内越来越多地被用来开发新型应用。如果你想编写一个IPv6应用程序,首先要知道你的设备是否支持IPv6。在Linux/Unix中,可通过下面的命令确认:
$ cat procnet/if_inet600000000000000000000000000000001 01 80 10 80 lo
fe800000000000000a0027fffe950d1a 02 40 20 80 eth0
使用Python脚本也可以检查你的设备是否支持IPv6,以及所安装的Python是否支持。
3.11.1 准备工作
在这个攻略中,要使用pip安装一个Python第三方库,netifaces,如下所示:
$ pip install netifaces
3.11.2 实战演练
我们可以使用第三方库netifaces确认你的设备是否支持IPv6。我们要调用这个库中的interfaces()函数,列出系统中的所有接口。
代码清单3-10是检查设备是否支持IPv6的Python脚本,如下所示:
#!usrbin/env python # Python Network Programming Cookbook -- Chapter - 3# This program is optimized for Python 2.7.
# It may run on any other version with/without modifications.
#IPv6 test in Unix commandline: $cat procnet/if_inet6
import socket
import argparse
import netifaces as ni
def inspect_ipv6_support():
""" Find the ipv6 address"""
print "IPV6 support built into Python: %s" %socket.has_ipv6
ipv6_addr = {}
for interface in ni.interfaces():
all_addresses = ni.ifaddresses(interface)
print "Interface %s:" %interface
for family,addrs in all_addresses.iteritems():
fam_name = ni.address_families[family]
print ' Address family: %s' % fam_name
for addr in addrs:
if fam_name == 'AF_INET6':
ipv6_addr[interface] = addr['addr']
print ' Address : %s' % addr['addr']
nmask = addr.get('netmask', None)
if nmask:
print ' Netmask : %s' % nmask
bcast = addr.get('broadcast', None)
if bcast:
print ' Broadcast: %s' % bcast
if ipv6_addr:
print "Found IPv6 address: %s" %ipv6_addr
else:
print "No IPv6 interface found!"
if __name__ == '__main__':
inspect\_ipv6\_support()
这个脚本的输出如下所示:
$ python 3_10_check_ipv6_support.py IPV6 support built into Python: TrueInterface lo:
Address family: AF_PACKET
Address : 00:00:00:00:00:00
Address family: AF_INET
Address : 127.0.0.1
Netmask : 255.0.0.0
Address family: AF_INET6
Address : ::1
Netmask : ffff:ffff:ffff:ffff:ffff:ffff:ffff:ffff
Interface eth0:
Address family: AF_PACKET
Address : 08:00:27:95:0d:1a
Broadcast: ff:ff:ff:ff:ff:ff
Address family: AF_INET
Address : 10.0.2.15
Netmask : 255.255.255.0
Broadcast: 10.0.2.255
Address family: AF_INET6
Address : fe80::a00:27ff:fe95:d1a
Netmask : ffff:ffff:ffff:ffff::
Found IPv6 address: {'lo': '::1', 'eth0': 'fe80::a00:27ff:fe95:d1a'}
3.11.3 原理分析
检查设备是否支持IPv6的函数inspect_ipv6_support()首先使用socket.has_ipv6检查编译Python时是否加入了IPv6支持。然后调用netifaces模块中的interfaces()函数,列出所有接口。调用ifaddresses()方法时如果传入了一个网络接口,会返回这个接口的所有IP地址。然后从中提取不同的IP相关信息,例如协议族、地址、网络掩码和广播地址。如果协议族匹配AF_INET6,就把网络接口的地址添加到IPv6_address字典中。
3.12 从IPv6地址中提取IPv6前缀
在IPv6应用中,你要从IPv6地址中找出前缀信息。注意,按照RFC 3513的定义,前面的64位IPv6地址由全网路由前缀和子网ID组成。通常使用一个较短的前缀(例如/48),可以定义很多更长、更具体的前缀(例如/64)。使用Python脚本可以更方便的生成前缀信息。
3.12.1 实战演练
我们可以使用第三方库netifaces和netaddr找出IPv6地址中的IPv6前缀,如下所示:
#!usrbin/env python # Python Network Programming Cookbook -- Chapter - 3# This program is optimized for Python 2.7.
# It may run on any other version with/without modifications.
import socket
import netifaces as ni
import netaddr as na
def extract_ipv6_info():
""" Extracts IPv6 information"""
print "IPV6 support built into Python: %s" %socket.has_ipv6
for interface in ni.interfaces():
all_addresses = ni.ifaddresses(interface)
print "Interface %s:" %interface
for family,addrs in all_addresses.iteritems():
fam_name = ni.address_families[family]
#print ' Address family: %s' % fam_name
for addr in addrs:
if fam_name == 'AF_INET6':
addr = addr['addr']
has_eth_string = addr.split("%eth")
if has_eth_string:
addr = addr.split("%eth")[0]
print " IP Address: %s" %na.IPNetwork(addr)
print " IP Version: %s" %na.IPNetwork(addr).version print " IP Prefix length: %s" %na.IPNetwork(addr).prefixlen print " Network: %s" %na.IPNetwork(addr).network print " Broadcast: %s" %na.IPNetwork(addr).broadcast
if __name__ == '__main__':
extract\_ipv6\_info()
这个脚本的输出如下所示:
$ python 3_11_extract_ipv6_prefix.py IPV6 support built into Python: TrueInterface lo:
IP Address: ::1/128
IP Version: 6
IP Prefix length: 128
Network: ::1
Broadcast: ::1
Interface eth0:
IP Address: fe80::a00:27ff:fe95:d1a/128
IP Version: 6
IP Prefix length: 128
Network: fe80::a00:27ff:fe95:d1a
Broadcast: fe80::a00:27ff:fe95:d1a
3.12.2 原理分析
Python的netifaces库使用interfaces()和ifaddresses()两个函数获取网络接口的IPv6地址。处理网络地址时使用netaddr模块特别方便。这个模块中的IPNetwork()类构造方法会提供一个IPv4或IPv6地址,并计算出前缀、网络地址和广播地址。这些信息从IPNetwork()类实例的version、prefixlen、network和broadcast属性中获取。
3.13 编写一个IPv6回显客户端/服务器
你要编写一个支持IPv6的服务器或客户端,才能知道它和IPv4版有何区别。
3.13.1 实战演练
这里使用的方案和编写IPv4回显客户端/服务器一样。唯一重要的区别是,使用IPv6信息创建套接字的方法。
代码清单3-12a是IPv6回显服务器,如下所示:
#!usrbin/env python # Python Network Programming Cookbook -- Chapter - 3# This program is optimized for Python 2.7.
# It may run on any other version with/without modifications.
import argparse
import socket
import sys
HOST = 'localhost'
def echo_server(port, host=HOST):
"""Echo server using IPv6 """
for result in socket.getaddrinfo(host, port, socket.AF_UNSPEC, socket.SOCK_STREAM, 0, socket.AI_PASSIVE): af, socktype, proto, canonname, sa = result
try:
sock = socket.socket(af, socktype, proto)
except socket.error, err:
print "Error: %s" %err
try:
sock.bind(sa)
sock.listen(1)
print "Server lisenting on %s:%s" %(host, port)
except socket.error, msg:
sock.close()
continue
break
sys.exit(1)
conn, addr = sock.accept()
print 'Connected to', addr
while True:
data = conn.recv(1024)
print "Received data from the client: [%s]" %data
if not data: break
conn.send(data)
print "Sent data echoed back to the client: [%s]" %data
conn.close()
if __name__ == '__main__':
parser = argparse.ArgumentParser(description='IPv6 Socket Server Example') parser.add_argument('--port', action="store", dest="port", type=int, required=True) given_args = parser.parse_args()
port = given_args.port
echo\_server(port)
代码清单3-12b是IPv6回显客户端,如下所示:
#!usrbin/env python # Python Network Programming Cookbook -- Chapter - 3# This program is optimized for Python 2.7.
# It may run on any other version with/without modifications.
import argparse
import socket
import sys
HOST = 'localhost'
BUFSIZE = 1024
def ipv6_echo_client(port, host=HOST):
for res in socket.getaddrinfo(host, port, socket.AF_UNSPEC, socket.SOCK_STREAM): af, socktype, proto, canonname, sa = res
try:
sock = socket.socket(af, socktype, proto)
except socket.error, err:
print "Error:%s" %err
try:
sock.connect(sa)
except socket.error, msg:
sock.close()
continue
if sock is None:
print 'Failed to open socket!'
sys.exit(1)
msg = "Hello from ipv6 client"
print "Send data to server: %s" %msg
sock.send(msg)
while True:
data = sock.recv(BUFSIZE)
print 'Received from server', repr(data)
if not data:
break
sock.close()
if __name__ == '__main__':
parser = argparse.ArgumentParser(description='IPv6 socket client example') parser.add_argument('--port', action="store", dest="port", type=int, required=True) given_args = parser.parse_args()
port = given_args.port
ipv6\_echo\_client(port)
服务器的输出如下:
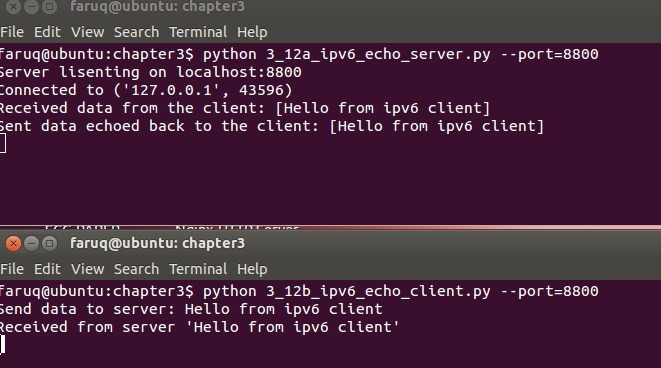
$ python 3_12a_ipv6_echo_server.py --port=8800Server lisenting on localhost:8800
Connected to ('127.0.0.1', 35034)
Received data from the client: [Hello from ipv6 client]
Sent data echoed back to the client: [Hello from ipv6 client]
客户端的输出如下:
$ python 3_12b_ipv6_echo_client.py --port=8800Send data to server: Hello from ipv6 client
Received from server 'Hello from ipv6 client'
下面的截图展示了IPv6客户端和服务器之间的交互:
3.13.2 原理分析
IPv6回显服务器首先调用socket.getaddrinfo()获取自身的IPv6信息。注意,创建TCP套接字时指定的协议是AF_UNSPEC。得到的信息是有五个值的元组。创建服务器套接字时用到了其中三个信息:地址族、套接字类型和协议。然后把套接字绑定到元组中保存的套接字地址上,监听并接受进入的连接。建立连接后,服务器接收客户端发来的数据,然后回显给客户端。
在客户端代码中,我们创建了一个兼容IPv6的客户端套接字实例,然后在这个实例上调用send()方法发送数据,再调用recv()方法获取服务器回显的数据。
