第 4 章 HTTP协议网络编程
本章攻略:
- 从HTTP服务器下载数据
- 在你的设备中伺服HTTP请求
- 访问网站后提取cookie信息
- 提交网页表单
- 通过代理服务器发送Web请求
- 使用HEAD请求检查网页是否存在
- 把客户端伪装成Mozilla Firefox
- 使用HTTP压缩节省Web请求消耗的带宽
- 编写一个支持断点续传功能的HTTP容错客户端
- 使用Python和OpenSSL编写一个简单的HTTPS服务器
4.1 简介
本章介绍Python HTTP网络库和一些第三方库的功能。例如,以一种更友好、更简洁的方式处理HTTP请求的requests库。其中有一个攻略用到了OpenSSL库,创建支持SSL的Web服务器。
多个攻略都介绍了HTTP协议的很多常规特性,例如使用POST请求提交网页表单、处理首部信息和使用压缩等。
4.2 从HTTP服务器下载数据
你可能想要编写一个简单的HTTP客户端,通过原生的HTTP协议从任意的Web服务器上下载一些数据。这是自己开发HTTP浏览器的第一步。
4.2.1 实战演练
我们要使用Python编写的微型浏览器访问www.python.org。这个浏览器使用Python中的httplib模块编写。
代码清单4-1说明了如何编写一个简单的HTTP客户端,如下所示:
#!usrbin/env python # Python Network Programming Cookbook -- Chapter - 4# This program is optimized for Python 2.7.
# It may run on any other version with/without modifications.
import argparse
import httplib
REMOTE_SERVER_HOST = 'www.python.org'
REMOTE_SERVER_PATH = '/'
class HTTPClient:
def __init__(self, host):
self.host = host
def fetch(self, path):
http = httplib.HTTP(self.host)
# Prepare header
http.putrequest("GET", path)
http.putheader("User-Agent", __file__)
http.putheader("Host", self.host)
http.putheader("Accept", "/") http.endheaders()
try:
errcode, errmsg, headers = http.getreply()
except Exception, e:
print "Client failed error code: %s message:%s headers:%s" %(errcode, errmsg, headers) else:
print "Got homepage from %s" %self.host
file = http.getfile()
return file.read()
if __name__ == "__main__":
parser = argparse.ArgumentParser(description='HTTP Client Example') parser.add_argument('--host', action="store", dest="host", default=REMOTE_SERVER_HOST) parser.add_argument('--path', action="store", dest="path", default=REMOTE_SERVER_PATH) given_args = parser.parse_args()
host, path = given_args.host, given_args.path
client = HTTPClient(host)
print client.fetch(path)
这个攻略默认从www.python.org中获取一个网页。运行这个脚本时可以指定主机和路径参数,也可以不指定。运行脚本后会看到如下输出:
$ python 4_1_download_data.py --host=www.python.org Got homepage from www.python.org<!DOCTYPE html PUBLIC "-//W3C//DTD XHTML 1.0 Transitional//EN" "http://
www.w3.org/TR/xhtml1/DTD/xhtml1-transitional.dtd">
<html xmlns="http://www.w3.og/1999/xhtml" xml:lang="en" lang="en"> <head>
如果运行脚本时指定的路径不存在,会显示如下的服务器响应:
$ python 4_1_download_data.py --host='www.python.org' --path='not-exist'Got homepage from www.python.org
<!DOCTYPE html PUBLIC "-/W3C//DTD XHTML 1.0 Transitional//EN" "http://
www.w3.org/TR/xhtml1/DTD/xhtml1-transitional.dtd">
<html xmlns="http://www.w3.org/1999/xhtml" xml:lang="en" lang="en"> <head>
<meta http-equiv="content-type" content="text/html; charset=utf-8" > <title>Page Not Found<title>
4.2.2 原理分析
这个攻略使用Python的内置库httplib,定义了一个HTTPClient类,从远程主机上获取数据。在fetch()方法中使用HTTP()函数及其他辅助函数(例如putrequest()和putheader())创建了一个虚拟的HTTP客户端,首先指定一个GET/path字符串,然后设定用户代理,其值为当前脚本(__file__)。
发起请求的getreply()方法放在一个try-except块中。响应通过getfile()方法获取,然后读取数据流中的内容。
4.3 在你的设备中伺服HTTP请求
你可能想编写一个自己的Web服务器,处理客户端请求,返回一个简单的欢迎消息。
4.3.1 实战演练
Python集成了一个非常简单的Web服务器,可以在命令行中启动,如下所示:
$ python -m SimpleHTTPServer 8080
执行这个命令后会在端口8080上启动一个HTTP Web服务器。通过在浏览器中输入http://localhost:8080,可以访问这个服务器。你将看到的是运行上述命令时所在文件夹里的内容。如果这个文件夹中有能被Web服务器识别的索引文件,例如index.html,在浏览器中就会显示这个文件的内容。如果你想完全掌控Web服务器,就得启动自己定制的HTTP服务器。
代码清单4-2是这个定制的HTTP Web服务器,如下所示:
#!usrbin/env python # Python Network Programming Cookbook -- Chapter - 4# This program is optimized for Python 2.7.
# It may run on any other version with/without modifications.
import argparse
import sys
from BaseHTTPServer import BaseHTTPRequestHandler, HTTPServer
DEFAULT_HOST = '127.0.0.1'
DEFAULT_PORT = 8800
class RequestHandler(BaseHTTPRequestHandler):
""" Custom request handler"""
def do_GET(self):
""" Handler for the GET requests """
self.send_response(200)
self.send_header('Content-type','text/html')
self.end_headers()
# Send the message to browser
self.wfile.write("Hello from server!")
return
class CustomHTTPServer(HTTPServer):
"A custom HTTP server"
def __init__(self, host, port):
server_address = (host, port)
HTTPServer.__init__(self, server_address, RequestHandler)
def run_server(port):
try:
server= CustomHTTPServer(DEFAULT_HOST, port)
print "Custom HTTP server started on port: %s" % port server.serve_forever()
except Exception, err:
print "Error:%s" %err
except KeyboardInterrupt:
print "Server interrupted and is shutting down..."
server.socket.close()
if __name__ == "__main__":
parser = argparse.ArgumentParser(description='Simple HTTP Server Example') parser.add_argument('--port', action="store", dest="port", type=int, default=DEFAULT_PORT) given_args = parser.parse_args()
port = given_args.port
run\_server(port)
下面的截图是一个简单的HTTP服务器:
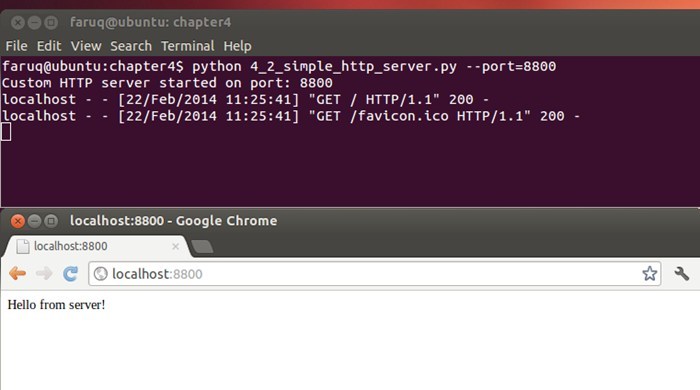
运行这个Web服务器,然后在浏览器中访问,会看到浏览器中显示了一行文本“Hello from server!”,如下所示:
$ python 4_2_simple_http_server.py --port=8800Custom HTTP server started on port: 8800
localhost - - [18/Apr/2013 13:39:33] "GET HTTP1.1" 200 -
localhost \- \- [18/Apr/2013 13:39:33] "GET favicon.ico HTTP1.1" 200
4.3.2 原理分析
在这个攻略中,我们定义了CustomHTTPServer类,它继承自HTTPServer类。在CustomHTTPServer类的构造方法中,设定了服务器地址和用户输入的端口号,还用到了RequestHandler类。客户端连到服务器上时,服务器就通过RequestHandler类处理请求。
RequestHandler类定义了处理客户端GET请求的方法。这个方法向客户端发送一个HTTP首部(状态码200),然后使用write()方法返回一个成功消息“Hello from server!”。
4.4 访问网站后提取cookie信息
很多网站使用cookie在你的本地硬盘中存储各种信息。你可能想要查看cookie中保存的信息,或者使用cookie自动登录网站。
4.4.1 实战演练
假设我们要登录流行的代码分享网站www.bitbucket.org,我们要在登录页面(https://bitbucket.org/ account/signin/?next=/)提交登录信息。登录页面的截图如下所示:
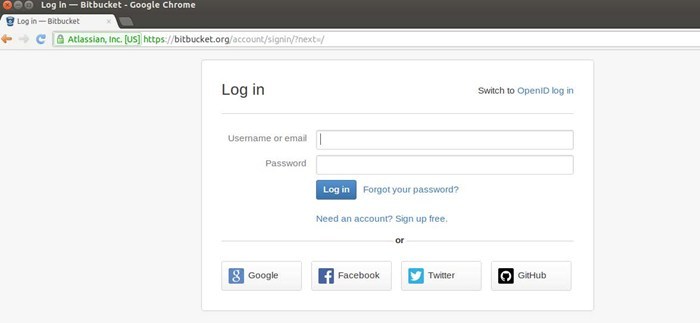
我们要记下表单中几个字段的ID,然后决定提交哪些虚拟值。我们首先要访问登录页面,再访问首页,查看在cookie中保存了什么。
代码清单4-3说明了如何提取cookie信息,如下所示:
#!usrbin/env python # Python Network Programming Cookbook -- Chapter - 4# This program is optimized for Python 2.7.
# It may run on any other version with/without modifications.
import cookielib
import urllib
import urllib2
ID_USERNAME = 'id_username'
ID_PASSWORD = 'id_password'
USERNAME = 'you@email.com'
PASSWORD = 'mypassword'
LOGIN_URL = 'https://bitbucket.org/account/signin/?next=/'
NORMAL_URL = 'https://bitbucket.org/'
def extract_cookie_info():
""" Fake login to a site with cookie"""
# setup cookie jar
cj = cookielib.CookieJar()
login_data = urllib.urlencode({ID_USERNAME : USERNAME, ID_PASSWORD : PASSWORD}) # create url opener
opener = urllib2.build_opener(urllib2.HTTPCookieProcessor(cj)) resp = opener.open(LOGIN_URL, login_data)
# send login info
for cookie in cj:
print "----First time cookie: %s --> %s" %(cookie.name, cookie.value)
print "Headers: %s" %resp.headers
# now access without any login info
resp = opener.open(NORMAL_URL)
for cookie in cj:
print "++++Second time cookie: %s --> %s" %(cookie.name, cookie.value)
print "Headers: %s" %resp.headers
if __name__ == '__main__':
extract\_cookie\_info()
运行这个脚本后得到的输出如下:
$ python 4_3_extract_cookie_information.py ----First time cookie: bb_session --> aed58dde1228571bf60466581790566d Headers: Server: nginx/1.2.4Date: Sun, 05 May 2013 15:13:56 GMT
Content-Type: text/html; charset=utf-8
Content-Length: 21167
Connection: close
X-Served-By: bitbucket04
Content-Language: en
X-Static-Version: c67fb01467cf
Expires: Sun, 05 May 2013 15:13:56 GMT
Vary: Accept-Language, Cookie
Last-Modified: Sun, 05 May 2013 15:13:56 GMT
X-Version: 14f9c66ad9db
ETag: "3ba81d9eb350c295a453b5ab6e88935e"
X-Request-Count: 310
Cache-Control: max-age=0
Set-Cookie: bb_session=aed58dde1228571bf60466581790566d; expires=Sun, 19-May-2013 15:13:56 GMT; httponly; Max-Age=1209600; Path=/; secure
Strict-Transport-Security: max-age=2592000
X-Content-Type-Options: nosniff
++++Second time cookie: bb_session --> aed58dde1228571bf60466581790566d Headers: Server: nginx/1.2.4
Date: Sun, 05 May 2013 15:13:57 GMT
Content-Type: text/html; charset=utf-8
Content-Length: 36787
Connection: close
X-Served-By: bitbucket02
Content-Language: en
X-Static-Version: c67fb01467cf
Vary: Accept-Language, Cookie
X-Version: 14f9c66ad9db
X-Request-Count: 97
Strict-Transport-Security: max-age=2592000
X\-Content\-Type\-Options: nosniff
4.4.2 原理分析
我们使用Python中的cookielib模块创建了一个cookie容器cj。登录数据使用urllib.urlencode()方法编码。urllib2模块中有个build_opener()方法,其参数是一个HTTPCookieProcessor类实例。我们要把之前创建的cookie容器传给HTTPCookieProcessor类的构造方法。urllib2.build_opener()方法的返回值是一个URL打开器。我们要调用这个打开器两次:一次访问登录页面,一次访问网站的首页。从响应的首部可以看出,在Set-Cookie首部中只设定了一个cookie,即bb_session。cookielib模块的更多信息可以在Python官方文档中查看,网址是http://docs.python.org/2/library/cookielib.html。
4.5 提交网页表单
浏览网络时,一天之中我们要提交好多次网页表单。现在,我们要使用Python代码提交表单。
4.5.1 准备工作
这个攻略用到了一个Python第三方模块,叫作requests。这个模块的安装方法参见安装指南:http://docs.python-requests.org/en/latest/user/install/。例如,可以在命令行中使用pip安装requests模块,如下所示:
$ pip install requests
4.5.2 实战演练
让我们来提交一些虚拟数据,注册Twitter账户。提交表单可以使用两种请求方法:GET和POST。不太敏感的数据,例如搜索查询,一般使用GET请求提交。敏感的数据则通过POST请求发送。我们来试一下使用这两种方法提交数据。
代码清单4-4说明了如何提交网页表单,如下所示:
#!usrbin/env python # Python Network Programming Cookbook -- Chapter - 4# This program is optimized for Python 2.7.
# It may run on any other version with/without modifications.
import requests
import urllib
import urllib2
ID_USERNAME = 'signup-user-name'
ID_EMAIL = 'signup-user-email'
ID_PASSWORD = 'signup-user-password'
USERNAME = 'username'
EMAIL = 'you@email.com'
PASSWORD = 'yourpassword'
SIGNUP_URL = 'https://twitter.com/account/create'
def submit_form():
"""Submit a form"""
payload = {ID_USERNAME : USERNAME,
ID_EMAIL : EMAIL,
ID_PASSWORD : PASSWORD,}
# make a get request
resp = requests.get(SIGNUP_URL)
print "Response to GET request: %s" %resp.content
# send POST request
resp = requests.post(SIGNUP_URL, payload)
print "Headers from a POST request response: %s" %resp.headers #print "HTML Response: %s" %resp.read()
if __name__ == '__main__':
submit\_form()
运行这个脚本后,会看到如下输出:
$ python 4_4_submit_web_form.py Response to GET request: <?xml version="1.0" encoding="UTF-8"?> <hash><error>This method requires a POST.</error>
<request>/account/create</request>
</hash>
Headers from a POST request response: {'status': '200 OK', 'content-length': '21064', 'set-cookie': 'twittersess=BAh7CD--
d2865d40d1365eeb2175559dc5e6b99f64ea39ff; domain=.twitter.com; path=/; HttpOnly', 'expires': 'Tue, 31 Mar 1981 05:00:00 GMT', 'vary': 'Accept-Encoding', 'last-modified': 'Sun, 05 May 2013
15:59:27 GMT', 'pragma': 'no-cache', 'date': 'Sun, 05 May 2013
15:59:27 GMT', 'x\-xss\-protection': '1; mode=block', 'x\-transaction': 'a4b425eda23b5312', 'content\-encoding': 'gzip', 'strict\-transport\-security': 'max\-age=631138519', 'server': 'tfe', 'x\-mid': 'f7cde9a3f3d111310427116adc90bf3e8c95e868', 'x\-runtime': '0.09969', 'etag': '"7af6f92a7f7b4d37a6454caa6094071d"', 'cache\-control': 'no\-cache, no\-store, must\-revalidate, pre\-check=0, post\-check=0', 'x\-frame\-options': 'SAMEORIGIN', 'content\-type': 'text/html; charset=utf\-8'}
4.5.3 原理分析
这个攻略使用了第三方模块requests。这个模块提供了便利的包装方法get()和post(),能正确编码URL中的数据并提交表单。
在这个攻略中,我们创建了一个数据字典,包含用户名、密码和电子邮件地址,用于注册Twitter账户。我们首先使用GET方法提交表单,但Twitter返回一个错误,说页面只支持POST方法。然后我们使用POST方法提交数据,结果Twitter接受了注册请求,这一点可以由首部数据证实。
4.6 通过代理服务器发送Web请求
你可能想通过代理访问网页。如果你为浏览器配置了一个代理服务器,而且代理可用,就可以运行这个攻略。否则,可以使用网上其他可用的公共代理服务器。
4.6.1 准备工作
你需要一个可使用的代理服务器。你可以使用谷歌或其他搜索引擎找到一个免费的代理服务器。这里,为了演示,我们使用的代理服务器是165.24.10.8。
4.6.2 实战演练
我们来通过一个公共代理服务器发送HTTP请求。
代码清单4-5说明了如何通过代理服务器发送Web请求,如下所示:
#!usrbin/env python # Python Network Programming Cookbook -- Chapter - 4# This program is optimized for Python 2.7.
# It may run on any other version with/without modifications.
import urllib
URL = 'https://www.github.com'
PROXY_ADDRESS = "165.24.10.8:8080" # By Googling free proxy server
if __name__ == '__main__':
resp = urllib.urlopen(URL, proxies = {"http" : PROXY\_ADDRESS}) print "Proxy server returns response headers: %s " %resp.headers
运行这个脚本后,会看到如下输出:
$ python 4_5_proxy_web_request.py Proxy server returns response headers: Server: GitHub.comDate: Sun, 05 May 2013 16:16:04 GMT
Content-Type: text/html; charset=utf-8
Connection: close
Status: 200 OK
Cache-Control: private, max-age=0, must-revalidate
Strict-Transport-Security: max-age=2592000
X-Frame-Options: deny
Set-Cookie: logged_in=no; domain=.github.com; path=/; expires=Thu, 05-May-2033 16:16:04 GMT; HttpOnly Set-Cookie: ghsess=BAh7...; path=/; expires=Sun, 01-Jan-2023 00:00:00
GMT; secure; HttpOnly
X-Runtime: 8
ETag: "66fcc37865eb05c19b2d15fbb44cd7a9"
Content-Length: 10643
Vary: Accept\-Encoding
4.6.3 原理分析
这个攻略很简短,使用在谷歌中找到的一个公共代理服务器访问社会化代码分享网站www.github.com。代理服务器的地址传给urllib模块的urlopen()方法。我们把响应的HTTP首部打印出来,以证明代理设置起到了作用。
4.7 使用HEAD请求检查网页是否存在
你可能想在不下载HTML内容的前提下检查网页是否存在。此时我们要使用浏览器客户端发送get HEAD请求。根据维基百科中的定义,HEAD请求和GET请求的响应一样,只是前者没有响应主体。使用HEAD请求可以获取响应首部中的元信息,而不用传输整个网页的内容。
4.7.1 实战演练
我们要向www.python.org发送一个HEAD请求。这个请求不会下载首页的内容,而是检查服务器是否返回正确的响应,例如OK、FOUND和MOVED PERMANENTLY等。
代码清单4-6说明了如何使用HEAD请求检查网页,如下所示:
#!usrbin/env python # Python Network Programming Cookbook -- Chapter - 4# This program is optimized for Python 2.7.
# It may run on any other version with/without modifications.
import argparse
import httplib
import urlparse
import re
import urllib
DEFAULT_URL = 'http://www.python.org'
HTTP_GOOD_CODES = [httplib.OK, httplib.FOUND, httplib.MOVED_PERMANENTLY]
def get_server_status_code(url):
"""
Download just the header of a URL and
return the server's status code.
"""
host, path = urlparse.urlparse(url)[1:3]
try:
conn = httplib.HTTPConnection(host)
conn.request('HEAD', path)
return conn.getresponse().status
except StandardError:
return None
if __name__ == '__main__':
parser = argparse.ArgumentParser(description='Example HEAD Request') parser.add_argument('--url', action="store", dest="url", default=DEFAULT_URL) given_args = parser.parse_args()
url = given_args.url
if get_server_status_code(url) in HTTP_GOOD_CODES:
print "Server: %s status is OK: " %url
else:
print "Server: %s status is NOT OK!" %url
运行这个脚本后,会根据HEAD请求的响应显示成功消息或错误消息,如下所示:
$ python 4_6_checking_webpage_with_HEAD_request.py Server: http://www.python.org status is OK!
$ python 4\_6\_checking\_webpage\_with\_HEAD\_request.py \-\-url=http://www.zytho.org Server: http://www.zytho.org status is NOT OK!
4.7.2 原理分析
我们使用httplib模块中的HTTPConnection()方法向服务器发起HEAD请求。如果需要,可以指定要访问的路径。在这个攻略中,HTTPConnection()方法检查的是www.python.org首页。如果URL不正确,在返回码的可接受列表中就无法找到返回的响应。
4.8 把客户端伪装成Mozilla Firefox
在Python代码中,你可能想假装成在使用Mozilla Firefox访问Web服务器。
4.8.1 实战演练
你可以在HTTP请求首部中发送自己定制的用户代理值。
代码清单4-7说明了如何把客户端伪装成Mozilla Firefox浏览器,如下所示:
#!usrbin/env python # Python Network Programming Cookbook -- Chapter - 4# This program is optimized for Python 2.7.
# It may run on any other version with/without modifications.
import urllib2
BROWSER = 'Mozilla/5.0 (Windows NT 5.1; rv:20.0) Gecko/20100101 Firefox/20.0'
URL = 'http://www.python.org'
def spoof_firefox():
opener = urllib2.build_opener()
opener.addheaders = [('User-agent', BROWSER)]
result = opener.open(URL)
print "Response headers:"
for header in result.headers.headers:
print "\t",header
if __name__ == '__main__':
spoof\_firefox()
运行这个脚本后,会看到如下输出:
$ python 4_7_spoof_mozilla_firefox_in_client_code.py Response headers:Date: Sun, 05 May 2013 16:56:36 GMT
Server: Apache/2.2.16 (Debian)
Last-Modified: Sun, 05 May 2013 00:51:40 GMT
ETag: "105800d-5280-4dbedfcb07f00"
Accept-Ranges: bytes
Content-Length: 21120
Vary: Accept-Encoding
Connection: close
Content\-Type: text/html
4.8.2 原理分析
我们使用urllib2模块中的build_opener()方法创建自定义浏览器,把用户代理字符串设为Mozilla/5.0 (Windows NT 5.1; rv:20.0) Gecko/20100101 Firefox/20.0。
4.9 使用HTTP压缩节省Web请求消耗的带宽
你可能想让Web服务器在下载网页时有更好的性能表现。压缩HTTP数据能提升伺服网页内容的速度。
4.9.1 实战演练
我们来编写一个Web服务器,把内容压缩成gzip格式后再提供给访问者。
代码清单4-8说明了如何压缩HTTP数据,如下所示:
#!usrbin/env python # Python Network Programming Cookbook -- Chapter - 4# This program is optimized for Python 2.7.
# It may run on any other version with/without modifications.
import argparse
import string
import os
import sys
import gzip
import cStringIO
from BaseHTTPServer import BaseHTTPRequestHandler, HTTPServer
DEFAULT_HOST = '127.0.0.1'
DEFAULT_PORT = 8800
HTML_CONTENT = """<html><body><h1>Compressed Hello World!</h1></body></html>"""
class RequestHandler(BaseHTTPRequestHandler):
""" Custom request handler"""
def do_GET(self):
""" Handler for the GET requests """
self.send_response(200)
self.send_header('Content-type','text/html')
self.send_header('Content-Encoding','gzip')
zbuf = self.compress_buffer(HTML_CONTENT)
sys.stdout.write("Content-Encoding: gzip\r\n")
self.send_header('Content-Length',len(zbuf))
self.end_headers()
# Send the message to browser
zbuf = self.compress_buffer(HTML_CONTENT)
sys.stdout.write("Content-Encoding: gzip\r\n")
sys.stdout.write("Content-Length: %d\r\n" % (len(zbuf))) sys.stdout.write("\r\n")
self.wfile.write(zbuf)
return
def compress_buffer(self, buf):
zbuf = cStringIO.StringIO()
zfile = gzip.GzipFile(mode = 'wb', fileobj = zbuf, compresslevel = 6) zfile.write(buf)
zfile.close()
return zbuf.getvalue()
if __name__ == '__main__':
parser = argparse.ArgumentParser(description='Simple HTTP Server Example') parser.add_argument('--port', action="store", dest="port", type=int, default=DEFAULT_PORT) given_args = parser.parse_args()
port = given_args.port
server_address = (DEFAULT_HOST, port)
server = HTTPServer(server_address, RequestHandler)
server.serve\_forever()
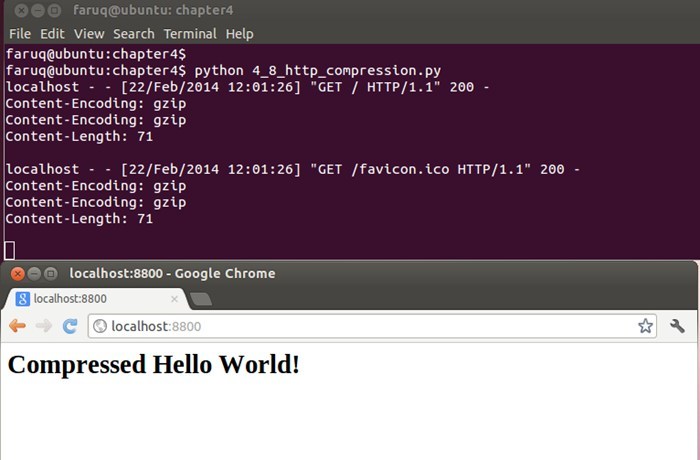
运行这个脚本后,在浏览器中访问http://localhost:8800,会看到浏览器中显示了文本“Compressed Hello World!”(HTTP压缩后得到的结果),如下所示:
$ python 4_8_http_compression.py localhost - - [22/Feb/2014 12:01:26] "GET HTTP1.1" 200 -Content-Encoding: gzip
Content-Encoding: gzip
Content-Length: 71
localhost - - [22/Feb/2014 12:01:26] "GET favicon.ico HTTP1.1" 200 -
Content-Encoding: gzip
Content-Encoding: gzip
Content\-Length: 71
下面的截图展示了Web服务器伺服压缩内容的过程:
4.9.2 原理分析
我们实例化BaseHTTPServer模块中的HTTPServer类,创建了一个Web服务器。然后为这个服务器实例定义了一个请求处理方法,它使用compress_buffer()方法压缩发给客户端的每个响应,再把事先定义好的HTML内容发送给客户端。
4.10 编写一个支持断点续传功能的HTTP容错客户端
你可能想编写一个容错的客户端,它在因某种原因初次下载失败后能继续下载文件。
4.10.1 实战演练
让我们从www.python.org上下载Python 2.7的源码。使用resume_download()函数下载的文件在中止后能继续下载尚未下载的内容。
代码清单4-9说明了如何继续下载,如下所示:
#!usrbin/env python # Python Network Programming Cookbook -- Chapter - 4# This program is optimized for Python 2.7.
# It may run on any other version with/without modifications.
import urllib
import os
TARGET_URL = 'http://python.org/ftp/python/2.7.4/'
TARGET_FILE = 'Python2.7.4.tgz'
class CustomURLOpener(urllib.FancyURLopener):
"""Override FancyURLopener to skip error 206 (when a
partial file is being sent)
"""
def http_error_206(self, url, fp, errcode, errmsg, headers, data=None): pass
def resume_download():
file_exists = False
CustomURLClass = CustomURLOpener()
if os.path.exists(TARGET_FILE):
out_file = open(TARGET_FILE,"ab")
file_exists = os.path.getsize(TARGET_FILE)
#If the file exists, then only download the unfinished part CustomURLClass.addheader("range","bytes=%s-" % (file_exists)) else:
out_file = open(TARGET_FILE,"wb")
web_page = CustomURLClass.open(TARGET_URL + TARGET_FILE)
#Check if last download was OK
if int(web_page.headers['Content-Length']) == file_exists: loop = 0
print "File already downloaded!"
byte_count = 0
while True:
data = web_page.read(8192)
if not data:
break
out_file.write(data)
byte_count = byte_count + len(data)
web_page.close()
out_file.close()
for k,v in web_page.headers.items():
print k, "=",v
print "File copied", byte_count, "bytes from", web_page.url
if __name__ == '__main__':
resume\_download()
运行这个脚本后,会看到如下输出结果:
$ python 4_9_http_fail_over_client.py content-length = 14489063content-encoding = x-gzip
accept-ranges = bytes
connection = close
server = Apache/2.2.16 (Debian)
last-modified = Sat, 06 Apr 2013 14:16:10 GMT
content-range = bytes 0-14489062/14489063
etag = "1748016-dd15e7-4d9b1d8685e80"
date = Tue, 07 May 2013 12:51:31 GMT
content-type = application/x-tar
File copied 14489063 bytes from http://python.org/ftp/python/2.7.4/Python2.7.4.tgz
4.10.2 原理分析
在这个攻略中,我们定义了一个URL打开器类,继承自urllib模块中的FancyURLopener类,不过重定义了用于分段下载内容的http_error_206()方法。resume_download()函数首先检查目标文件是否存在,如果不存在就尝试使用自定义的URL打开器类下载。
4.11 使用Python和OpenSSL编写一个简单的HTTPS服务器
你需要使用Python编写一个安全的Web服务器,而且已经有了SSL密钥和证书文件。
4.11.1 准备工作
你需要安装第三方Python模块pyOpenSSL。这个模块可从PyPI上下载,地址为https://pypi.python.org/pypi/pyOpenSSL。在Windows和Linux主机上都要安装一些其他的包,在http://pythonhosted.org/pyOpenSSL/中有说明。
4.11.2 实战演练
把证书文件放在当前工作目录后,我们就可以创建一个Web服务器,利用这个证书向客户端发送加密后的内容。
代码清单4-10是安全HTTP服务器的代码,如下所示:
#!usrbin/env python # Python Network Programming Cookbook -- Chapter - 4# This program is optimized for Python 2.7.
# It may run on any other version with/without modifications.
# Requires pyOpenSSL and SSL packages installed
import socket, os
from SocketServer import BaseServer
from BaseHTTPServer import HTTPServer
from SimpleHTTPServer import SimpleHTTPRequestHandler
from OpenSSL import SSL
class SecureHTTPServer(HTTPServer):
def __init__(self, server_address, HandlerClass):
BaseServer.__init__(self, server_address, HandlerClass) ctx = SSL.Context(SSL.SSLv23_METHOD)
fpem = 'server.pem' # location of the server private key and the server certificate ctx.use_privatekey_file (fpem)
ctx.use_certificate_file(fpem)
self.socket = SSL.Connection(ctx, socket.socket(self.address_family, self.socket_type)) self.server_bind()
self.server_activate()
class SecureHTTPRequestHandler(SimpleHTTPRequestHandler):
def setup(self):
self.connection = self.request
self.rfile = socket._fileobject(self.request, "rb", self.rbufsize) self.wfile = socket._fileobject(self.request, "wb", self.wbufsize)
def run_server(HandlerClass = SecureHTTPRequestHandler,
ServerClass = SecureHTTPServer):
server_address = ('', 4443) # port needs to be accessible by user server = ServerClass(server_address, HandlerClass)
running_address = server.socket.getsockname()
print "Serving HTTPS Server on %s:%s ..." %(running_address[0], running_address[1]) server.serve_forever()
if __name__ == '__main__':
run\_server()
运行这个脚本后会看到如下输出:
$ python 4_10_https_server.py Serving HTTPS Server on 0.0.0.0:4443 ...
4.11.3 原理分析
如果你仔细观察前面编写Web服务器的攻略会发现,它和这个攻略没有太多的区别,基本流程都是一样的。最重要的一个不同点是,这个脚本调用了SSL.Context()方法,并将其参数设为SSL.SSLv23_METHOD。我们使用Python OpenSSL第三方模块提供的Connection类创建了一个SSL套接字。Connection类构造方法的参数是前面创建的上下文对象,以及地址族和套接字类型。
服务器的证书文件保存在当前目录中。证书文件提供给上下文对象使用。最后,调用server_activate()方法激活服务器。
